Testing your endpoints
After building (a part of) your Awsome website™ you might have thought about testing its endpoints (links) in either of the two ways: manually [1] (clicking) on the links, or using a software like Postman [2] to create a bit more automatic testing. Or even better, you thought of making some kind of automatic testing that you could run on every deployment and catch bugs (essentially the beginning of a CI/CD pipeline).
Problems with the first one[1]:
- any new change to the site should be tested against every previous possibility (ex.: added the possibility to have dark and light mode? you should check if it works for logged in and logged out users).
- if you decide later to do CI/CD, now you have to write a lot of tests from zero.
Problems with the second one[2]:
- even though you can nicely collect your tests in collections and run them in batch, it gets too cramed in the long run
- to be able to run these test as part of a CI/CD pipeline you will need to use Newman (yet another tool to learn)
- if multiple people (more than 3) are working on the project and you want to synchronize the endpoint testing, Postman will require you to register and pay a team plan price
A better solution for you might be using SuperTest, Mocha, Chai, synchronized by (or even deployed as a CI/CD pipeline in) your Github repo.
It might be worthwhile to read / skim through the documentation of each of the above libraries to see what is their part in endpoint testing and what are their defaults:
Setup
We will need to install all these frameworks in either a new project (for separate tracking via git) or in your Wappler project.
We will use the Wappler project for now.
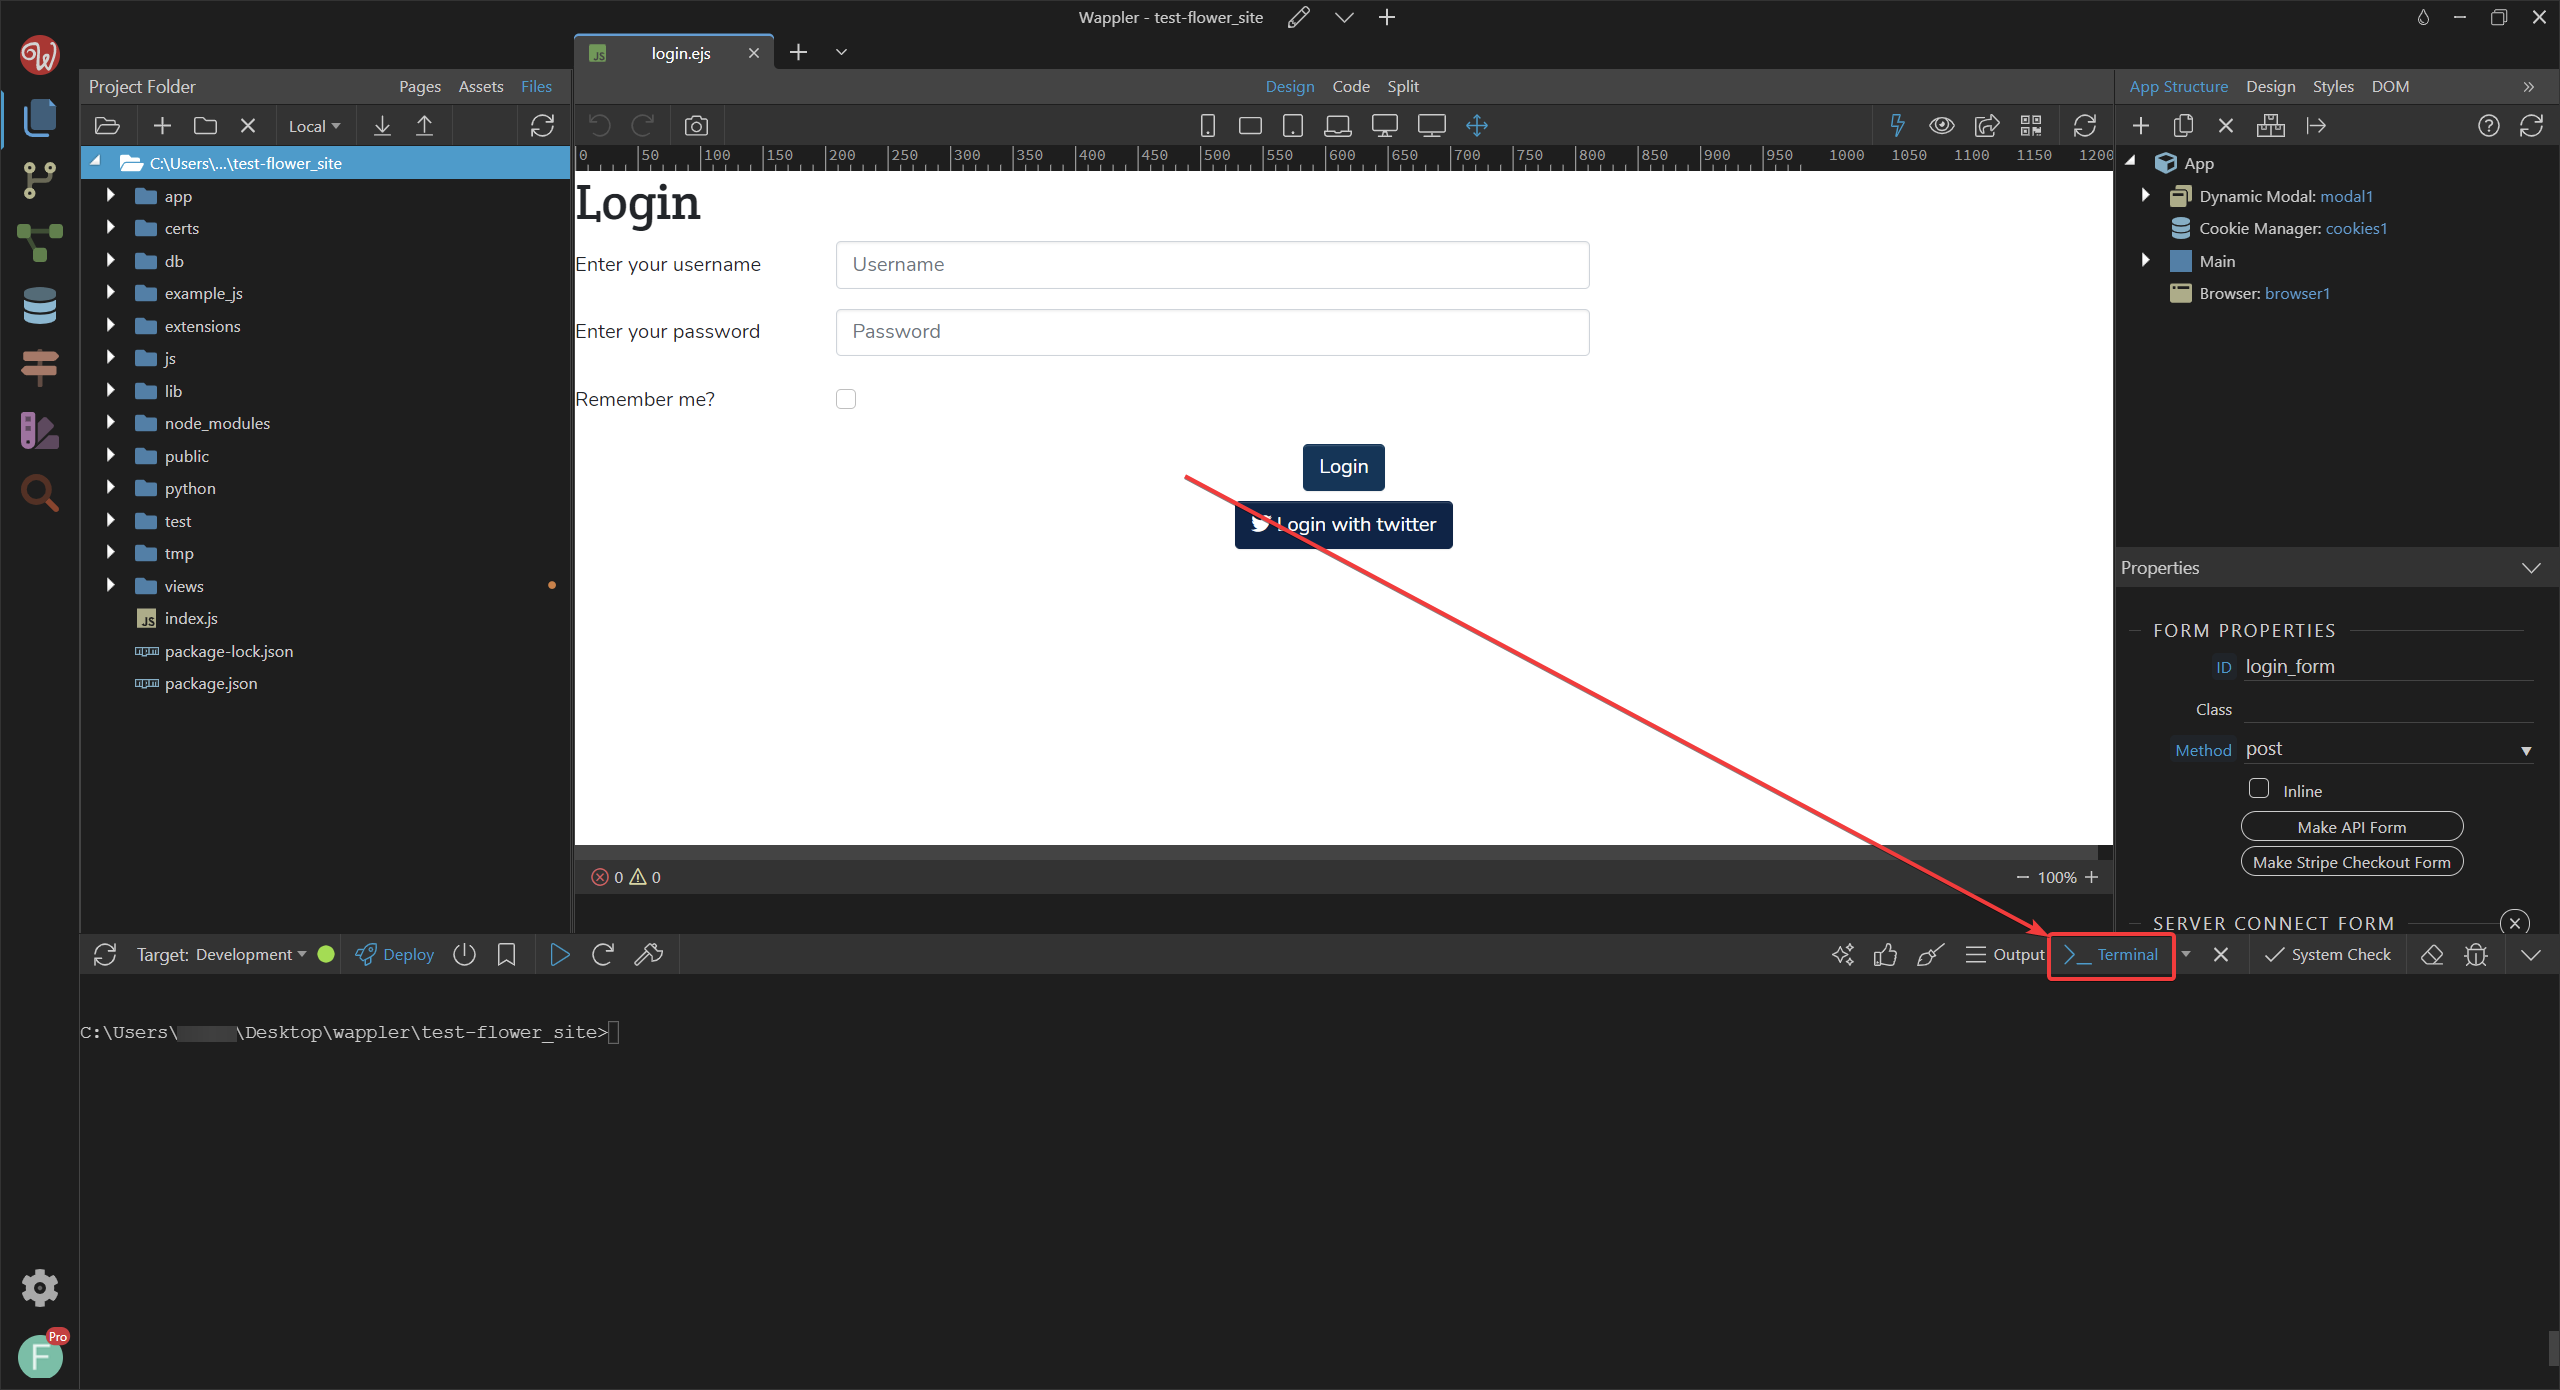
We will need to get a terminal to run commands, and we will do it in Wappler's terminal (but if you know you can achieve the same result with launching cmd and opening the project folder in File explorer).
Open up your Wappler project and on the bottom tab search for terminal and click on it.
Take note of the project root folder
C:\Users\<username>\Desktop\wappler\test-flower_site.
The command below installs these libraries as a dev dependency by the --save-dev flag. That means when you are building the site, it does not get packaged up, and (if you are collaborating with others on Github) you do not require the every other developer to download these too. If you would like to install these as a part of the project, leave out the --save-dev part.
npm i --save-dev supertest mocha chai
Writing your first (basic) test
It is important to know how mocha handles / searches test files by default so that you are able to reorganize your setup later on if you want.
By default (no parameters given to mocha), it will try to search in the current directory you called it from a folder named test and will run any .js file in there. For this reason we will create a test folder in our root folder, but you can change it.
Lets create a new directory, let's say test in the project root folder (in our example that folder is at.
Run the following command which creates a new folder mkdir test.
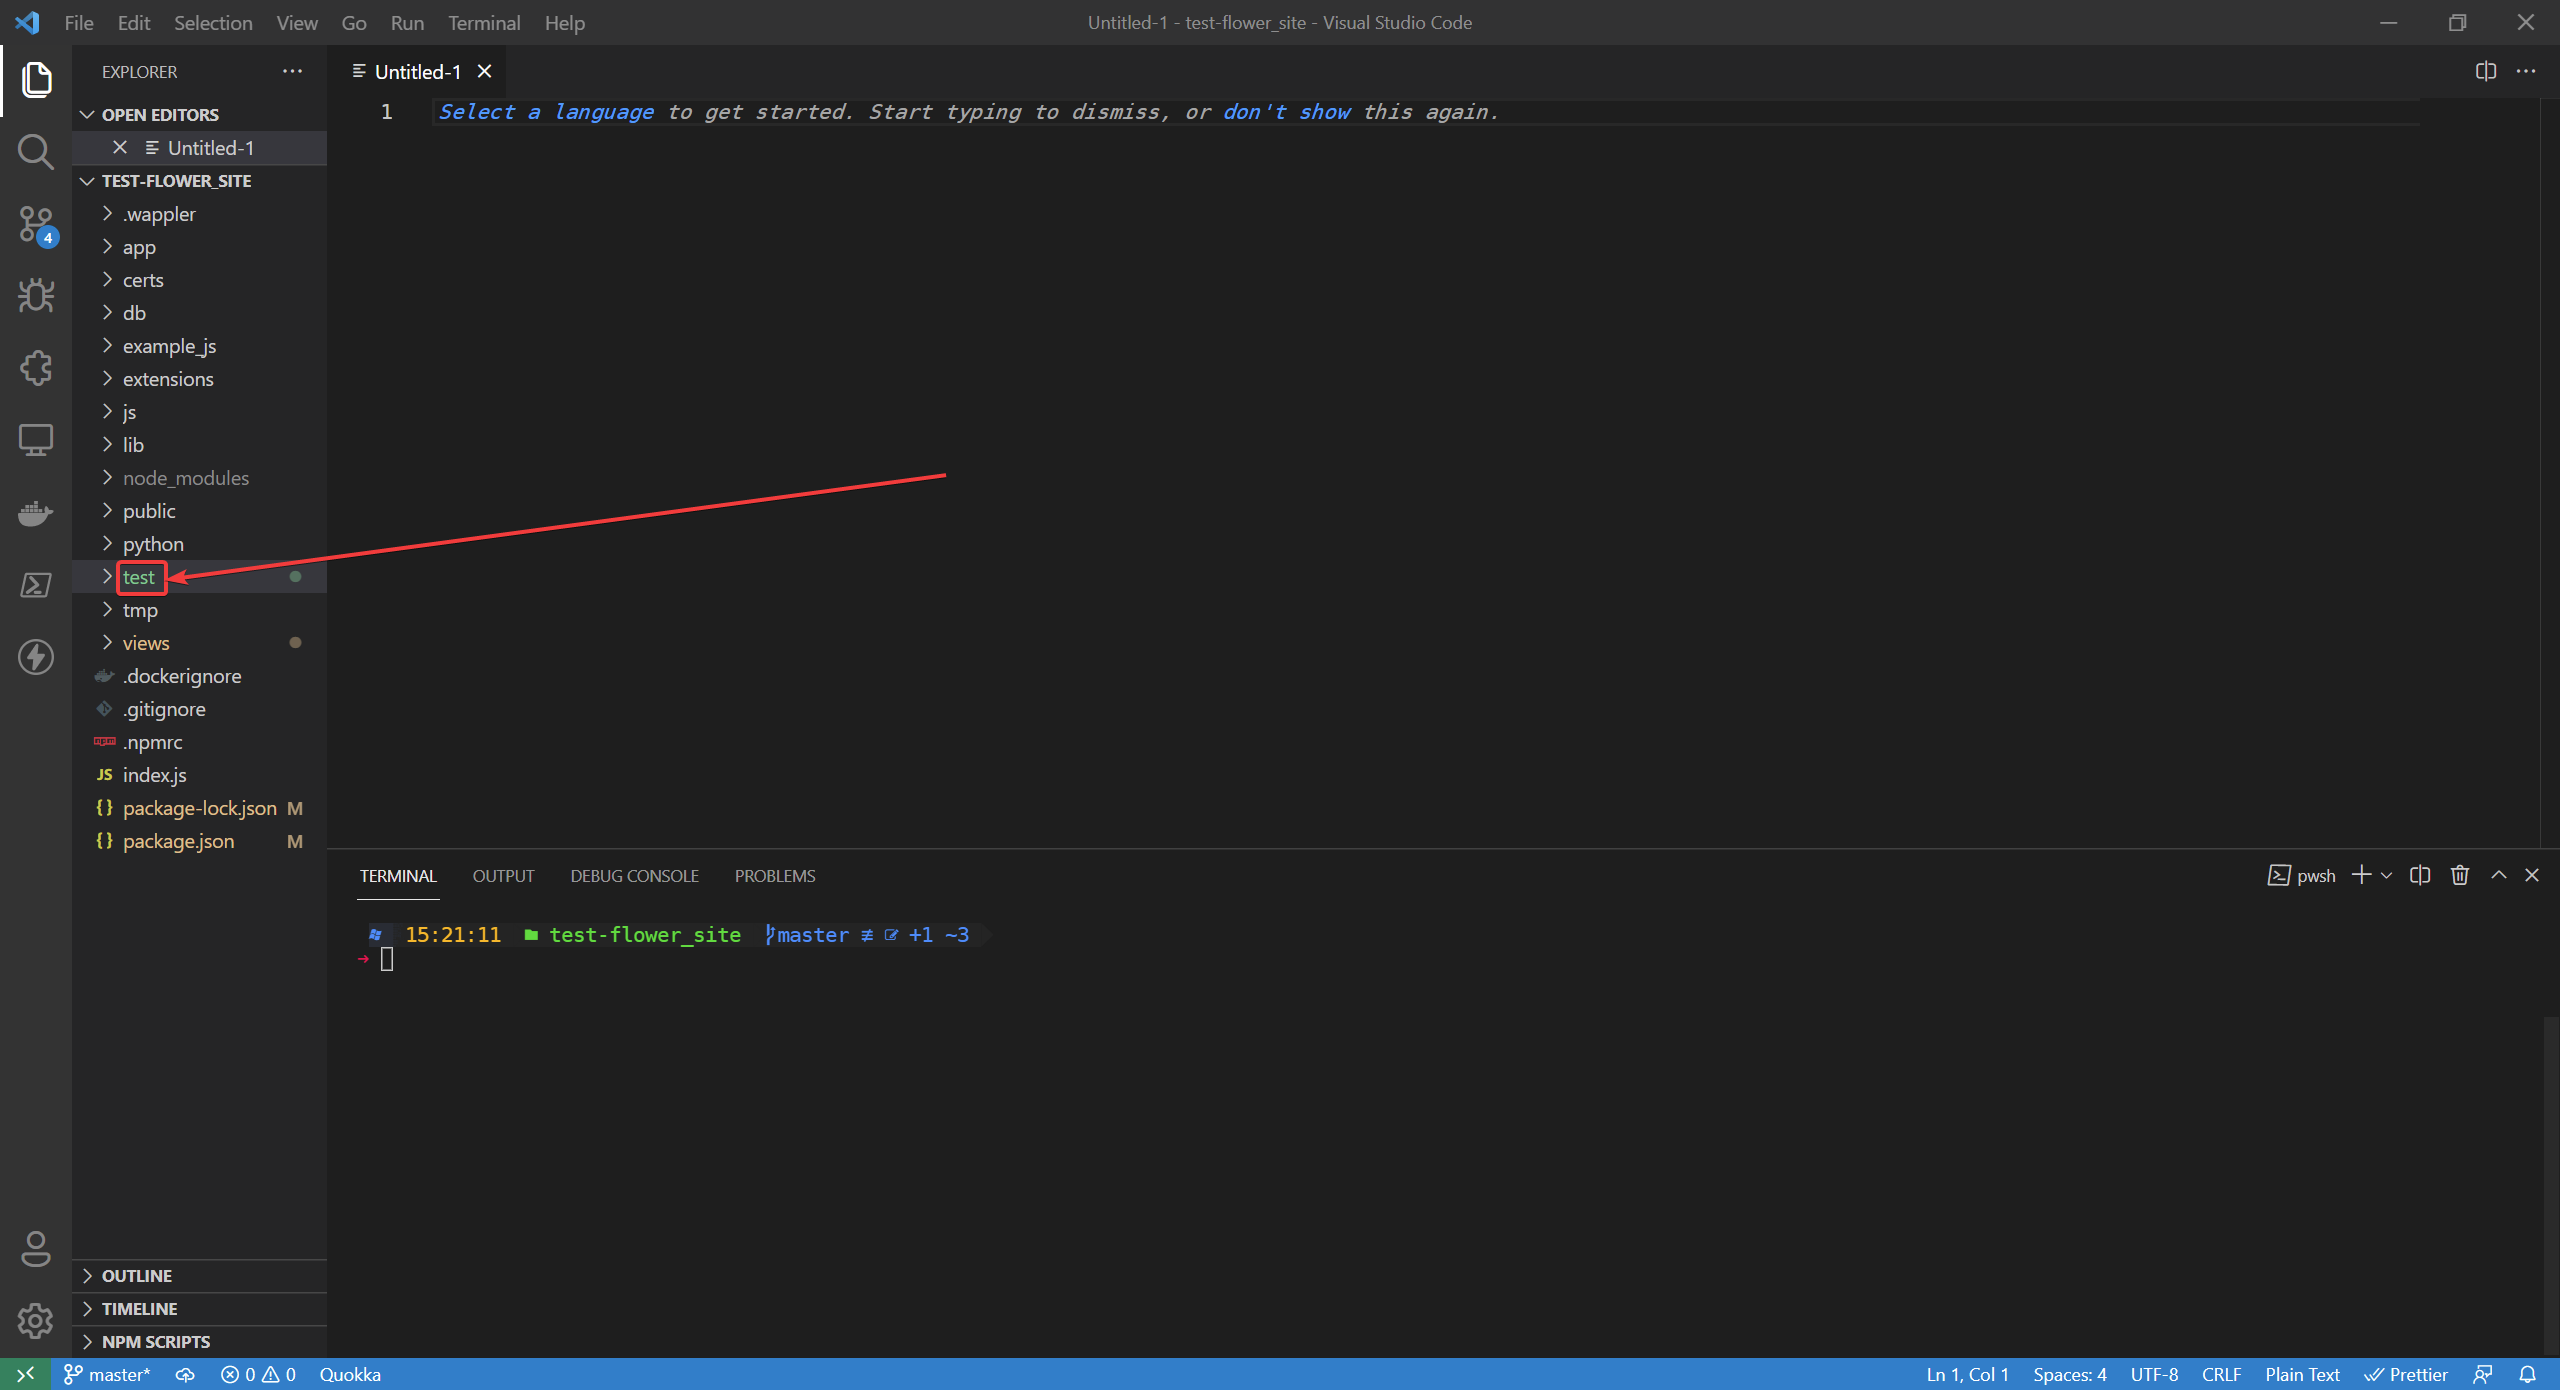
Now you should open up your favourite code editor, but we will be using VS Code.
To easily get into our newly made folder above called test, run code . which will launch the root project folder in VS Code, where you will see among other folders your test folder.

Below you can see the project root and you should have a test folder now. Now let's create our first endpoint test in there.
Let's create a new file

and name it
test-shopping.js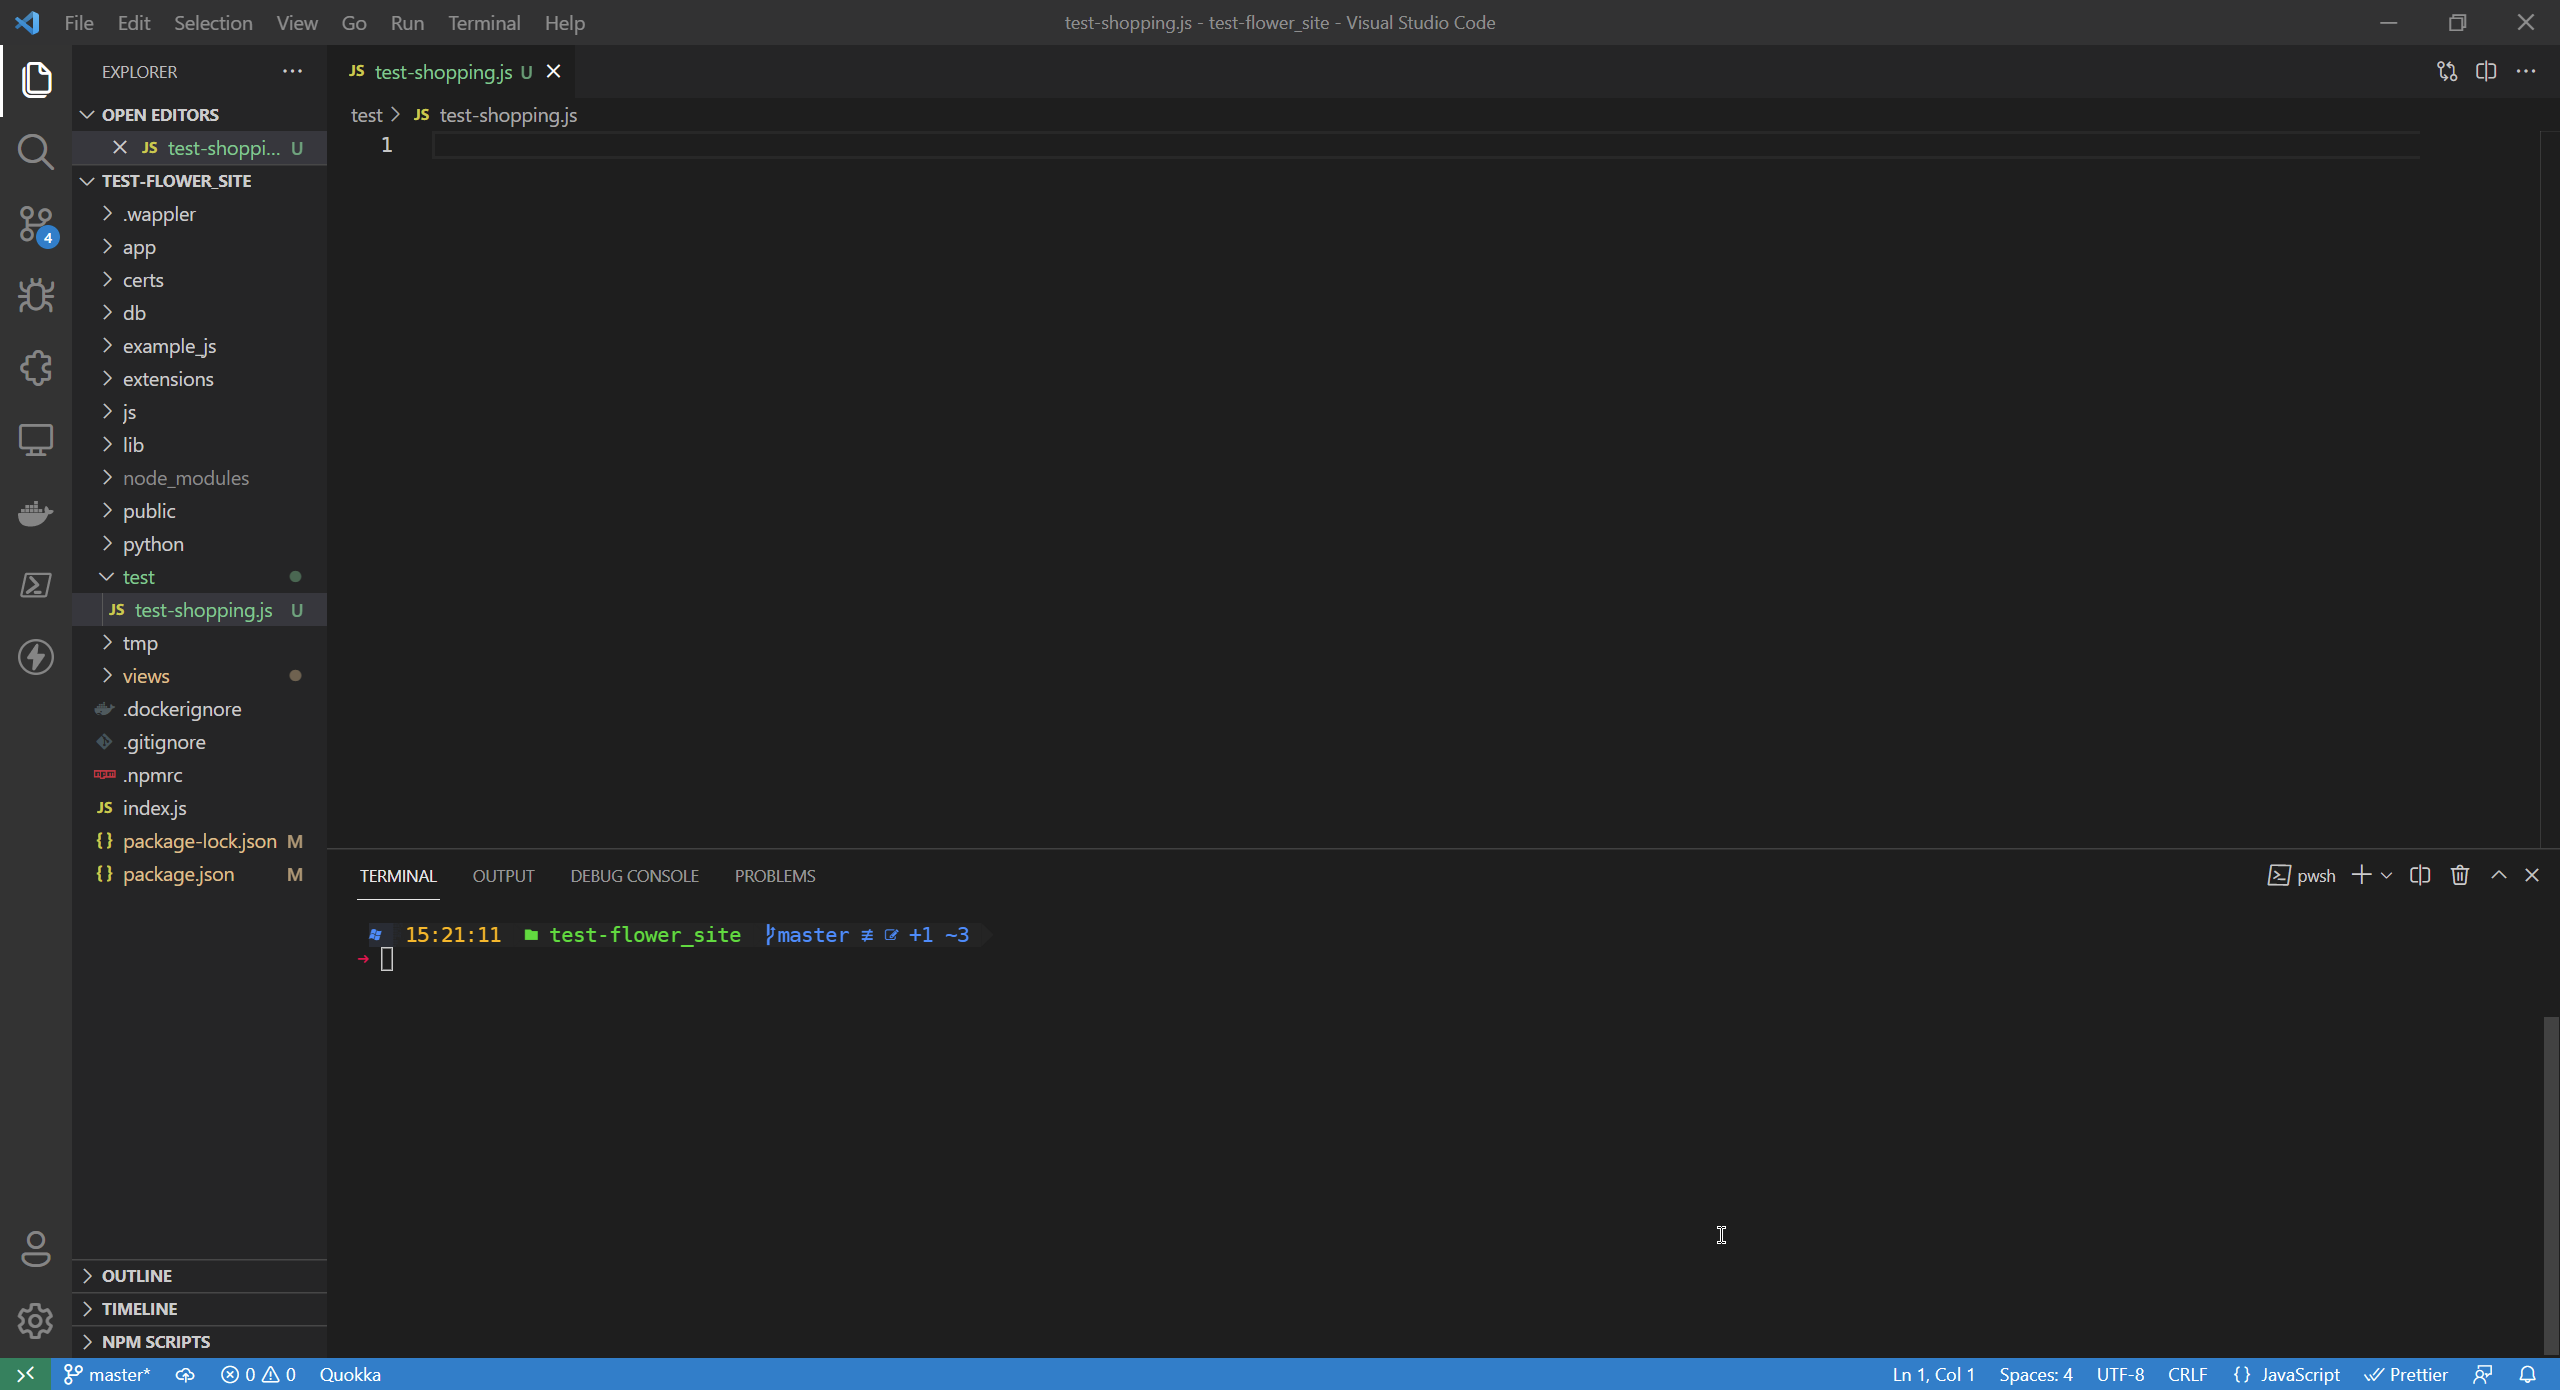
In there let's start by importing the needed modules, and define some const:
const request = require('supertest');
const expect = require('chai').expect;

const url = 'http://localhost:8100'
const req = request(url)
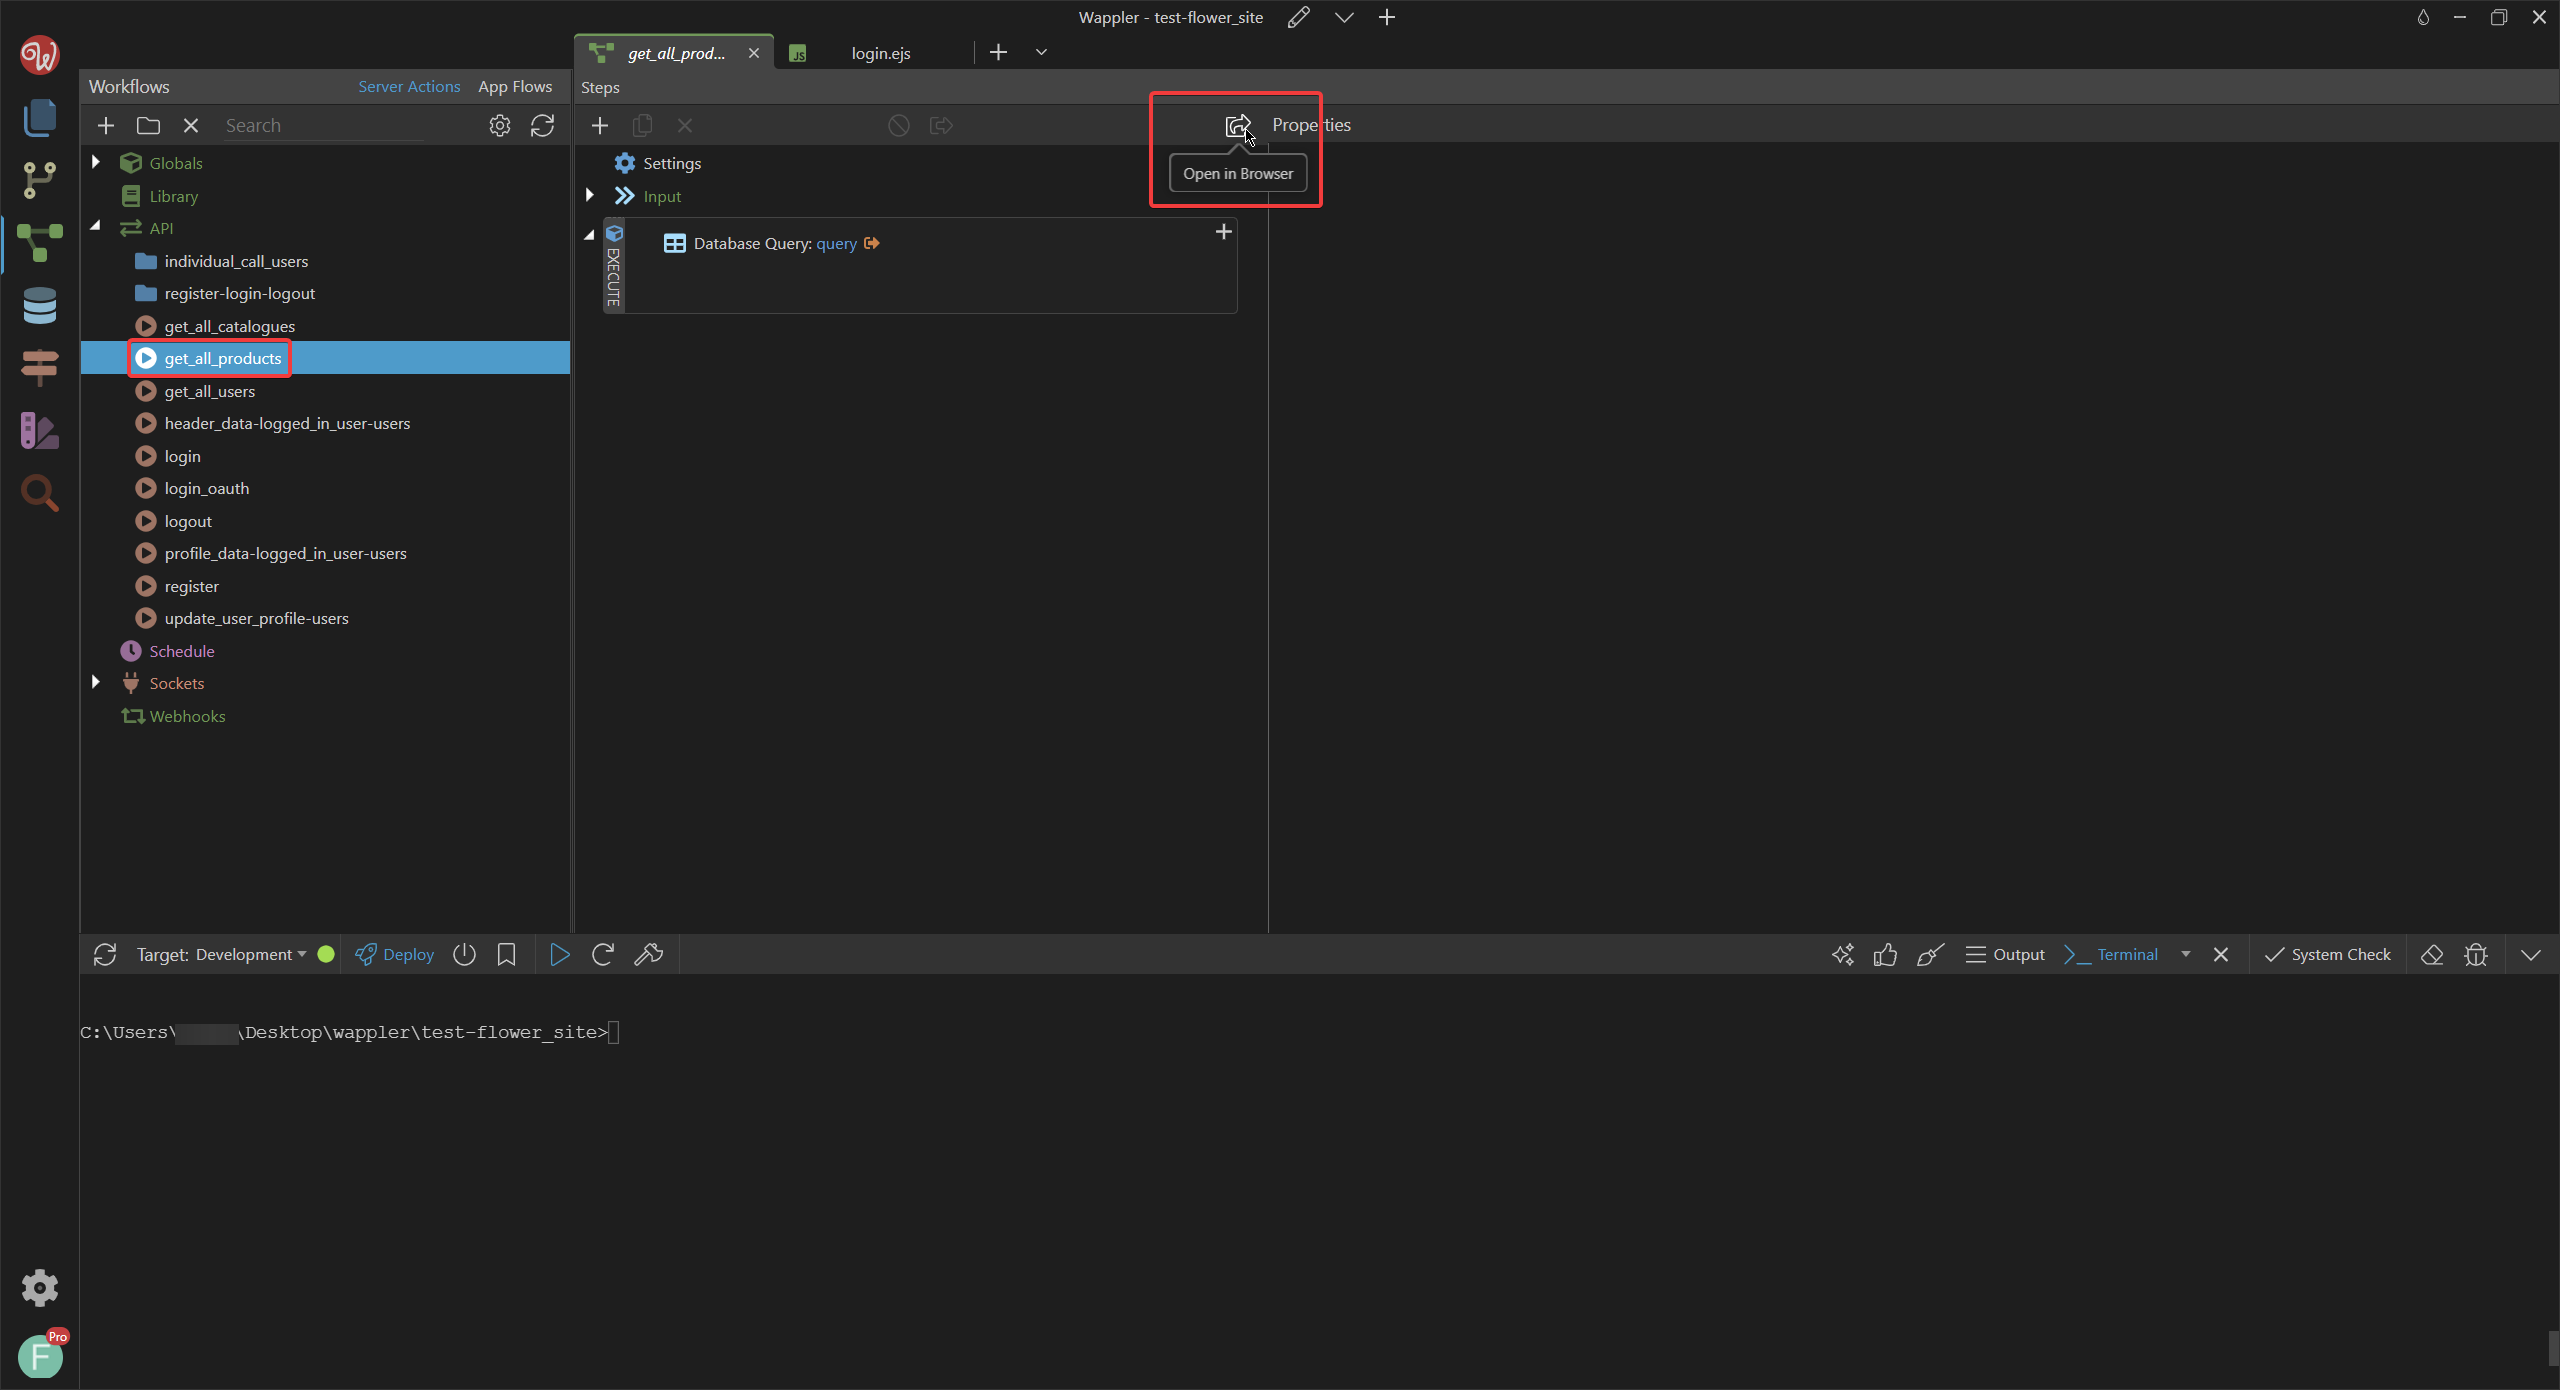
After this, let us finally create an actual test. I will use my predefined API call from my Wappler project under the /api/get_all_products, and you probably have your own already in your workflow tab of Wappler. In the below picture you can see from where I get that endpoint from, by launching in the browser and copying it. Make sure to change yours accordingly (so put in your endpoint instead of /api/get_all_products.
After we have the endpoint url, let us include it in the script:
const request = require('supertest');
const expect = require('chai').expect;

const url = 'http://localhost:8100'
const req = request(url)

describe('GET /api/get_all_products', function() {
    it('returns all products from database', function(done) {
      req
        .get('/api/get_all_products')
        .expect(200)
        .end(function (err, res) {
          if (err) throw err;
          return done();
        });
    })
})
Now let us try to understand what this will do: we will make a get request with the help of .get('/api/get_all_products') and we expect the result to be HTTP code 200 (OK) status response.
To run this we need a terminal to run commands, in VS Code it is the bottom part of the window, to access it either click on View > Terminal or use the shortcut: Ctrl + ` (on most keyboards that ` character is left to the number 1.
Lets run mocha to test, this command should run our mocha testing module and as we discussed above, it will try to search for the test folder and run any .js file in there:
npx mocha
And this is how it looks like if it succeeded:
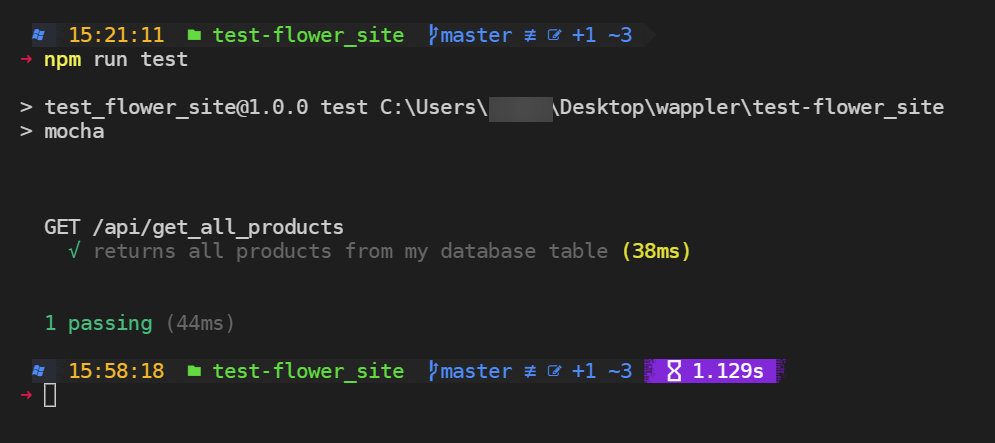
Now, even though there is a checkmark, we only checked one property of our endpoint, that is, whether it returns 200 (OK) status response code. So let us extend it with more rigorous testing.
Writing your first advanced test
To get more advanced let's define what do we really expect from our endpoint. For that I am going to assume that my endpoint is already in a correctly working state, such that I can visit http://localhost:8100/api/get_all_products in my browser and get a json result of my products in the database:
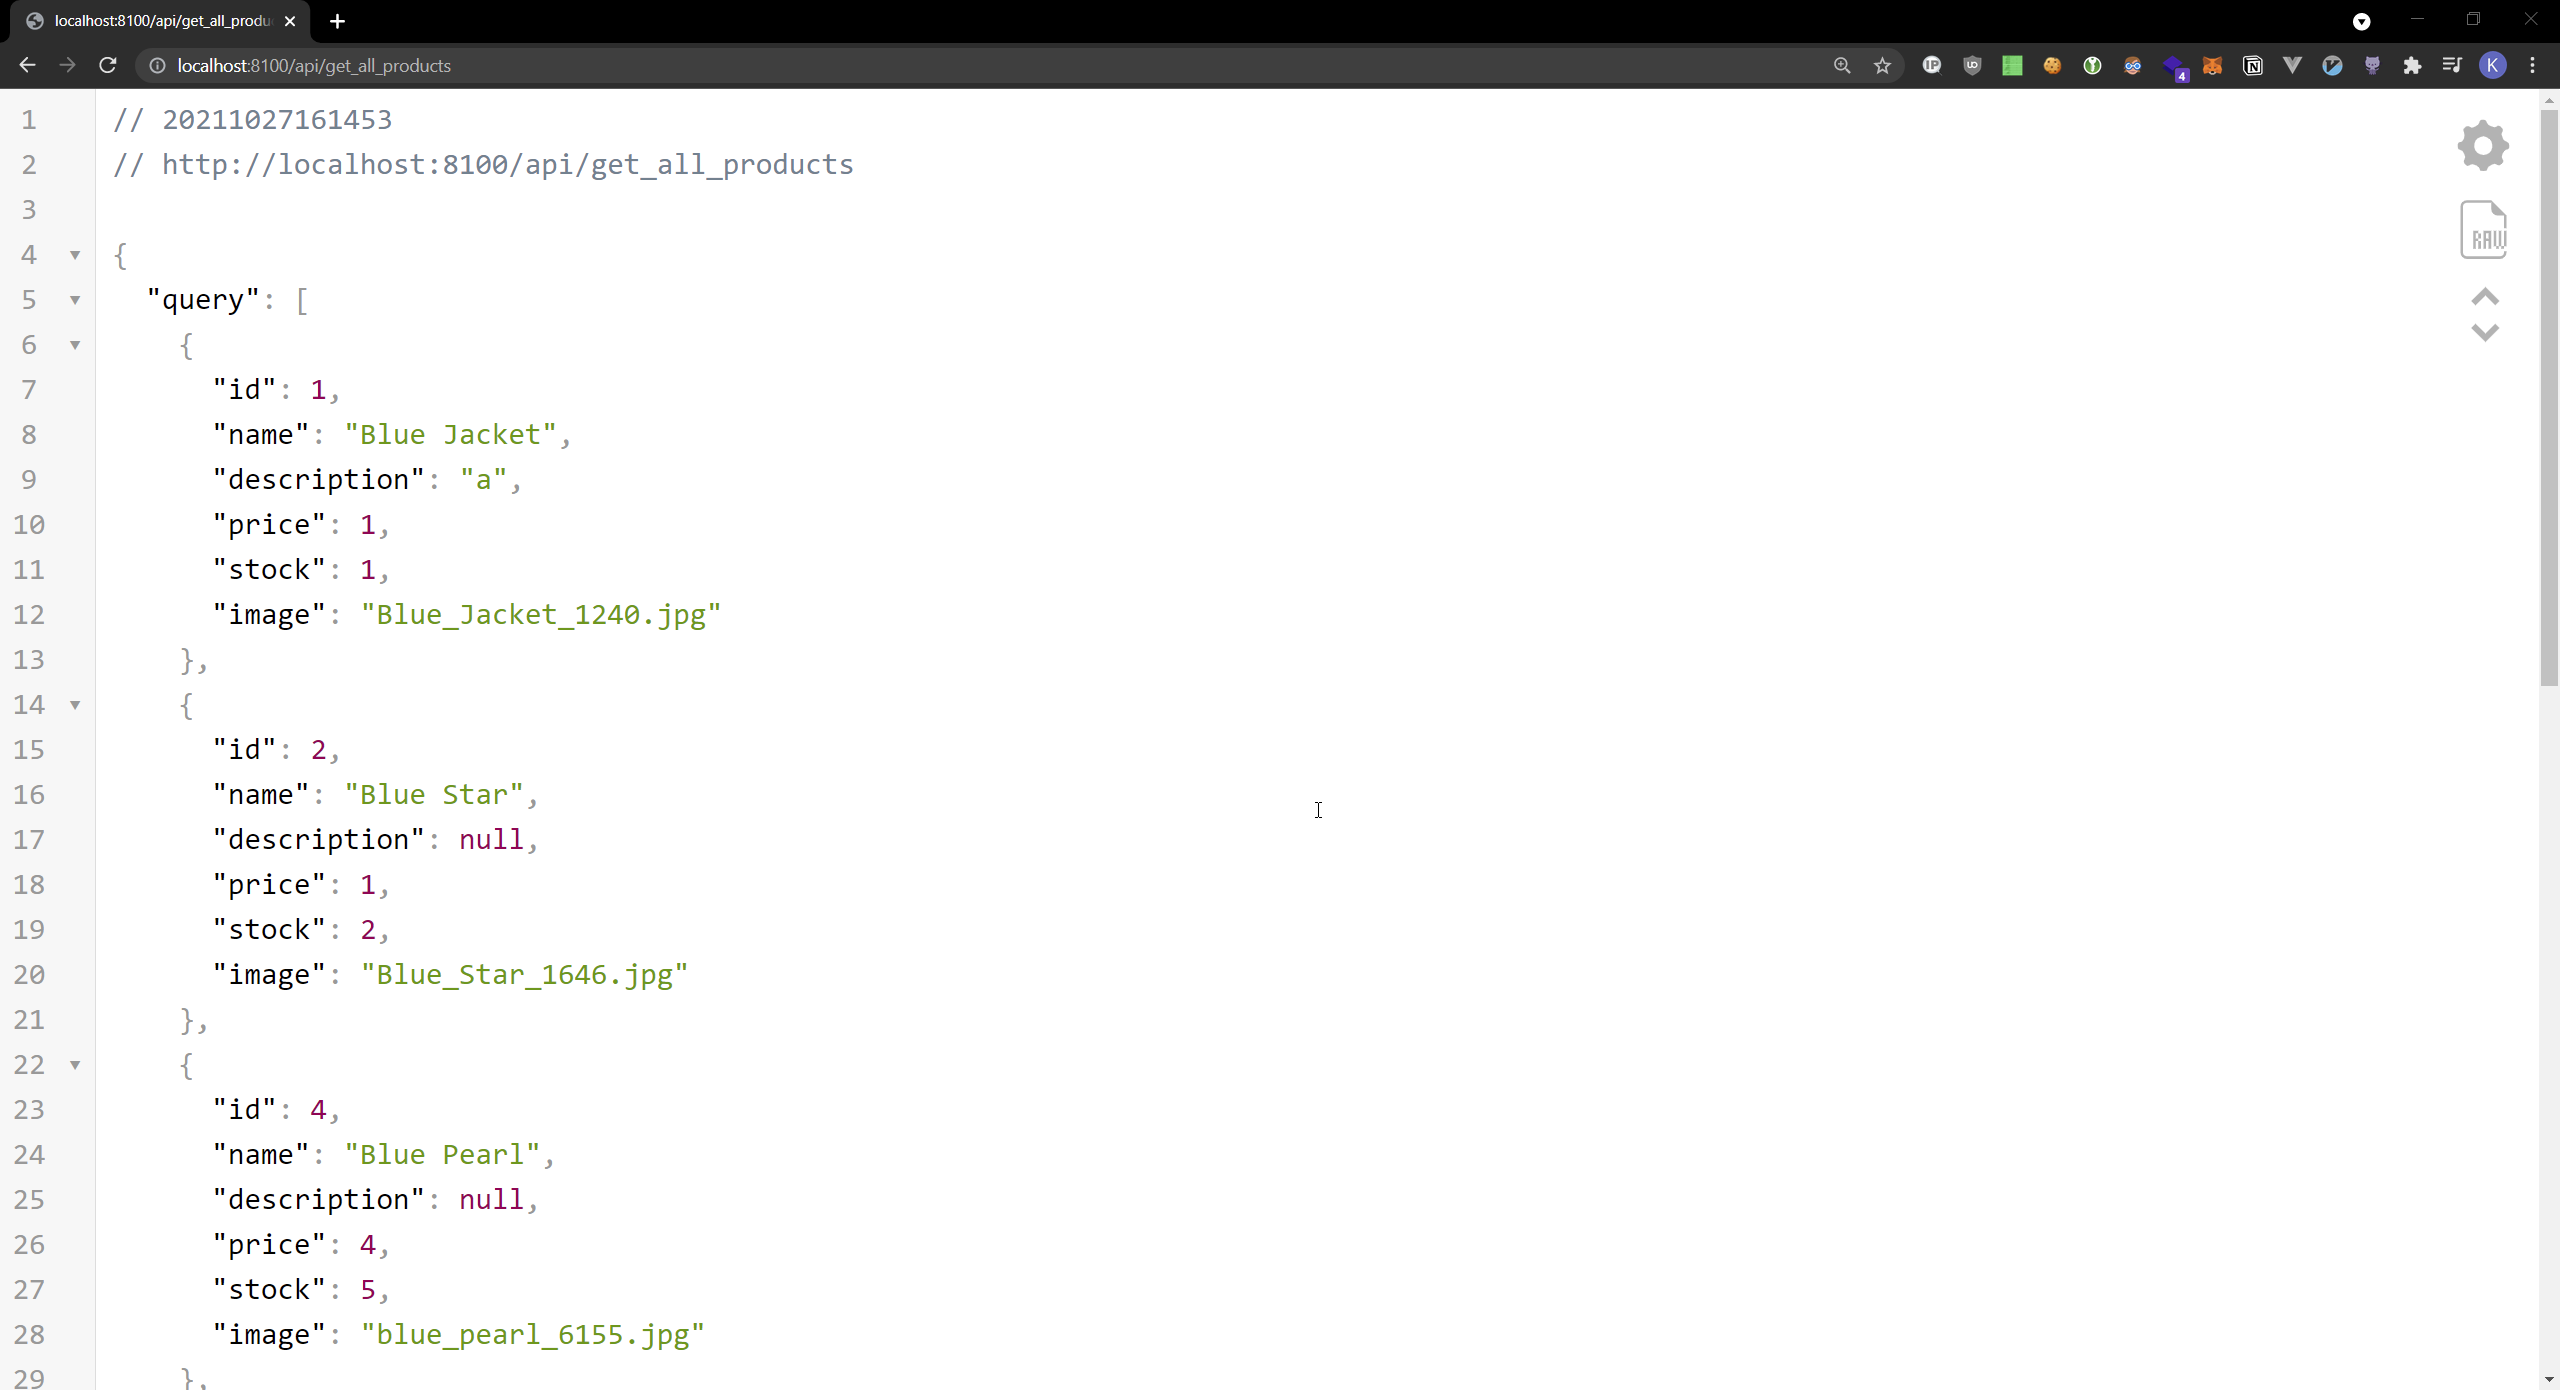
(for those interested, the result here is being pretty printed as json, thanks to the extension that I use called Json Viewer, without this it looks more basic)
Now we can make some expectations of what (and how) we expect this endpoint to return after being deployed. For this example I am going to expect a few things. To construct this expectation, we use chai. To make it easier to work with the resulting query I will reassign it to a new variable:
const query_result = res.body.query
I expect:
- the total number of product types to be equal to seven:
-
expect(const query_result).to.have.lengthOf(7)
-
- the price to never be greater or equal 0, (so that it is never negative number).
-
expect(product.price).to.be.greaterThanOrEqual(0)
-
So the final program would be:
const { expect } = require('chai');
const request = require('supertest');

const url = 'http://localhost:8100'
const req = request(url)

describe('GET /api/get_all_products', function() {
    it('returns all products from database', function(done) {
      req
        .get('/api/get_all_products')
        .expect('Content-Type', /json/)
        .expect(200)
        .end(function (err, res) {
          if (err) throw err;

          const query_result = res.body.query

          expect(query_result).to.have.lengthOf(7);

          query_result.forEach(product => {
            expect(product.price).to.be.greaterThanOrEqual(0)
          });
          return done();
        });
    })
})
Now if we run npx mocha:
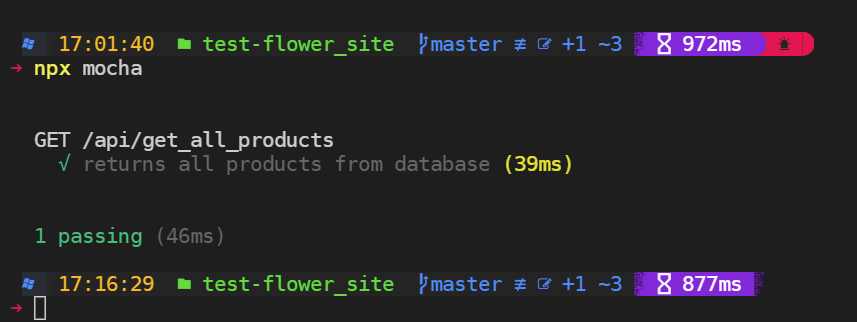
And it works still.
Creating and testing an insert and delete endpoint
For this part we will check how to create an endpoint for inserting data in our database and how to delete data from it, and in the end automatically test it with our setup.
We will be working for now in Wappler's Workflows tab.
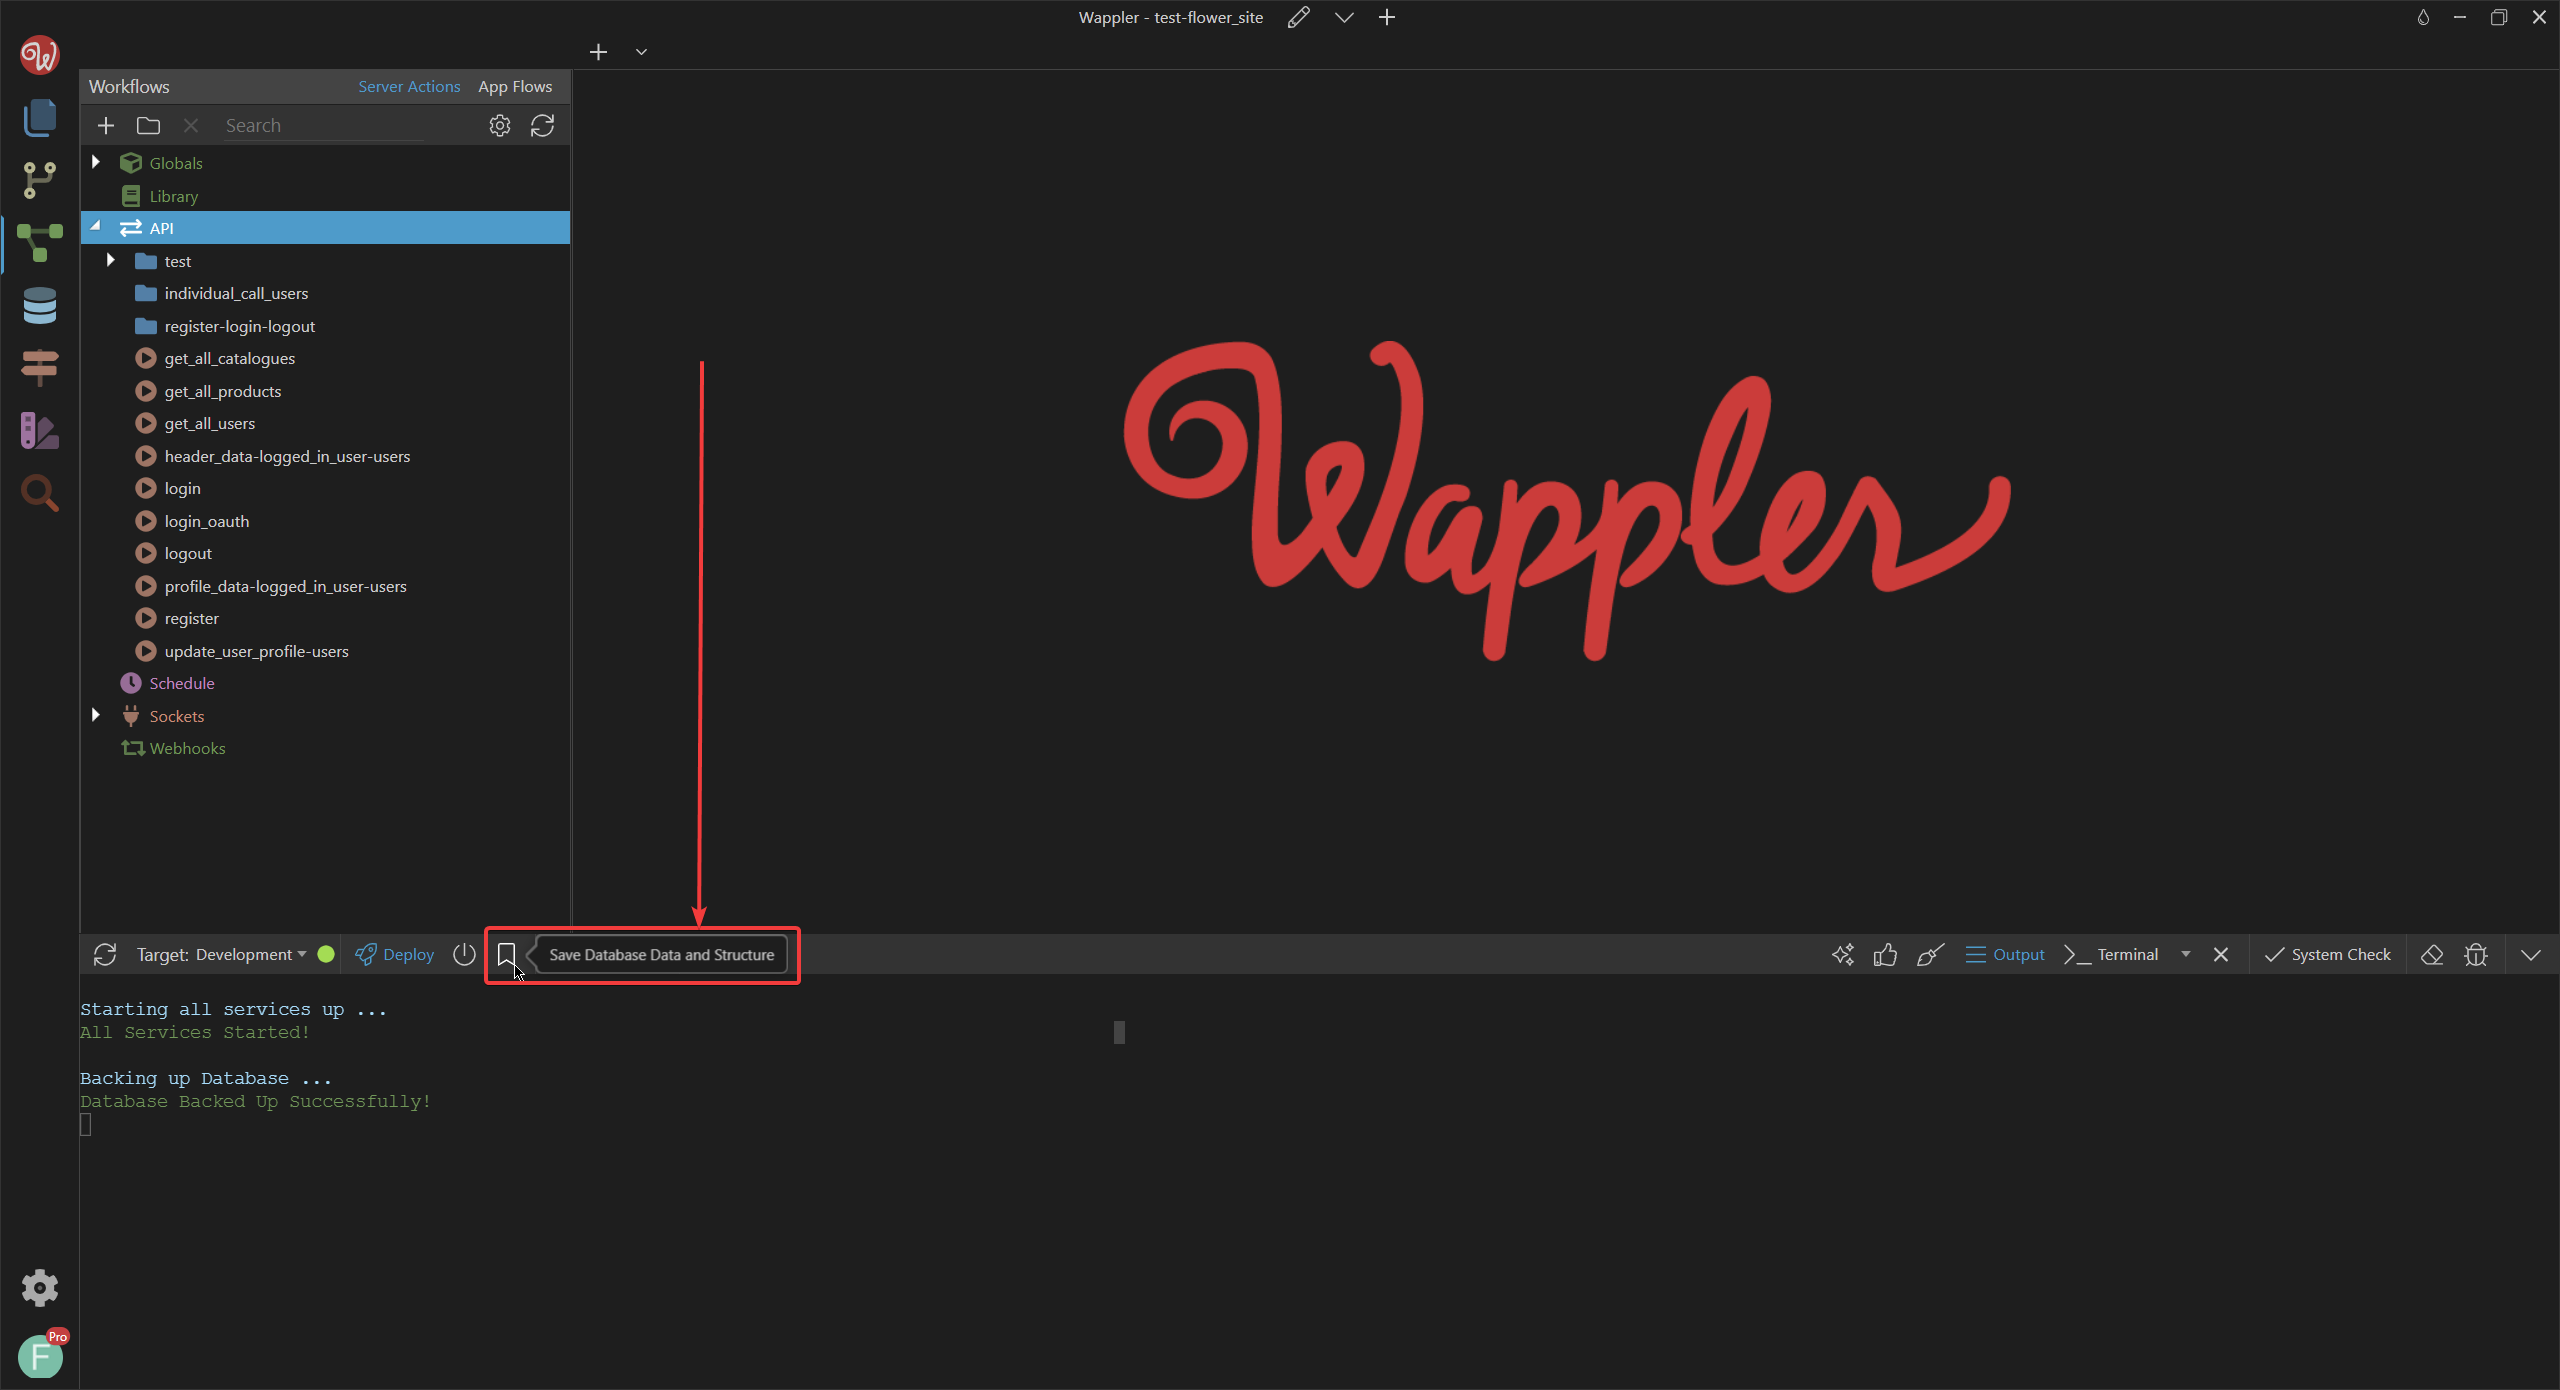
NOTE! If you have data in your database, it might be a good idea to save it via the Bookmark icon in Wappler's bottom tab. Clicking on it will save its current data inside docker, and if anything bad happens, it will be rebuilt the next time you open the project. Think of it like a save point.
Since we will be making both a create and a delete endpoint, let's practice good RESTful API notation by defining Routes in Wappler. We will do that at the end of each section.
Insert endpoint
Creating Insert workflow in Wappler
Let's create an API action:
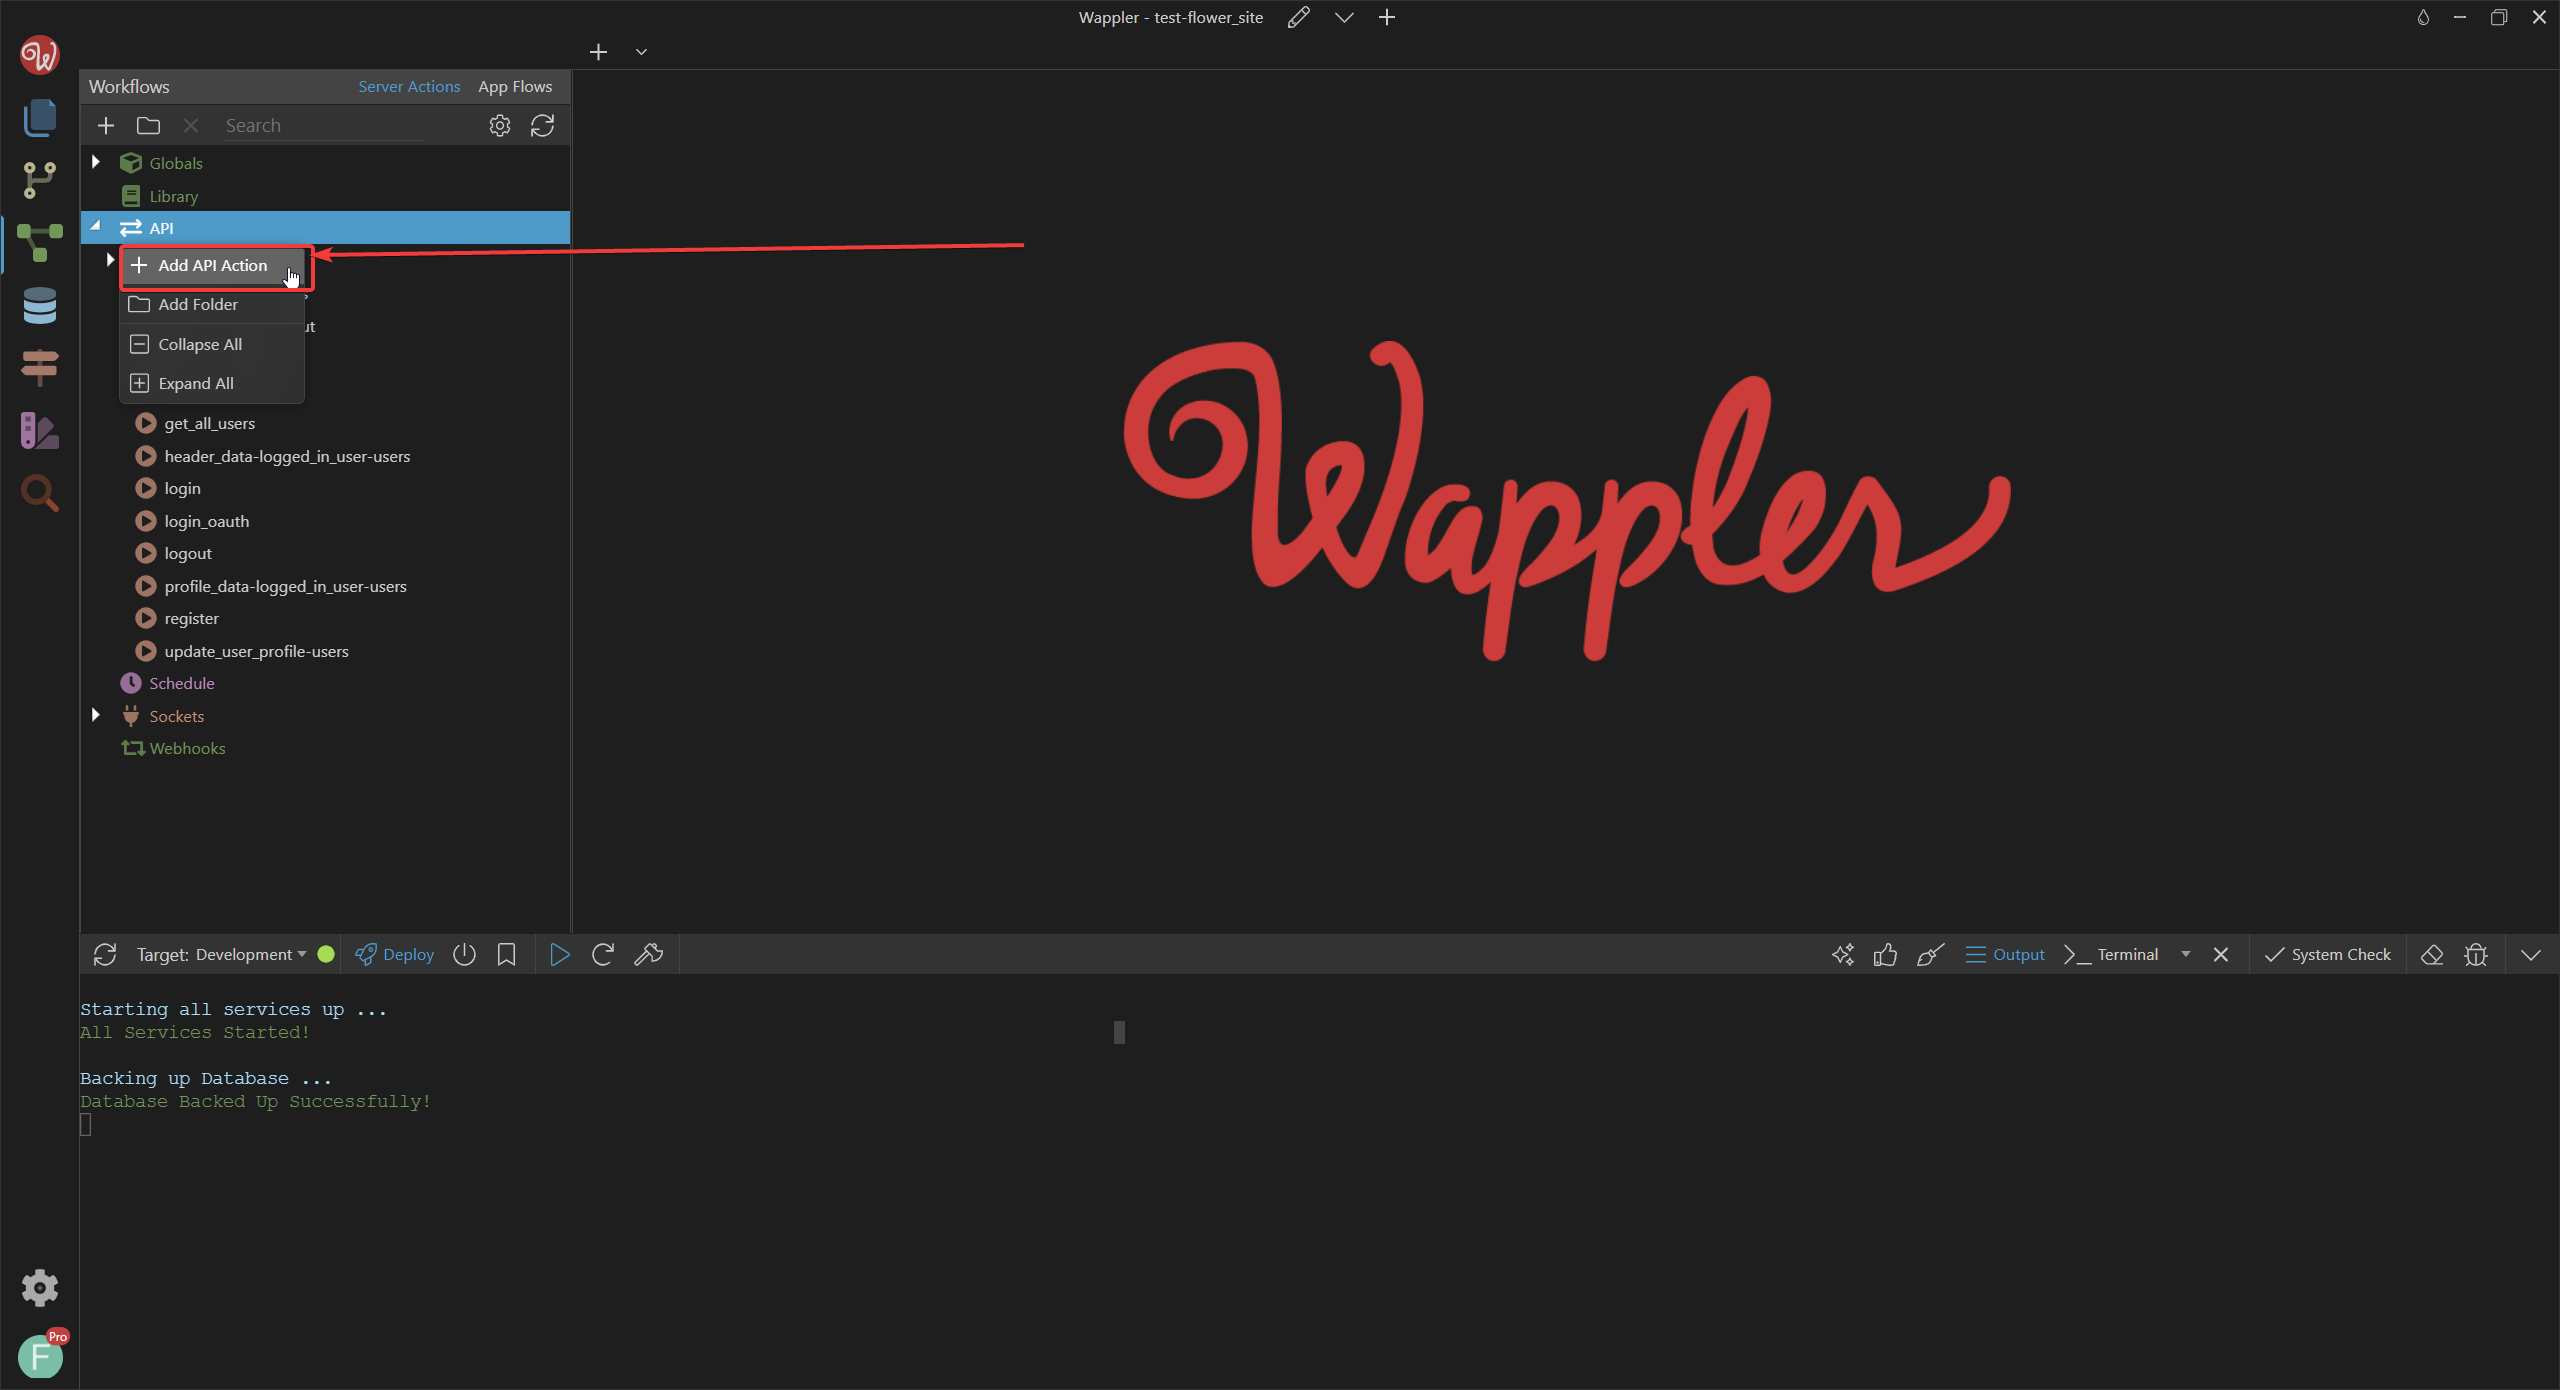
I will name it add_product since I will use this api to send a new item to my products database.
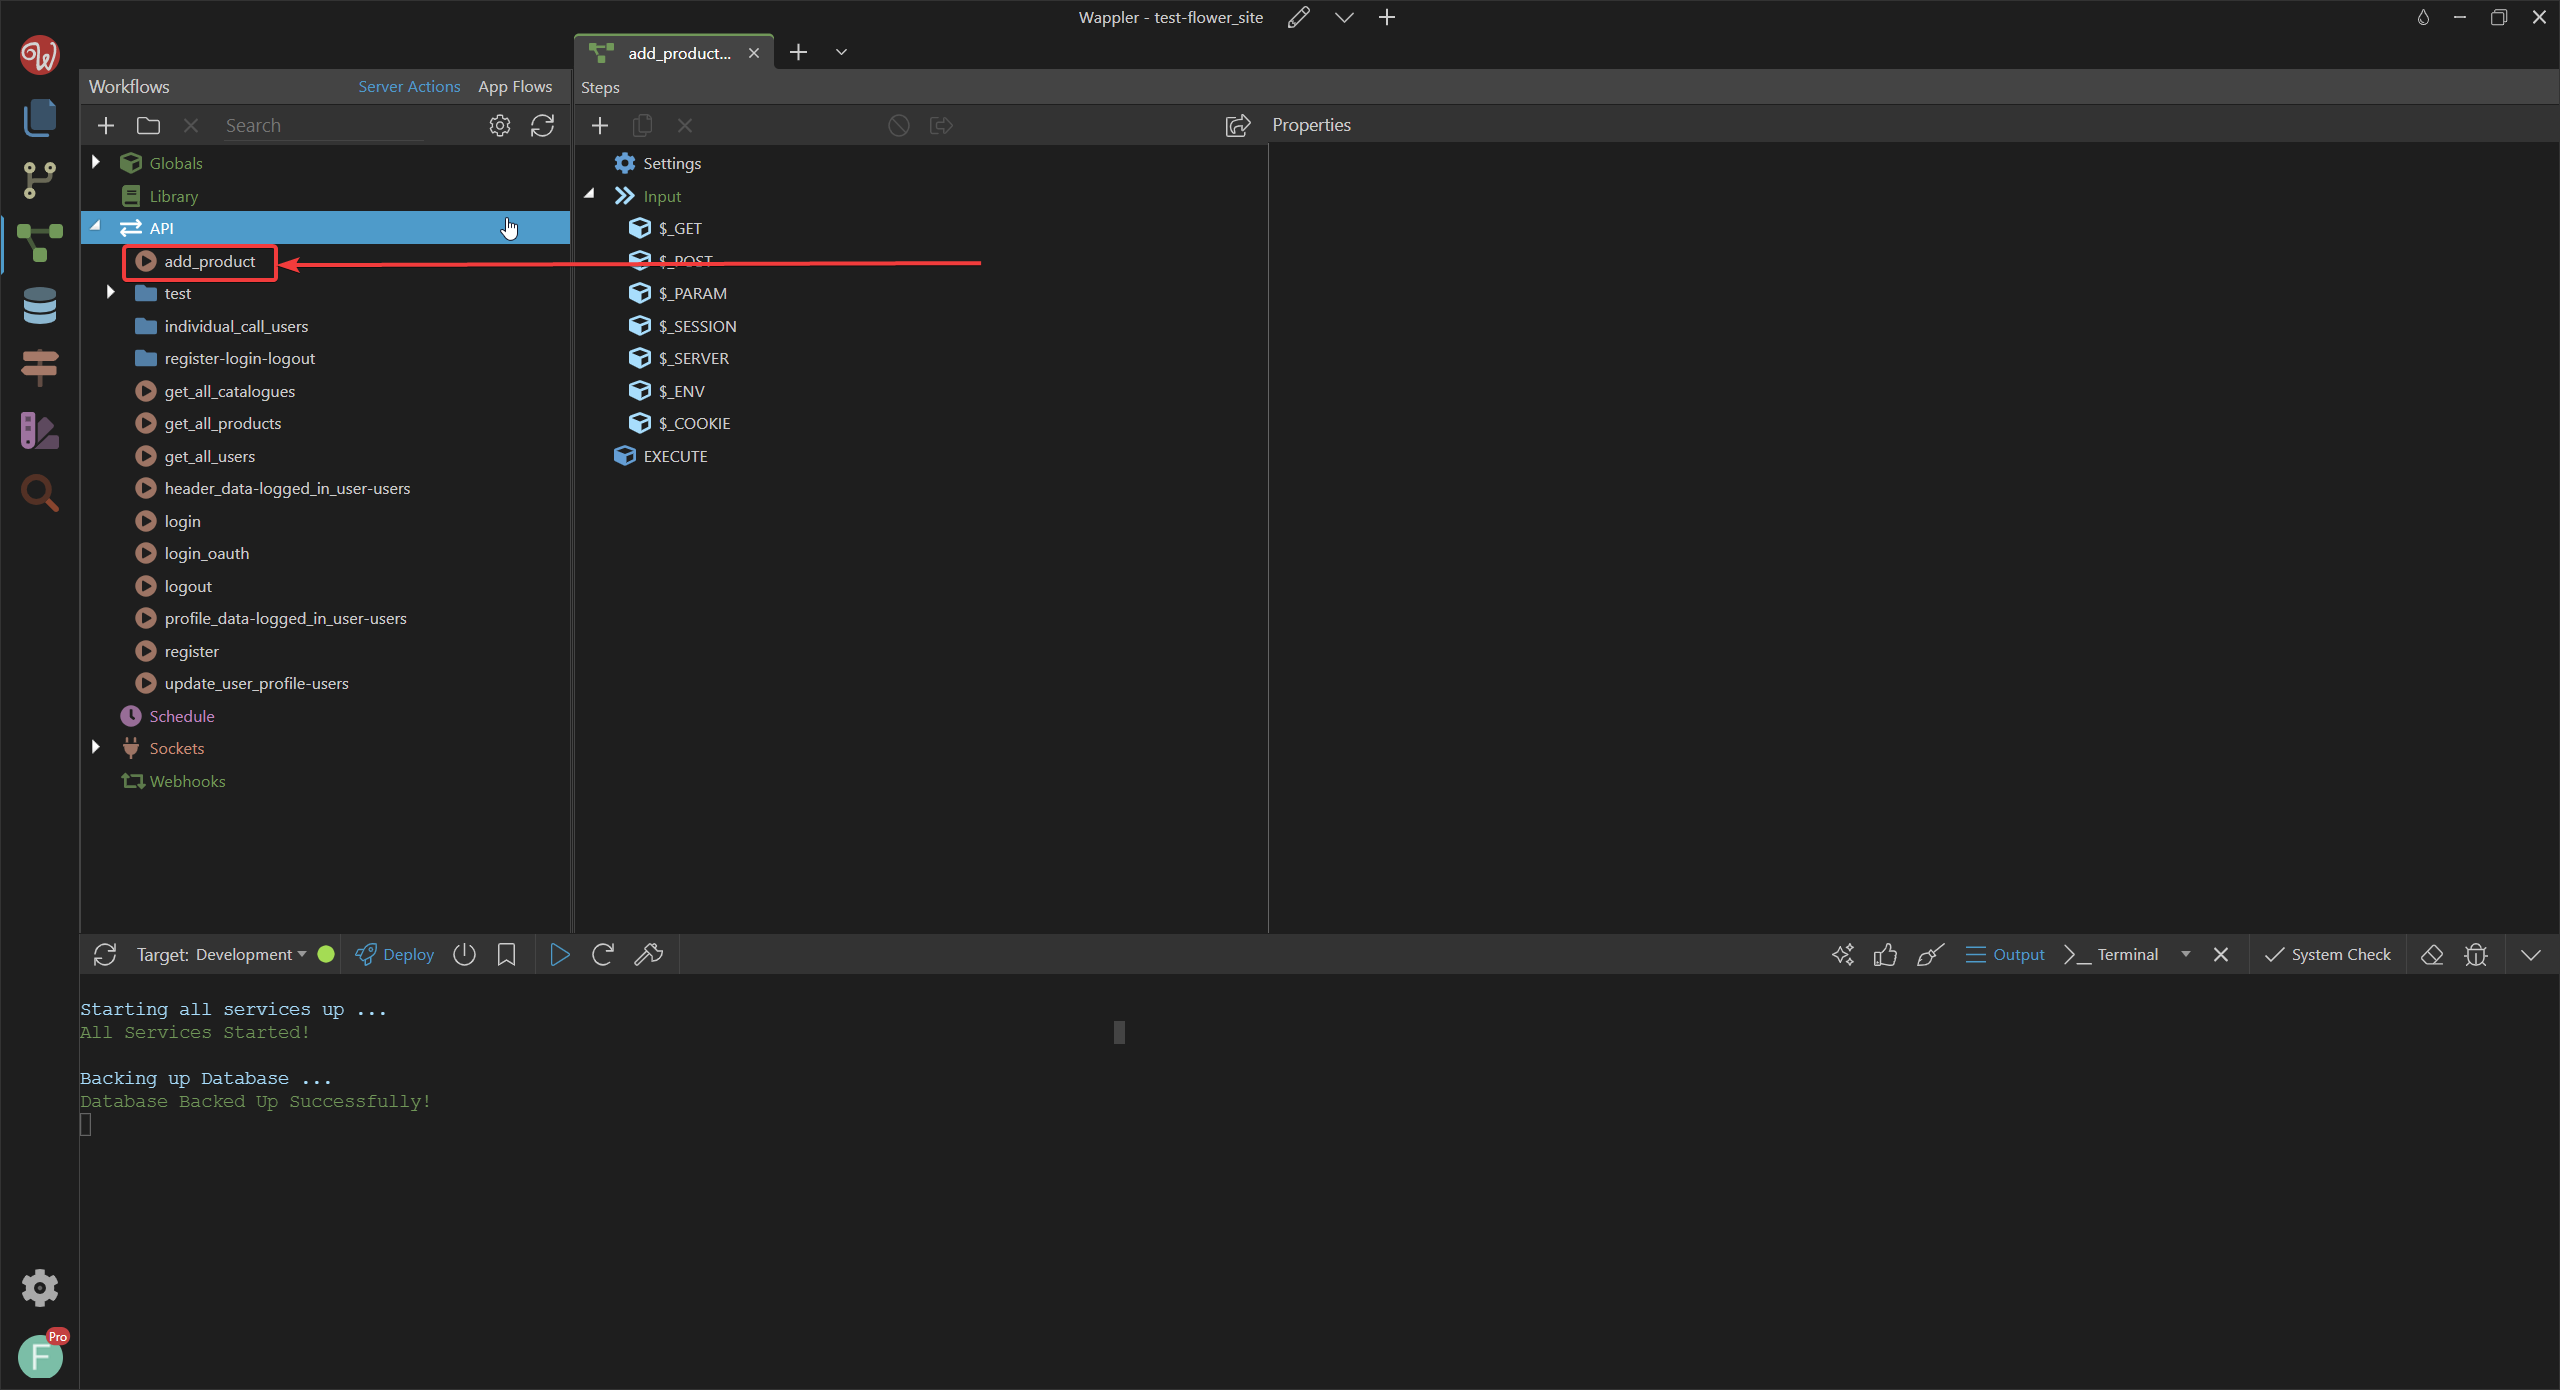
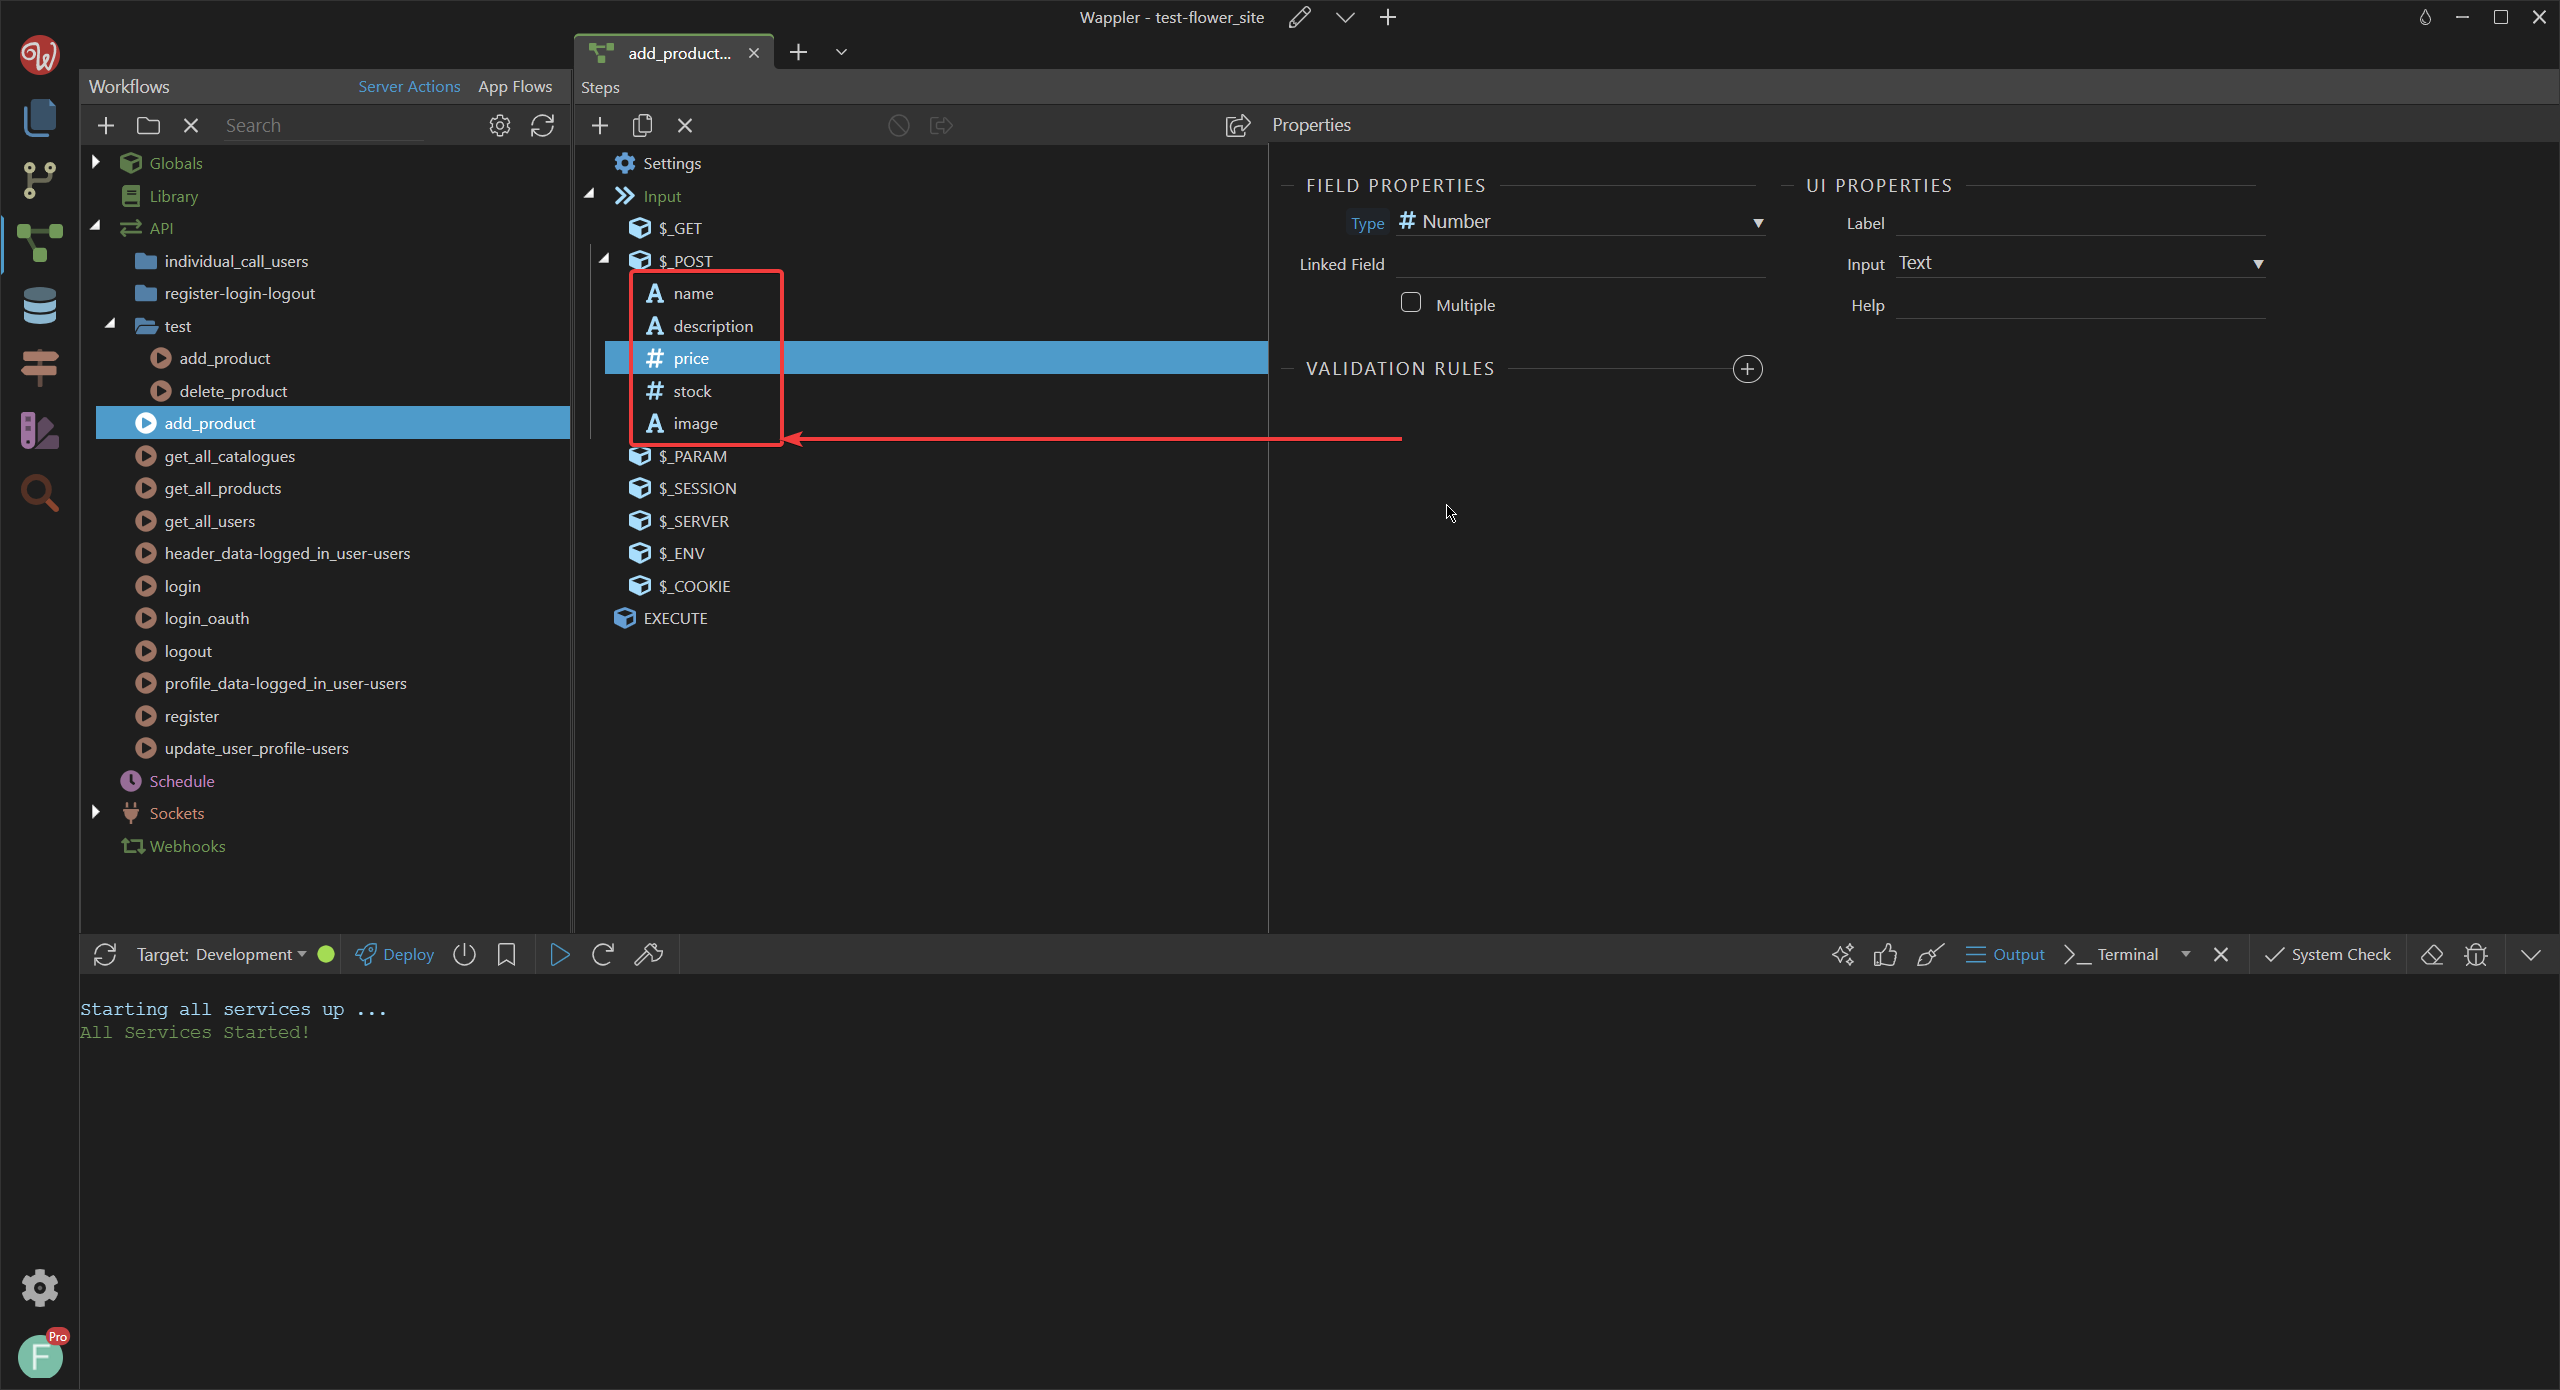
Let's add the input parameters we expect this endpoint to take.
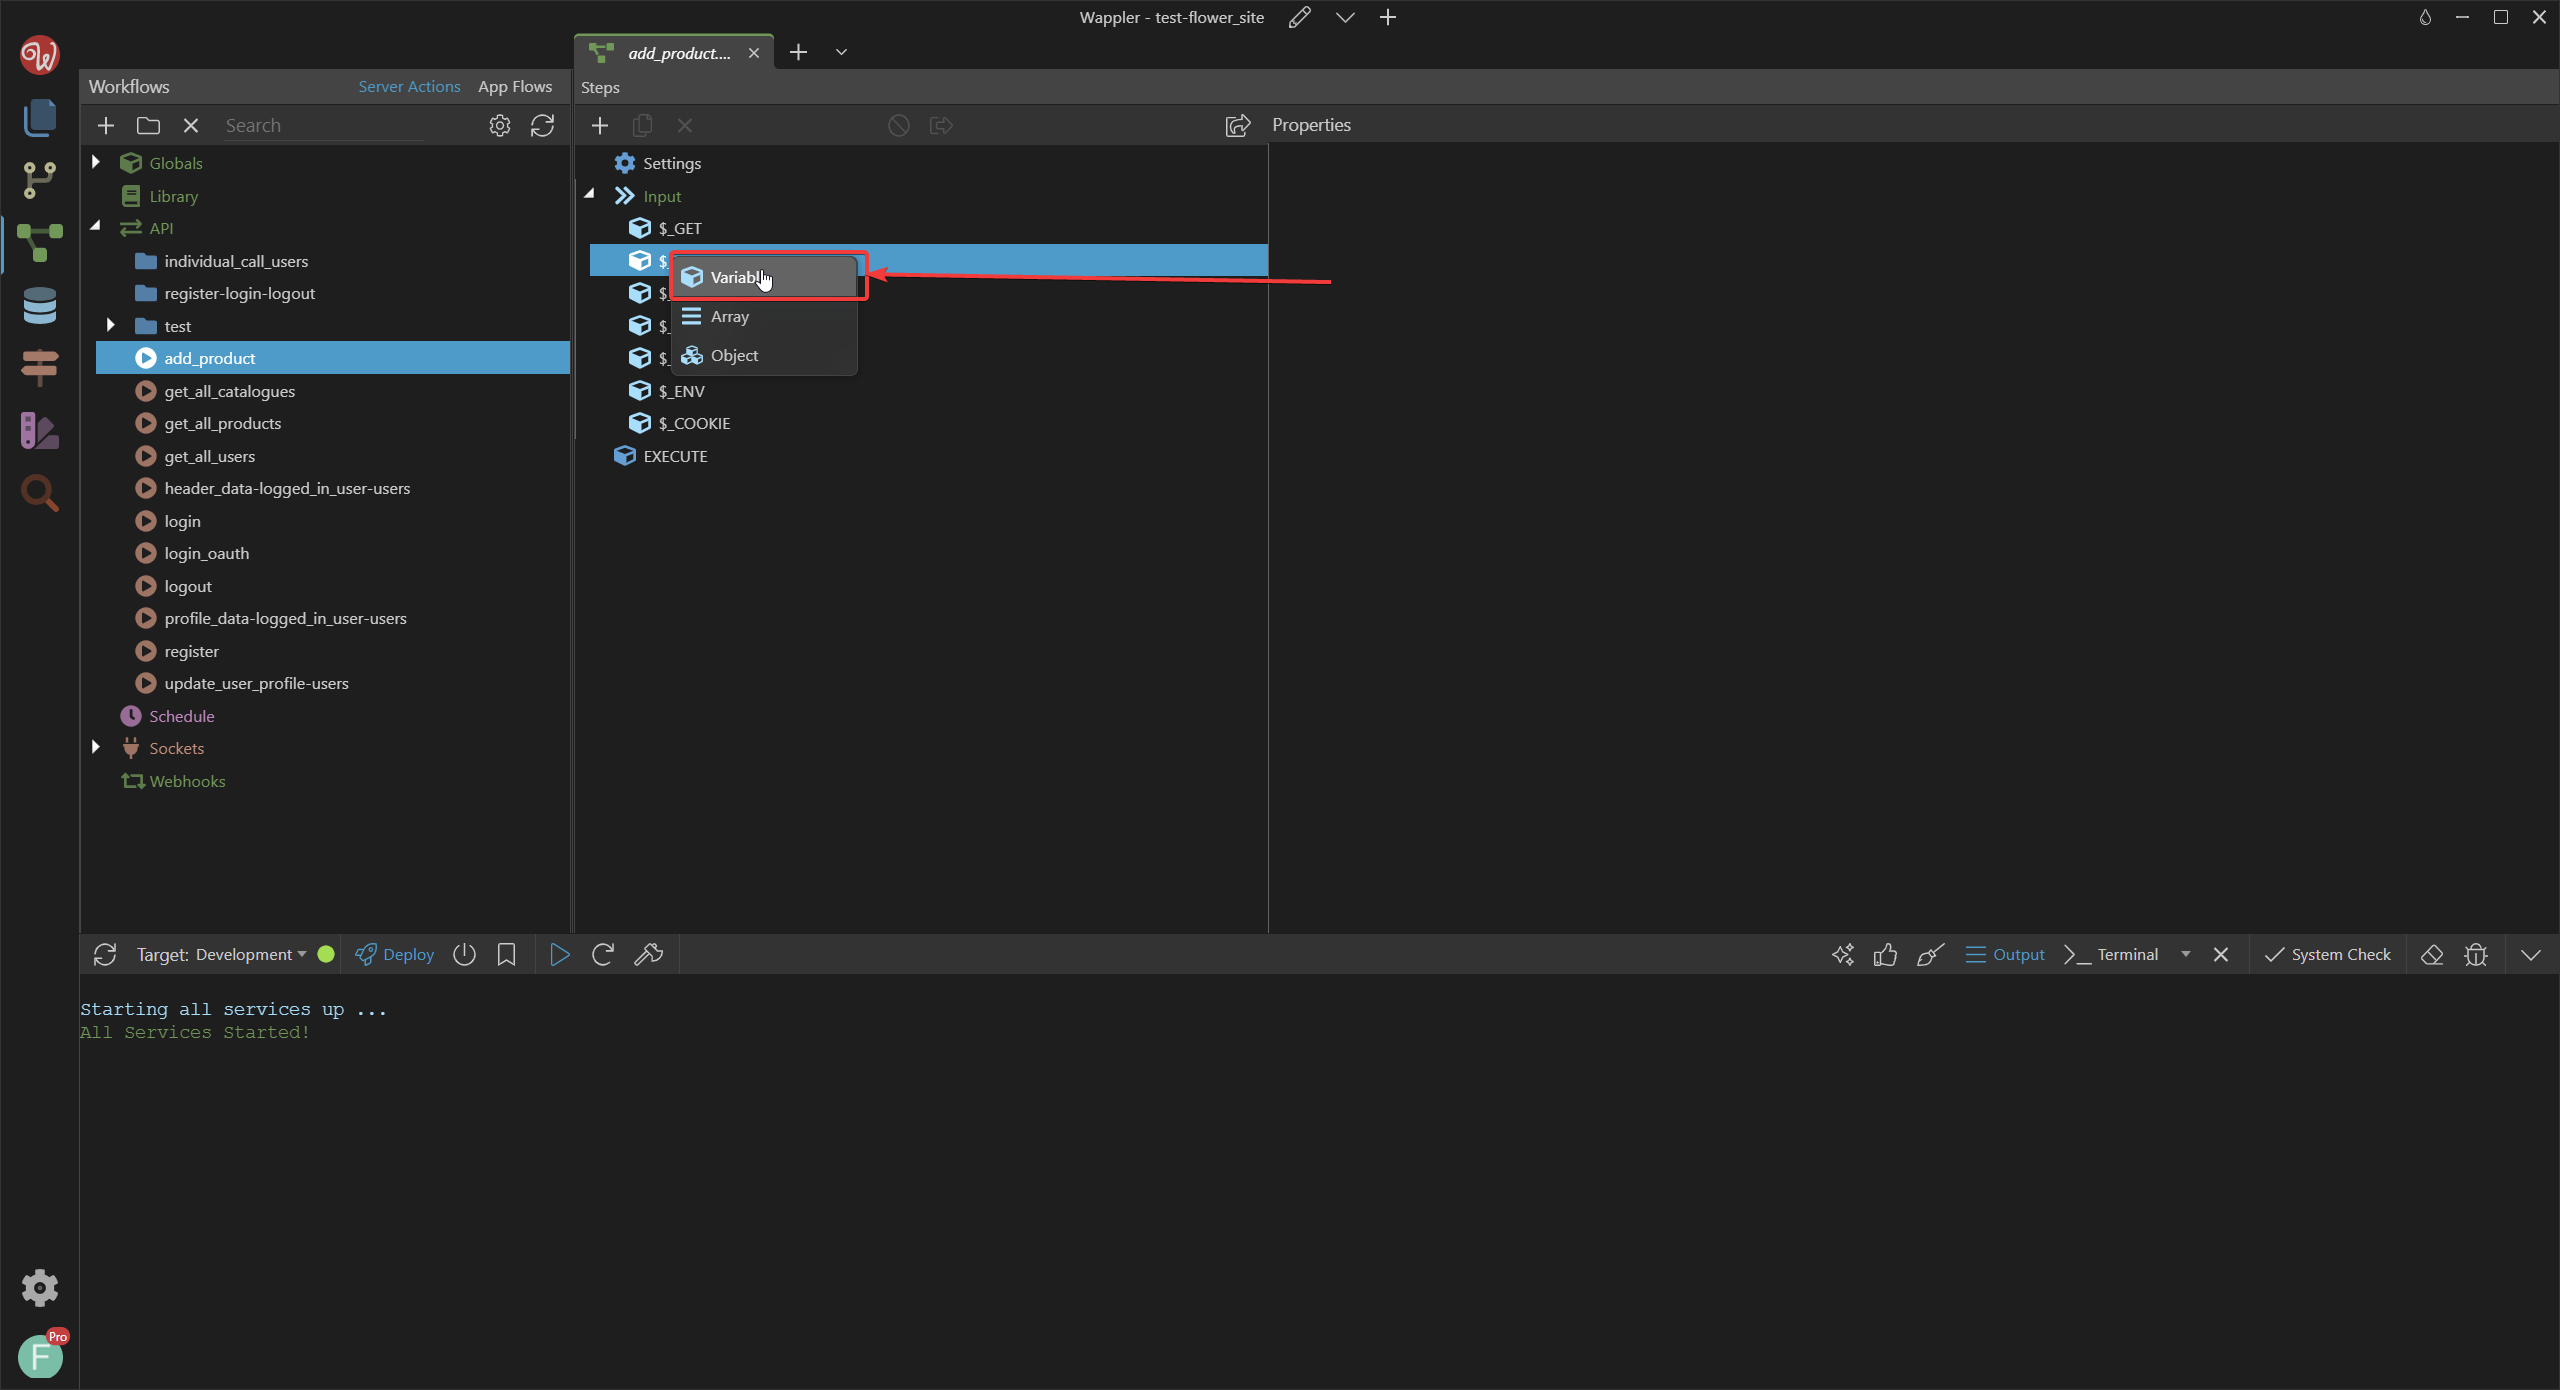
These are my filed names (with type)
- name (text)
- description (text)
- price (number)
- stock (number)
- image (text)
Now let's create the execution part:
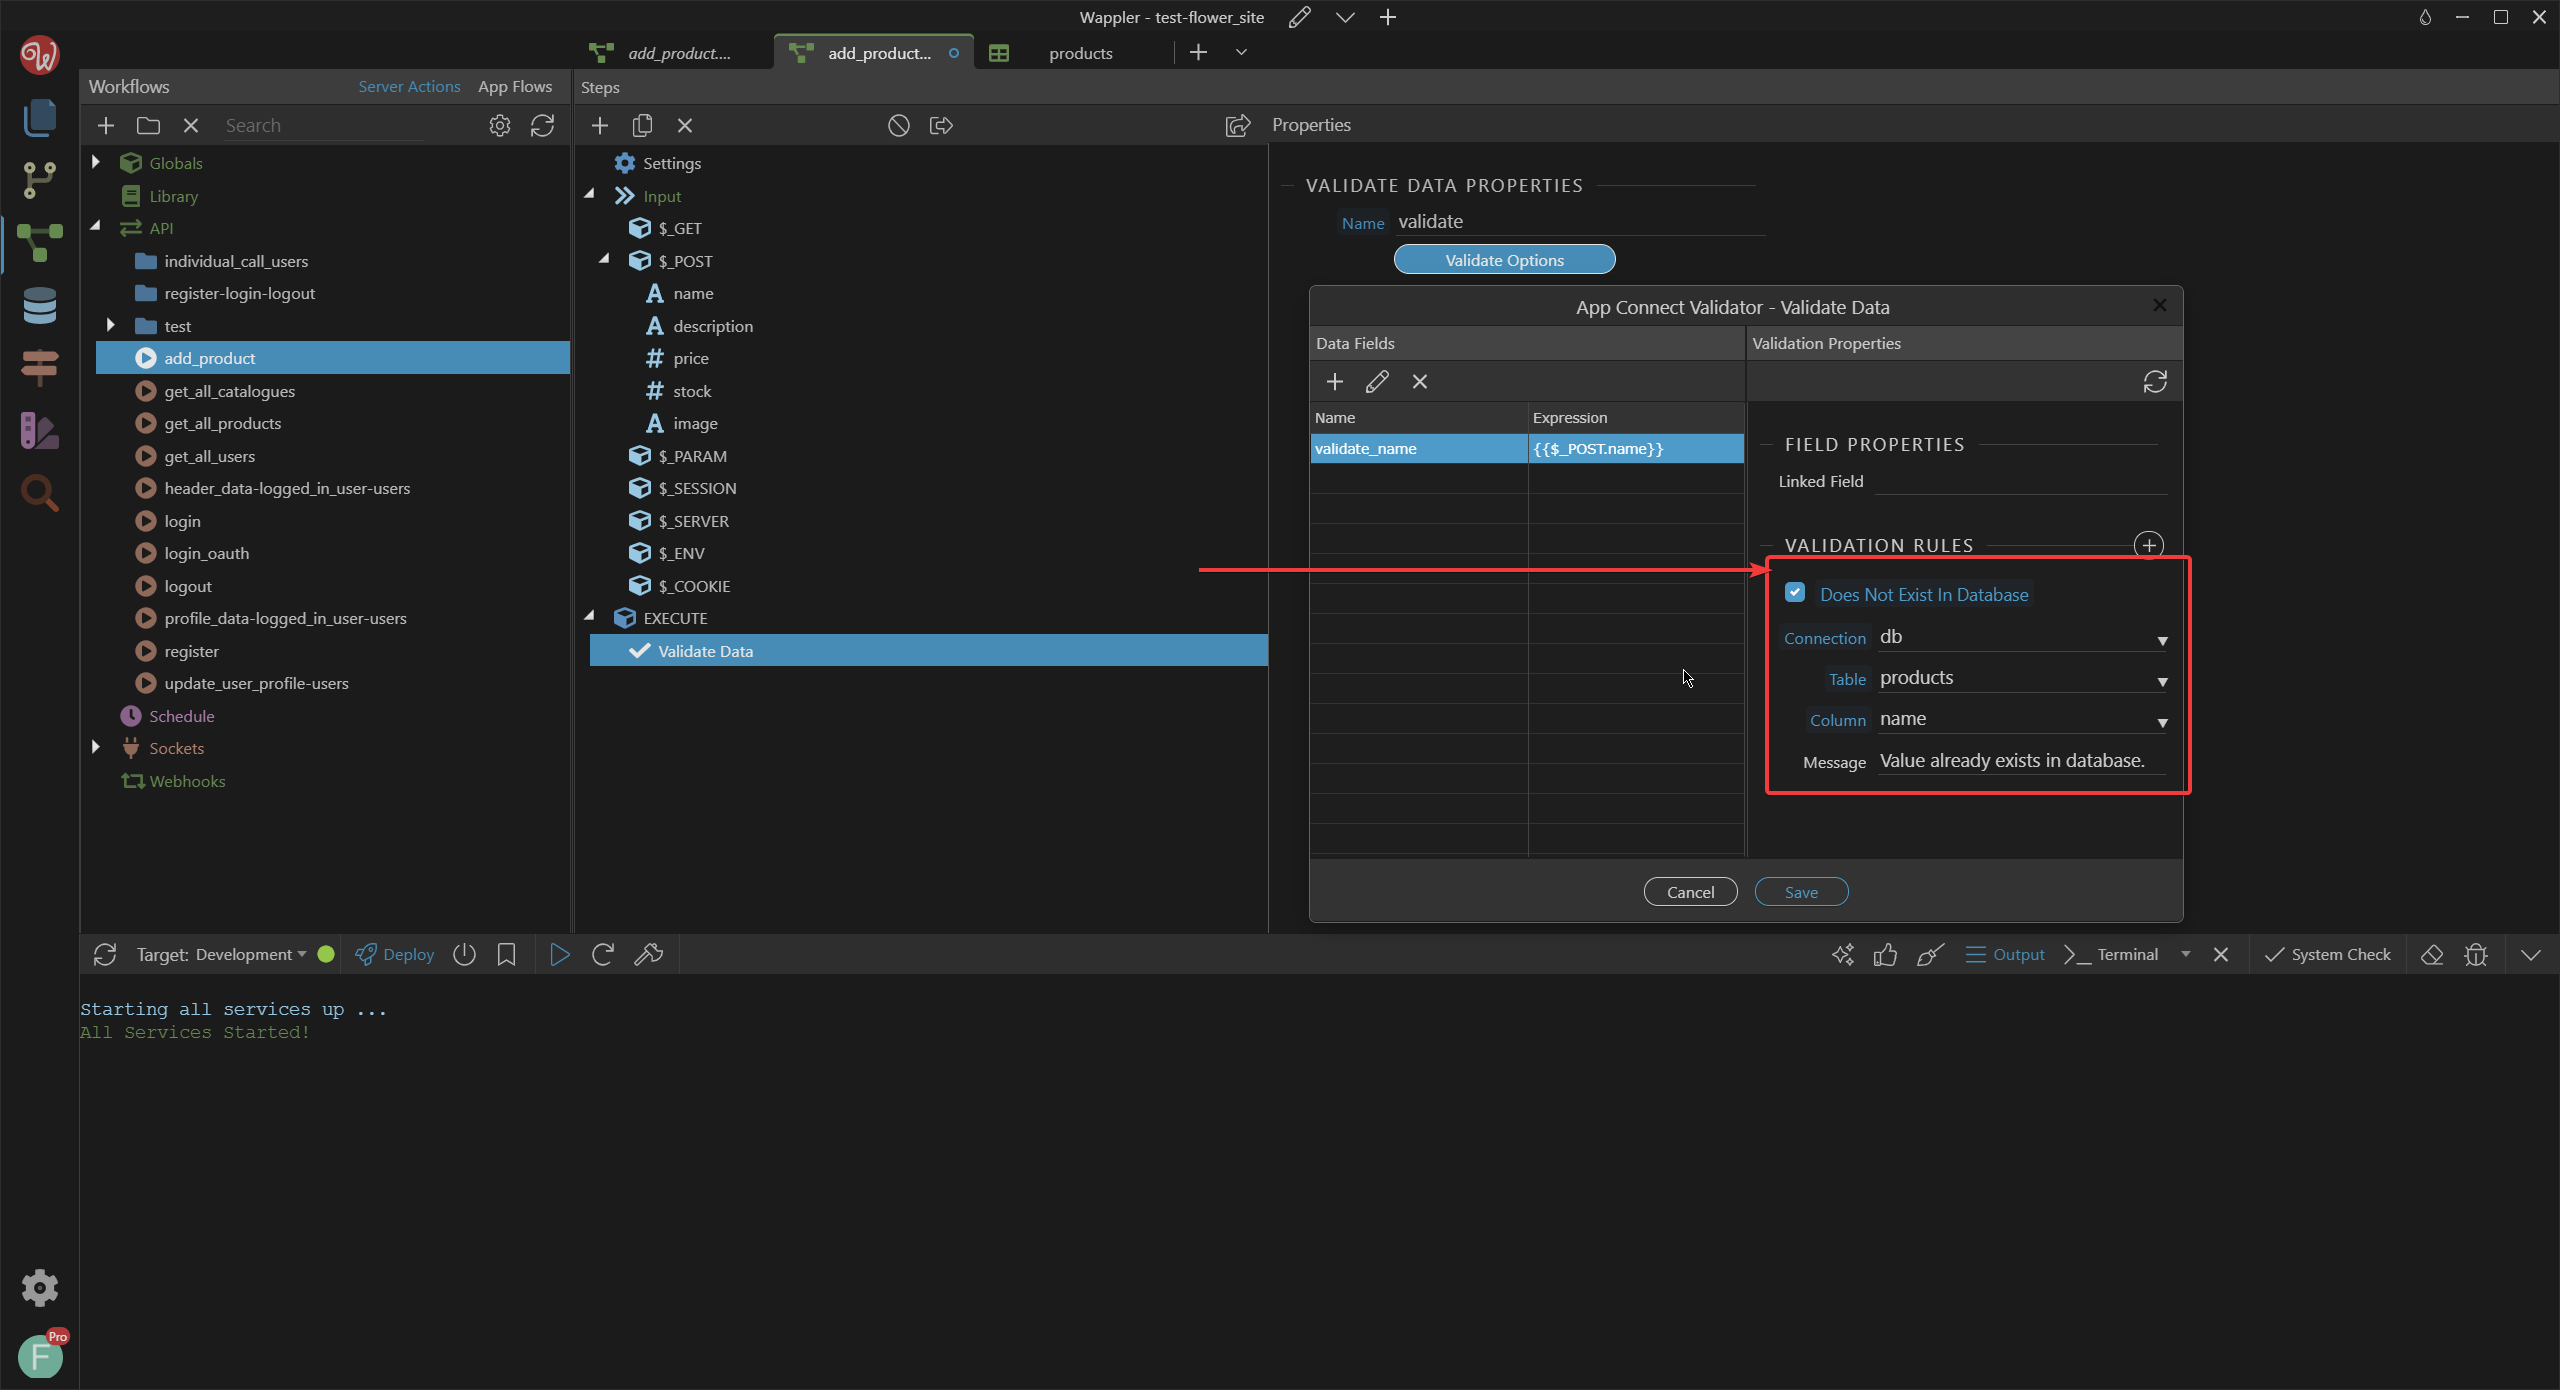
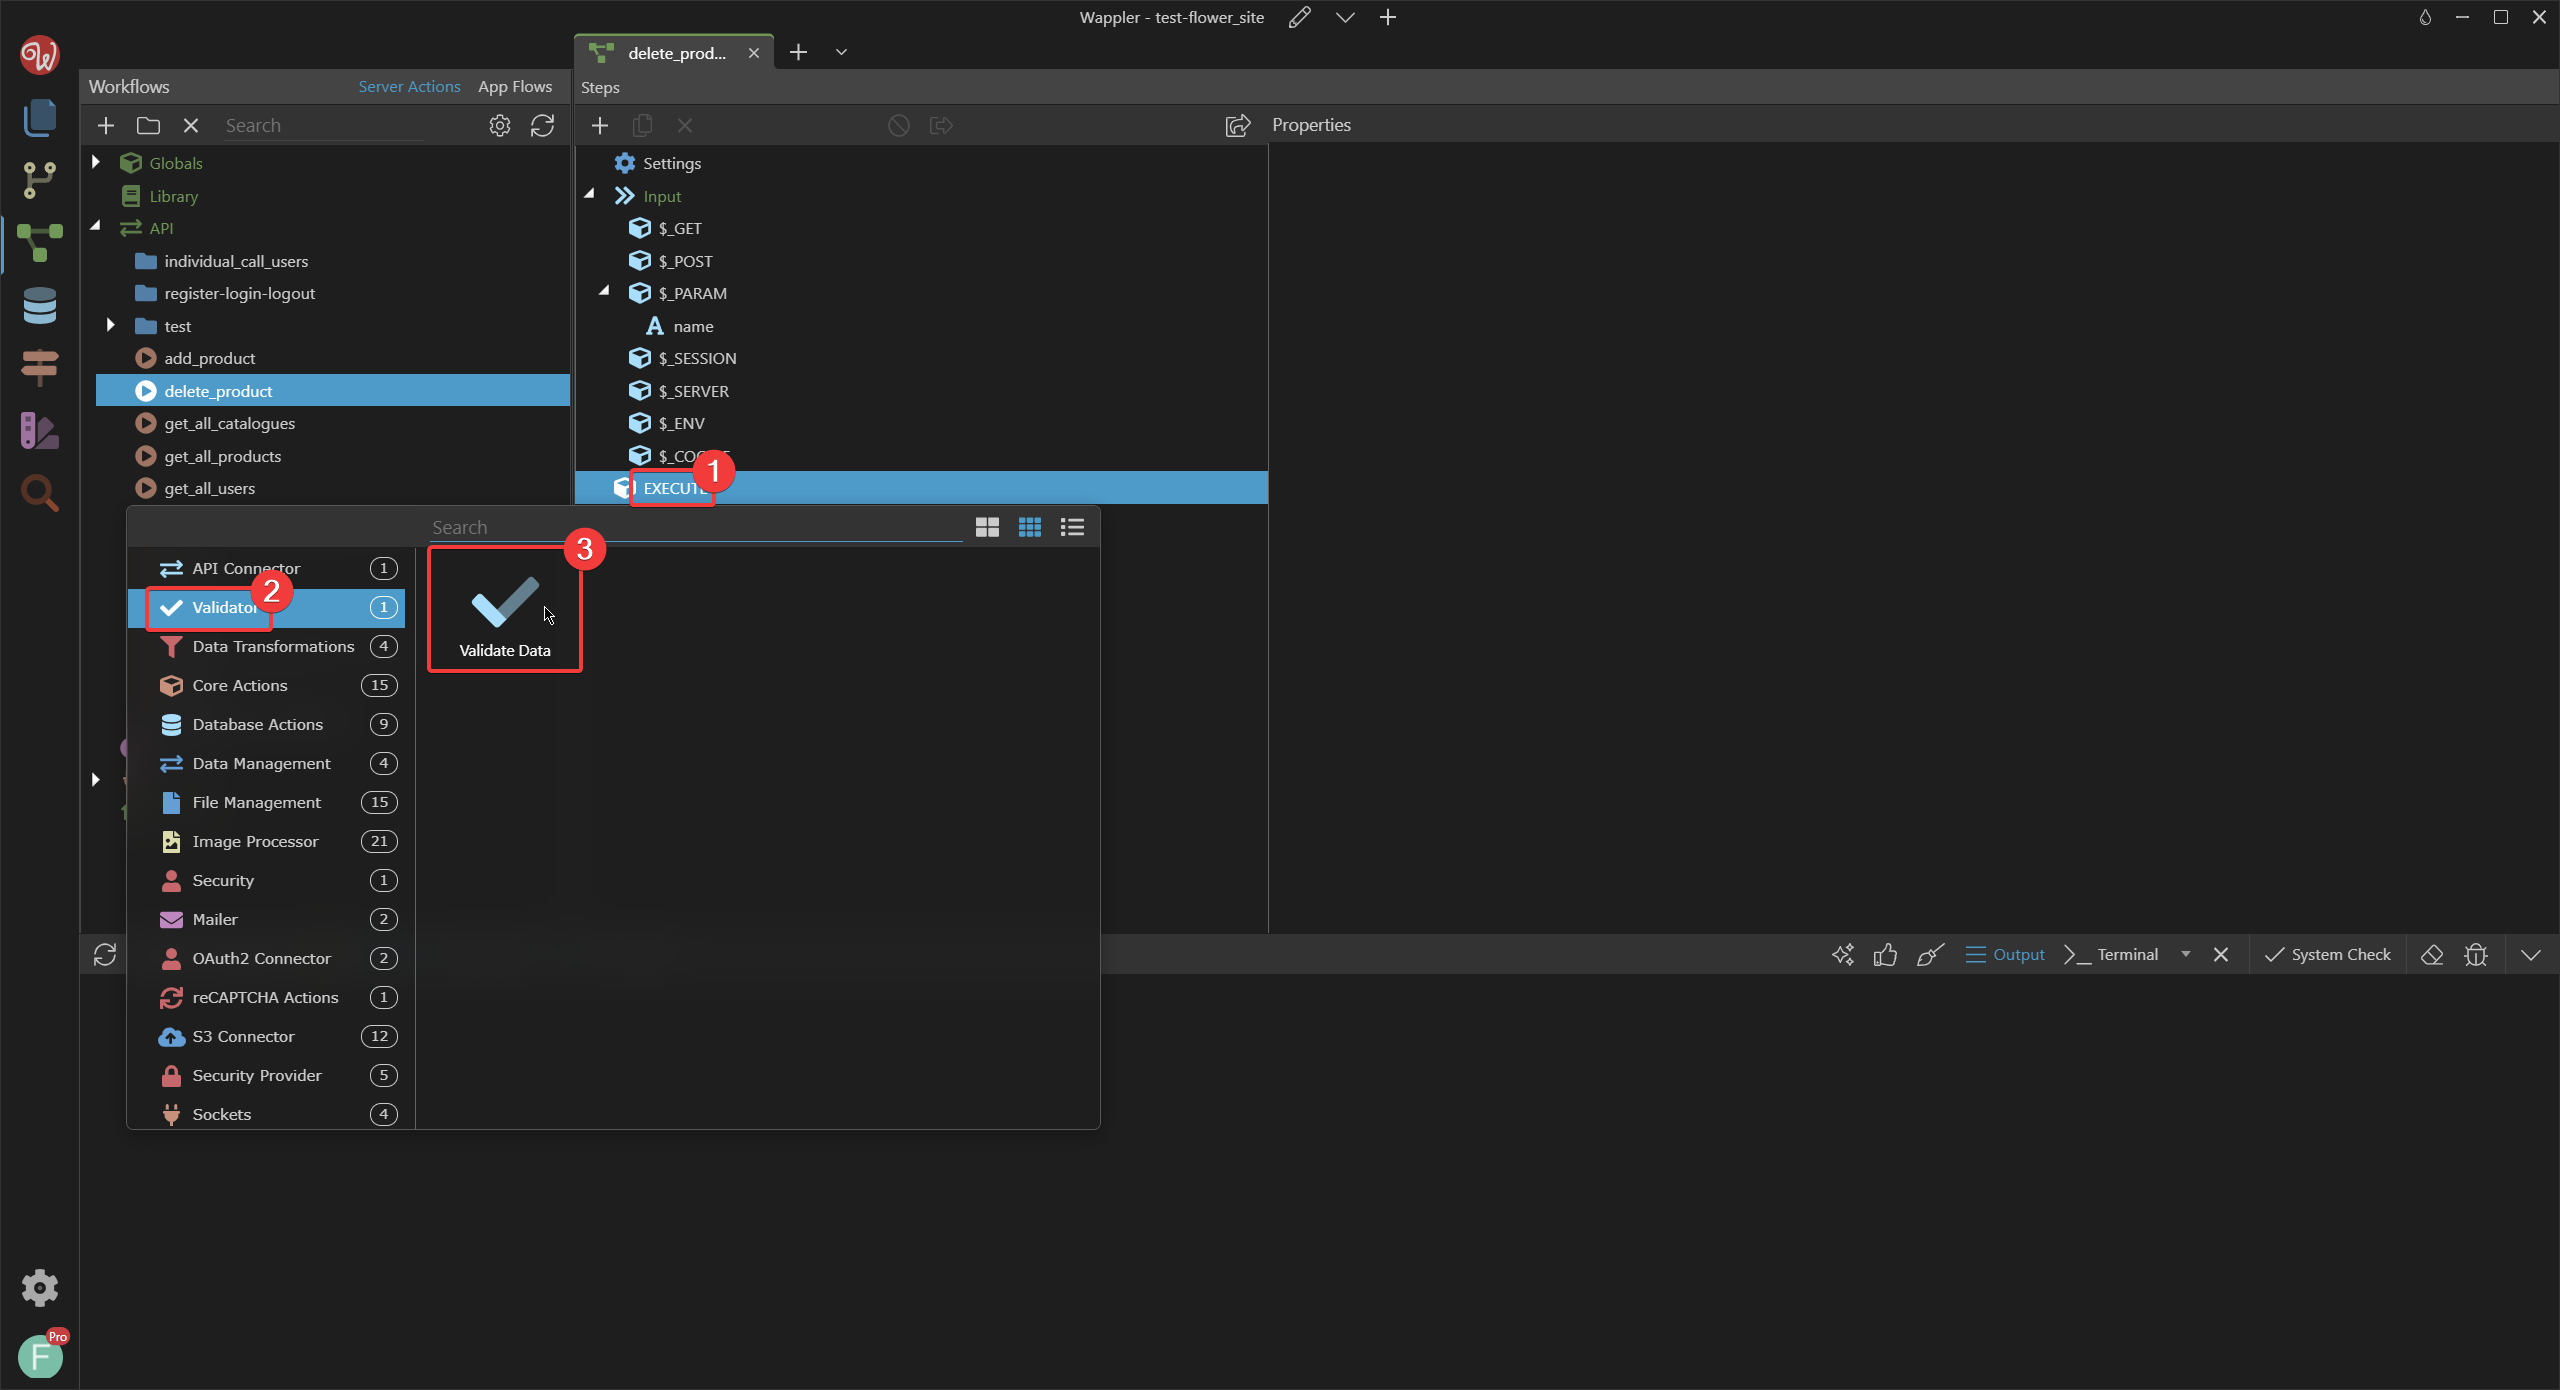
To be sure that I do not add duplicates I will create a validation step which checks if the name of the product already exists in the database.
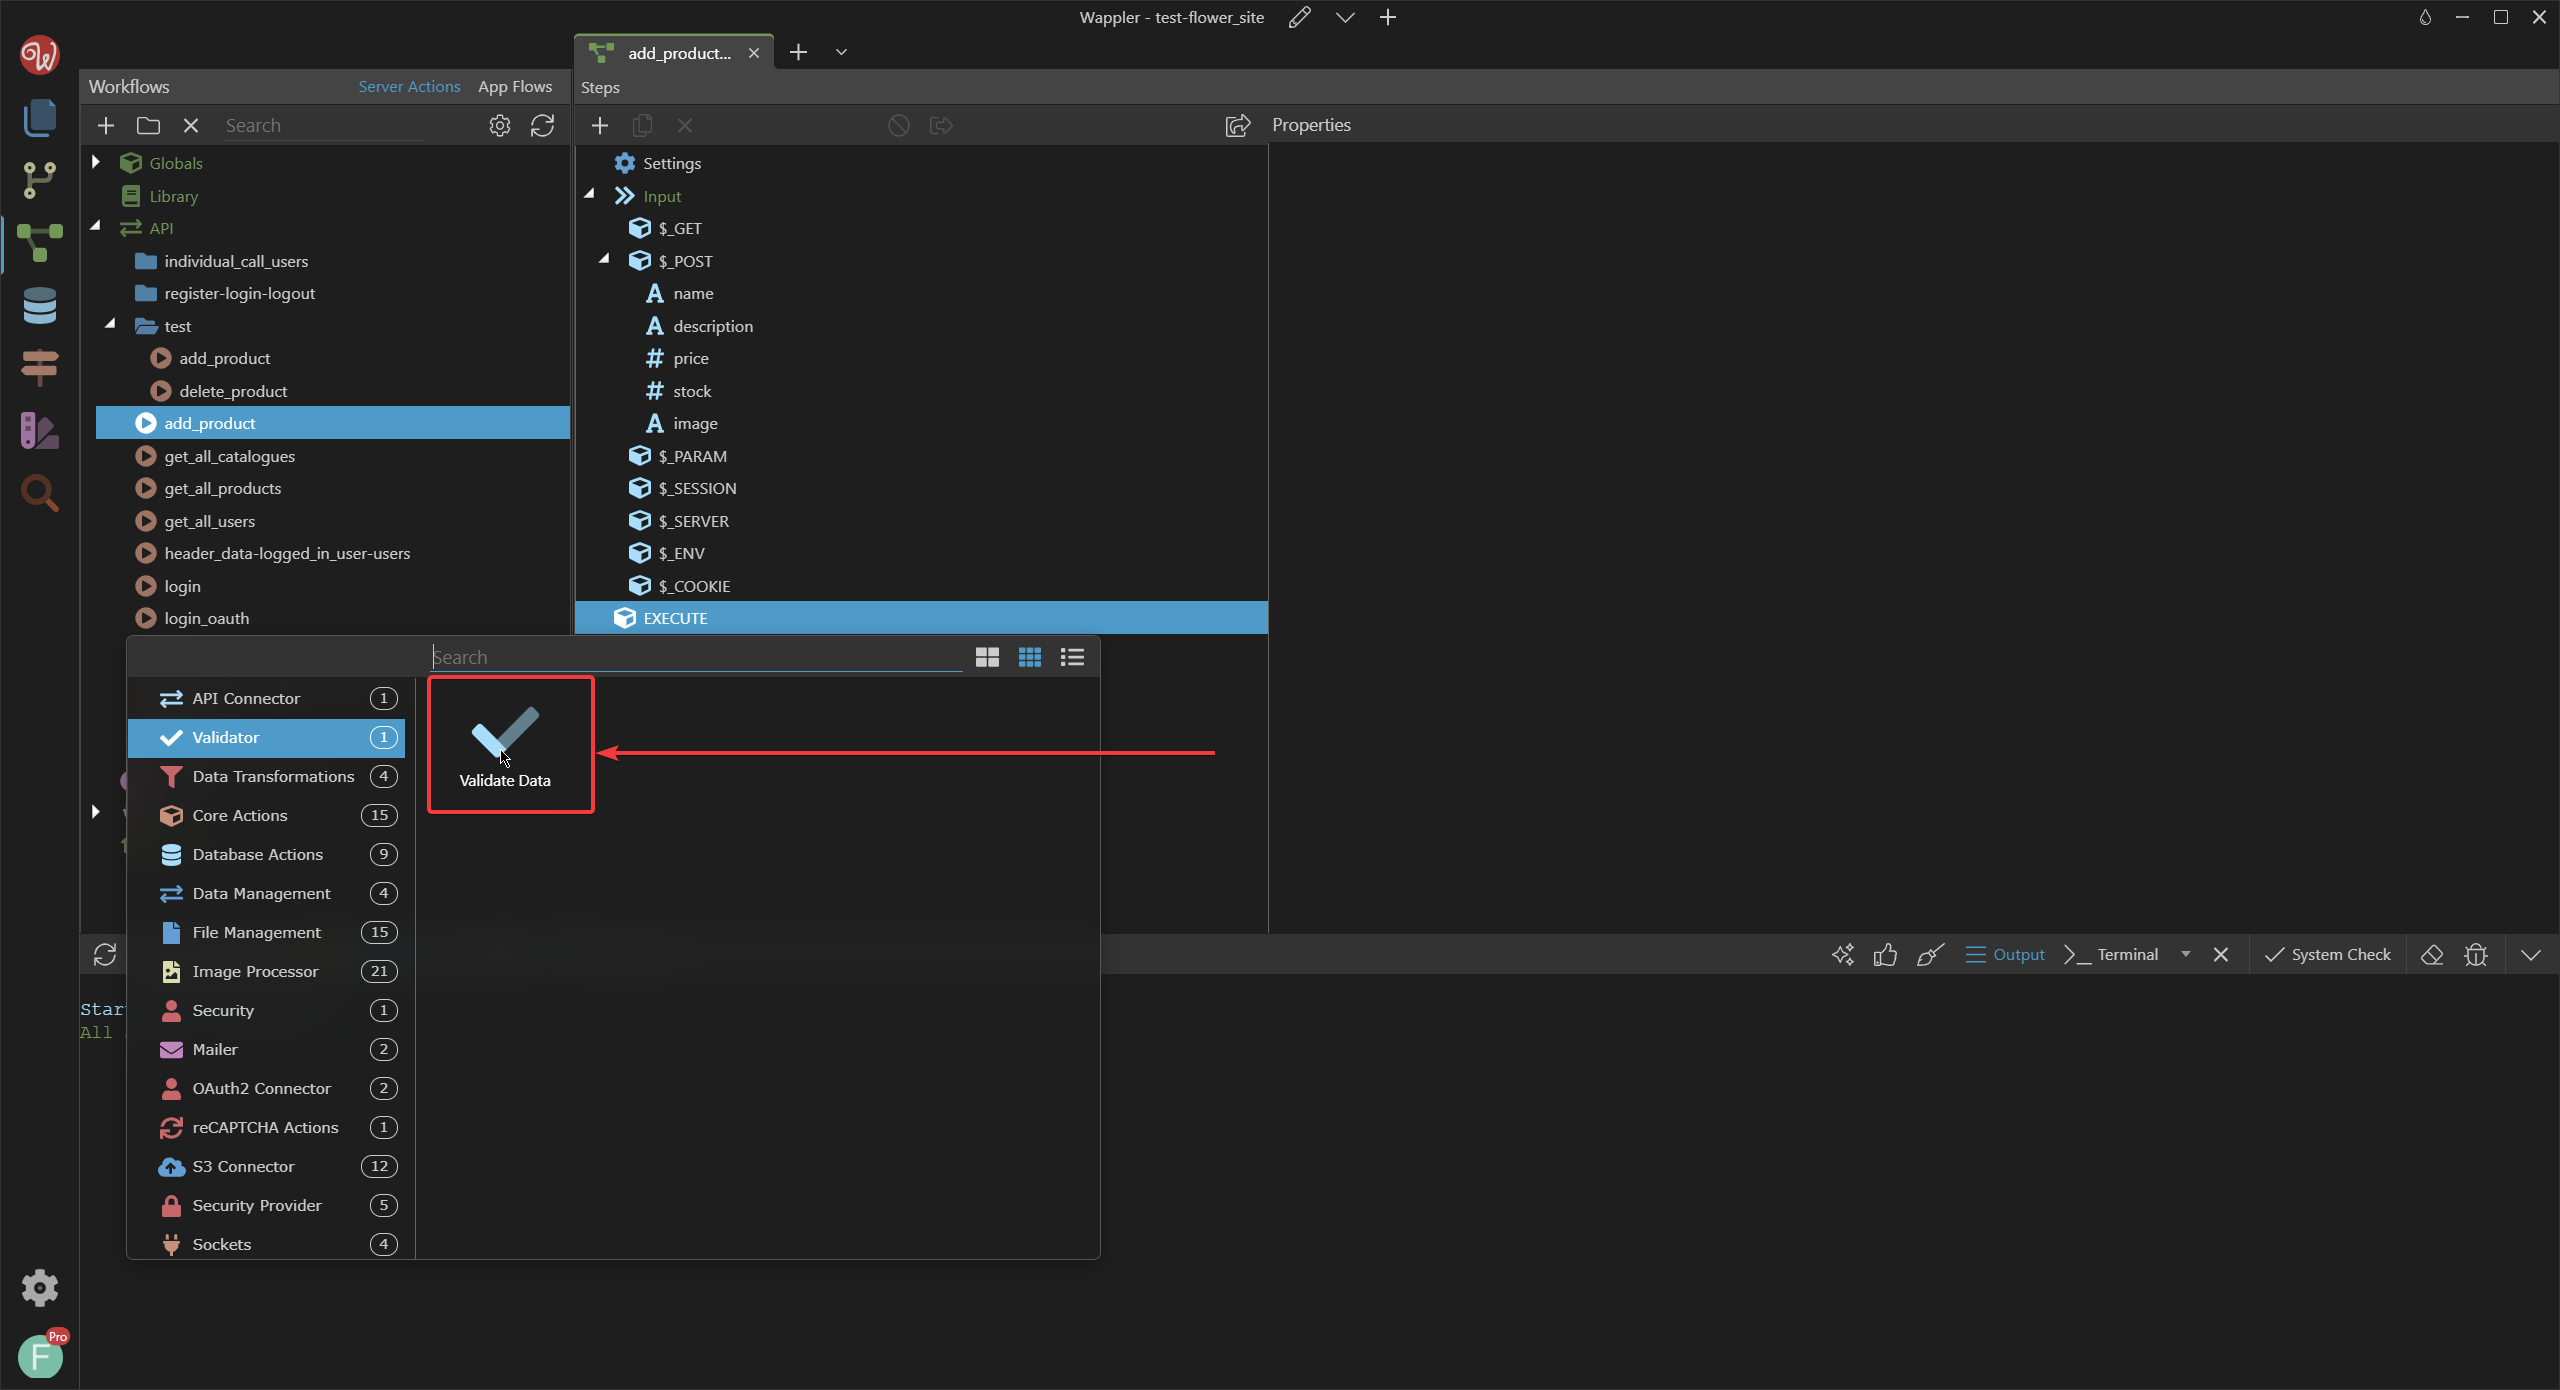
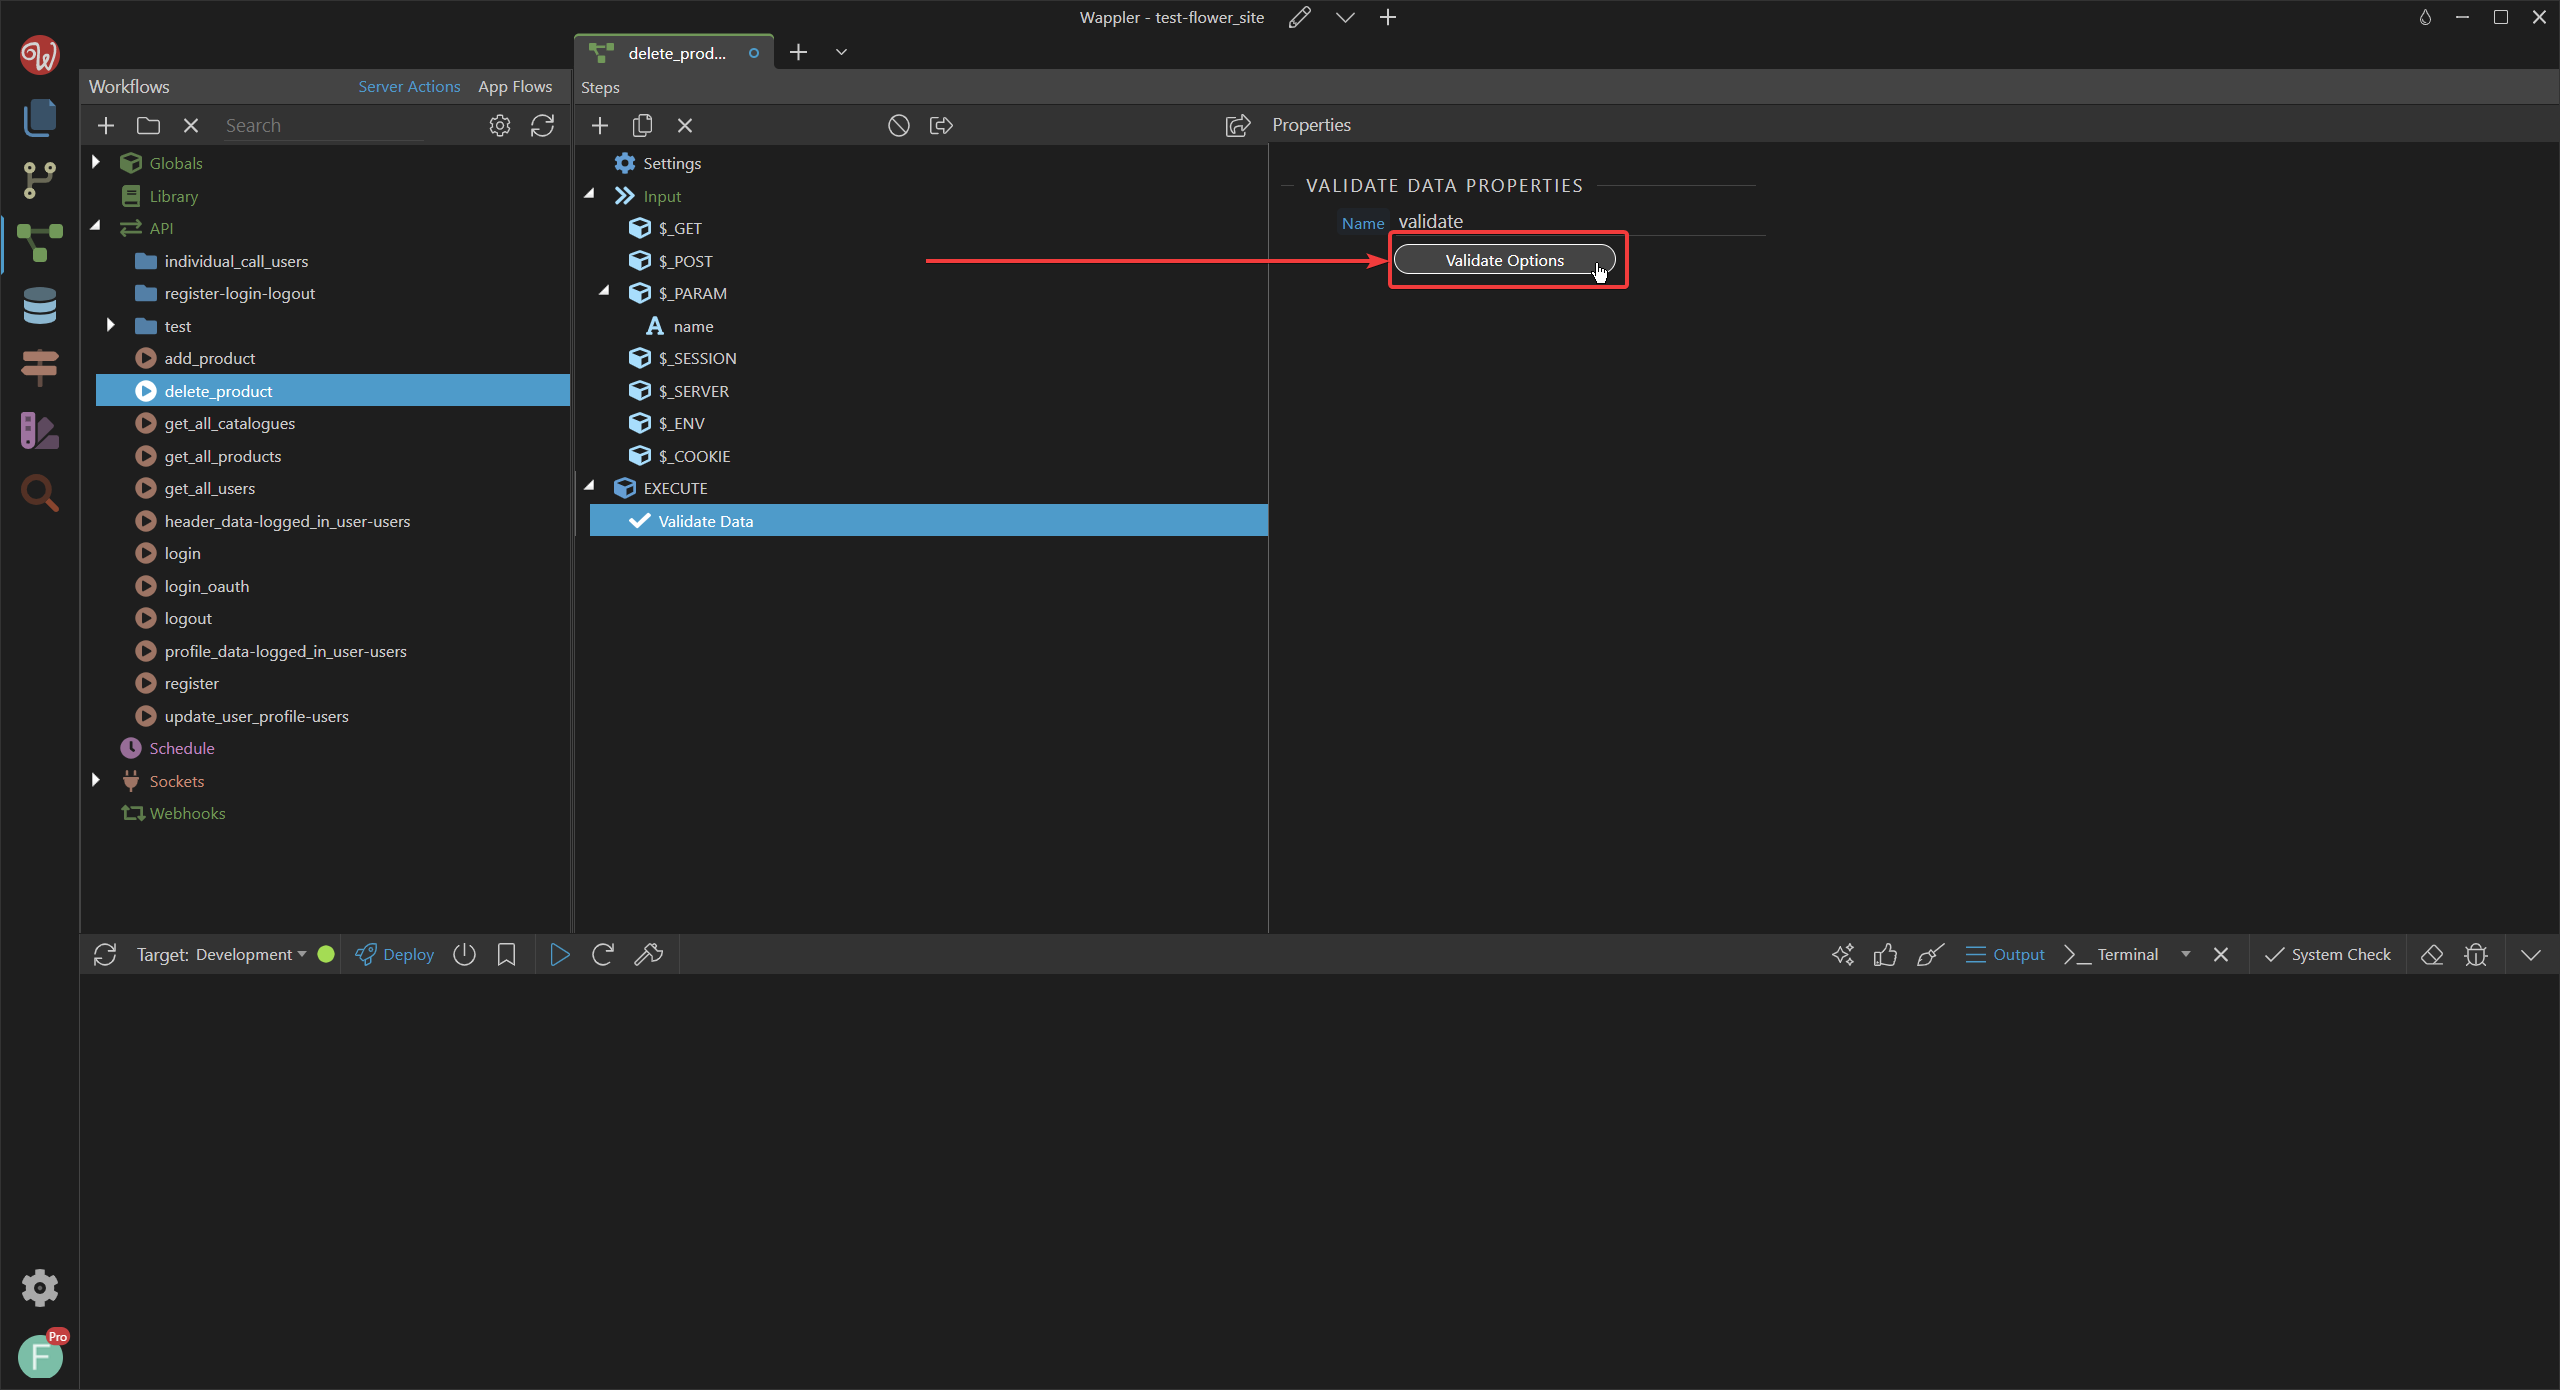
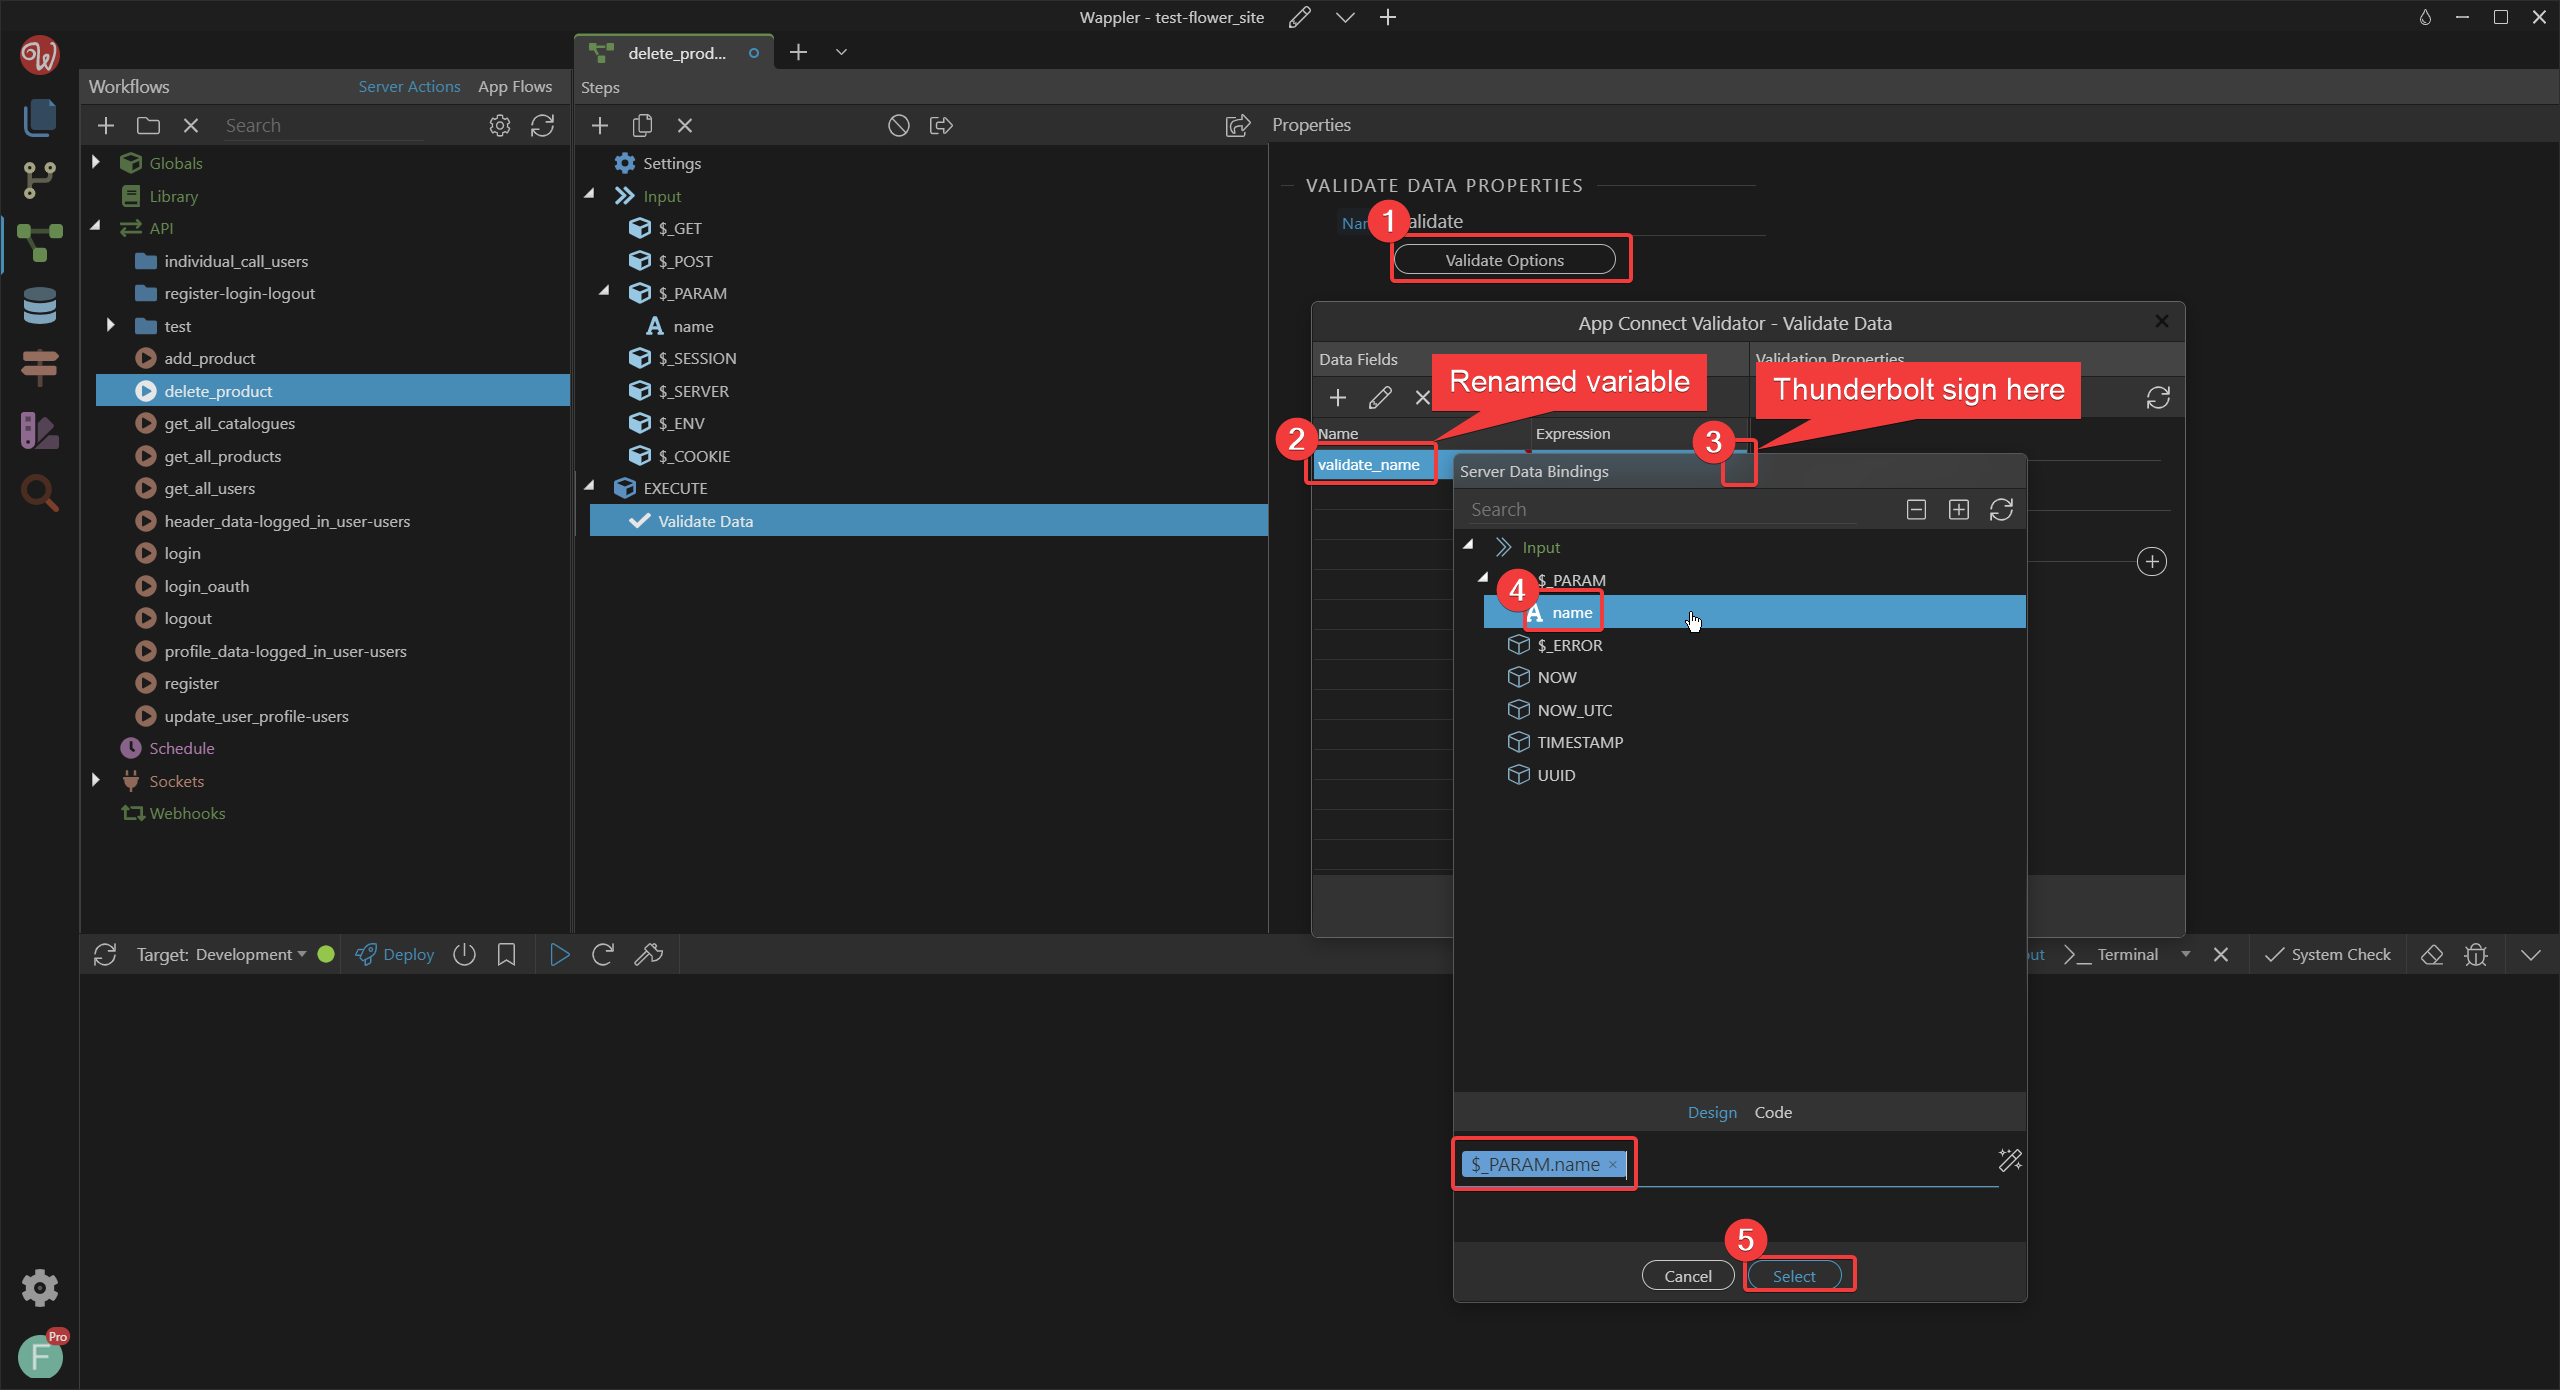
Click on Validate Options, then on the + sign and name the validation field to be validate_name. Then click fast twice on the expression part of the validate_name field and a thunder sign appears, click on that.
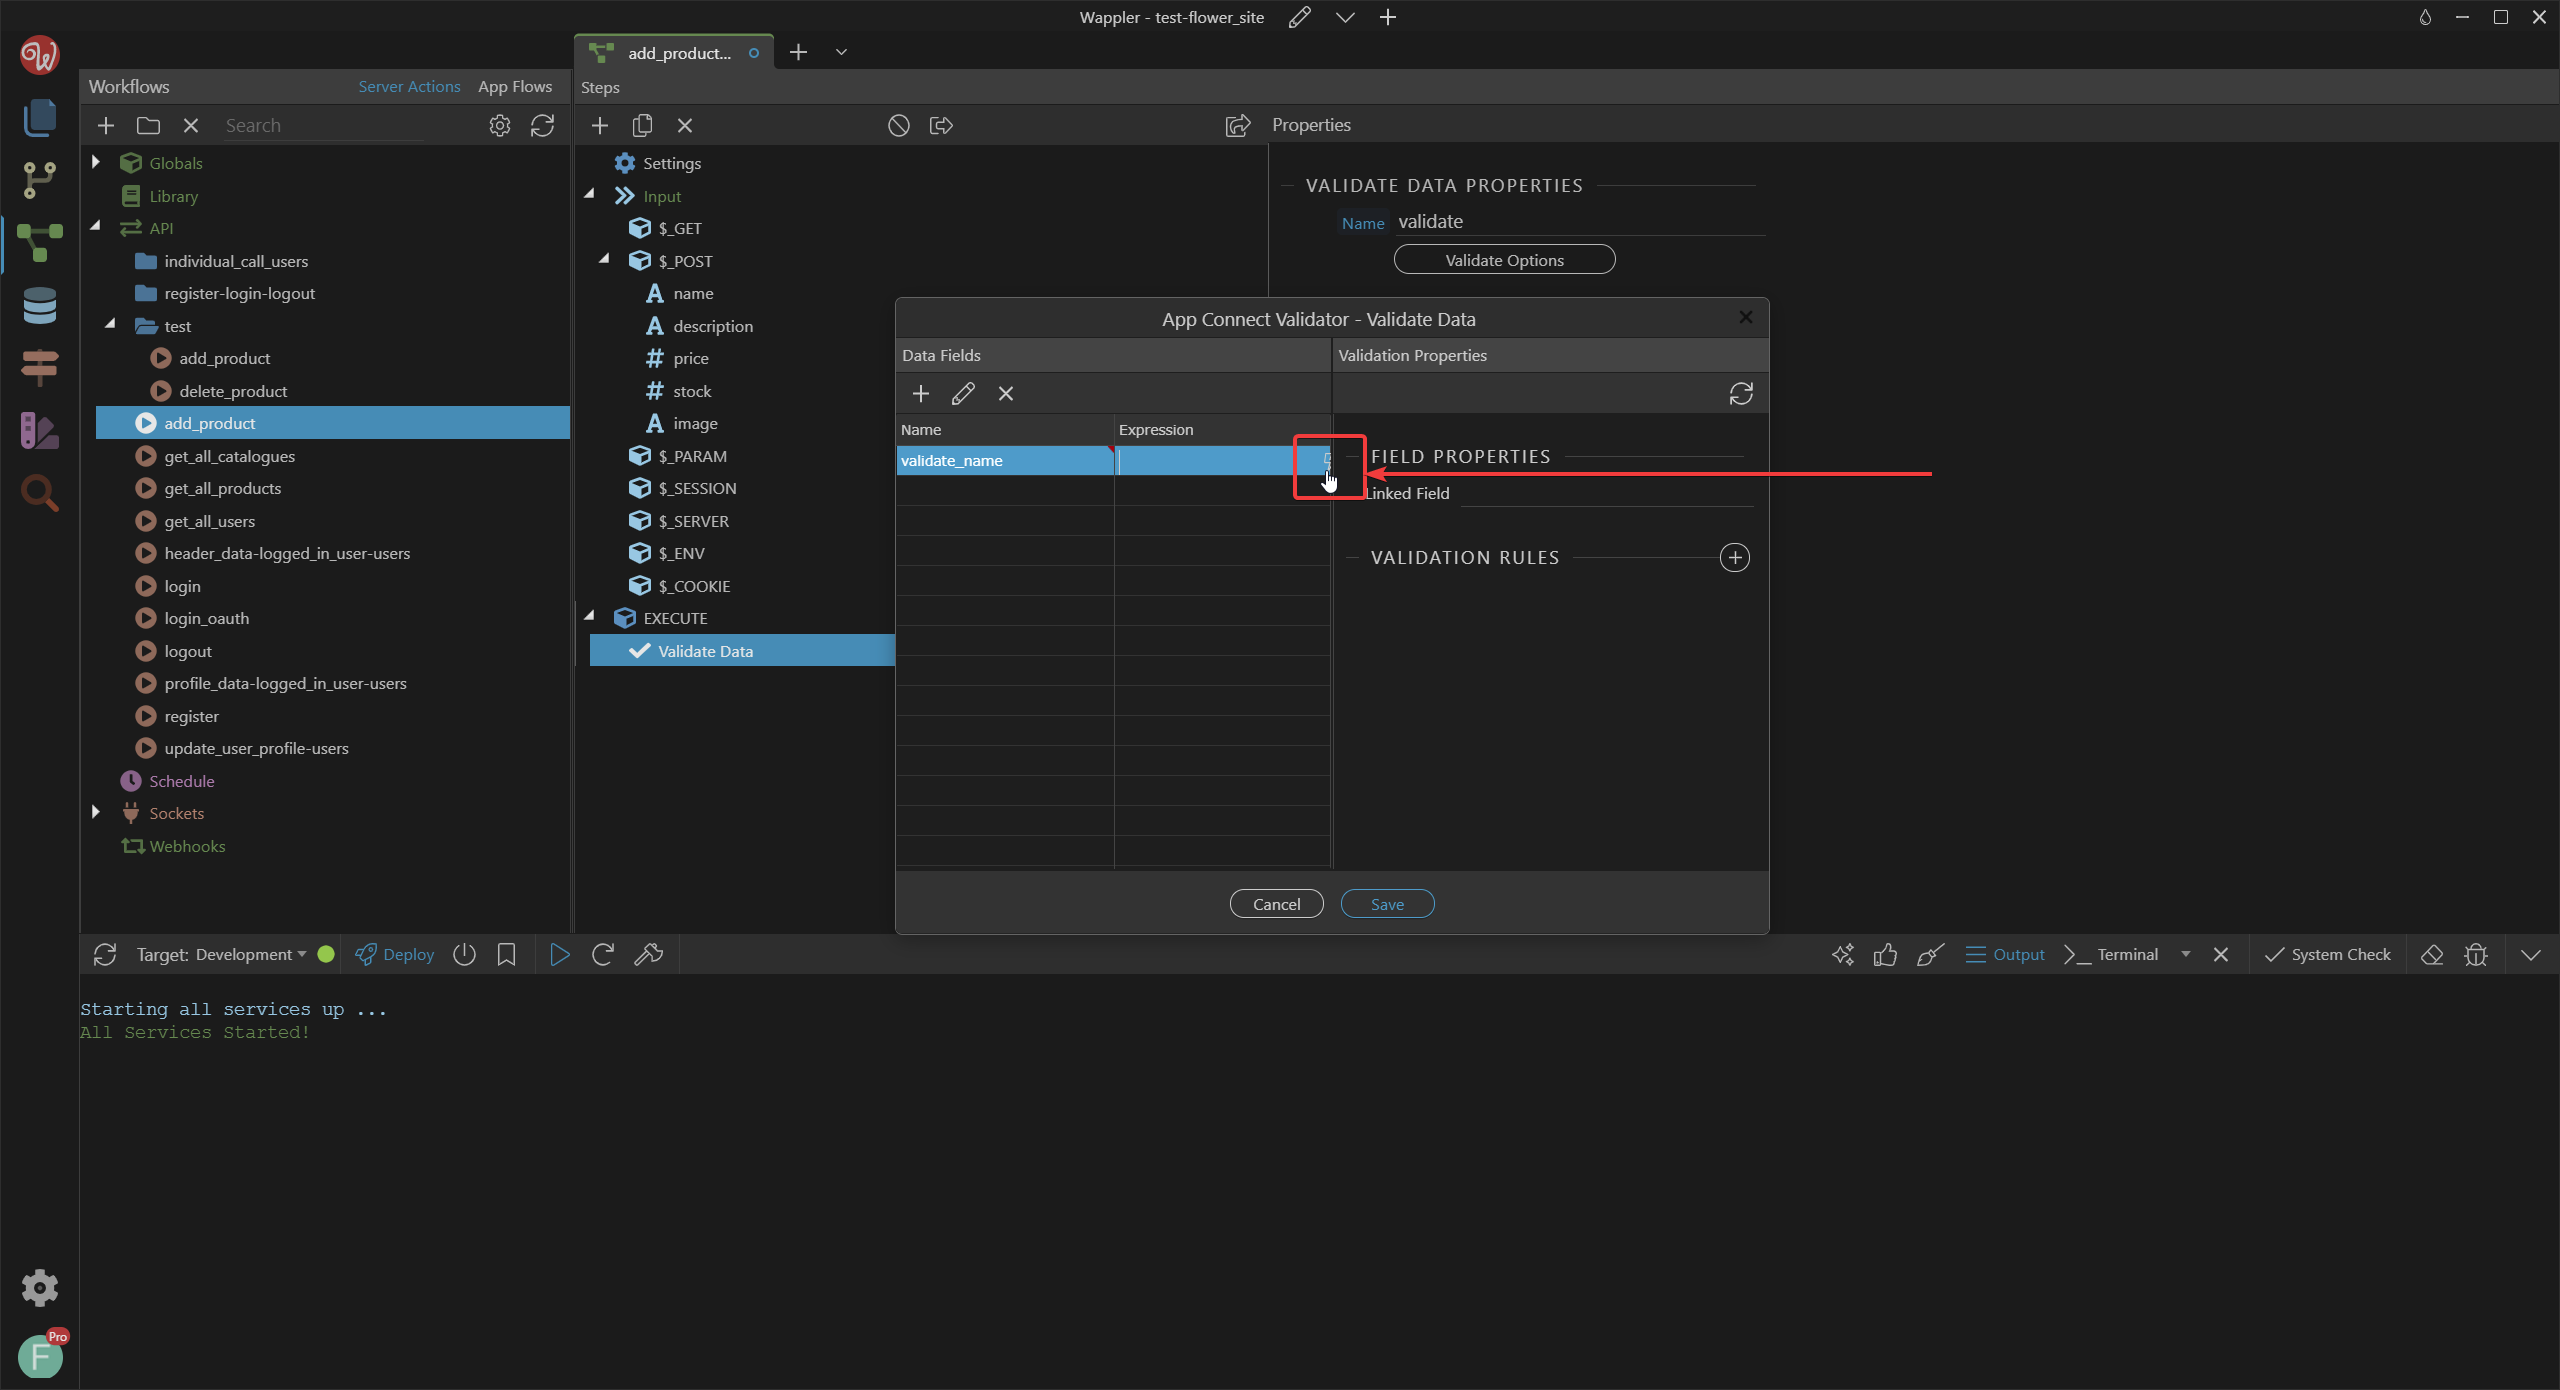
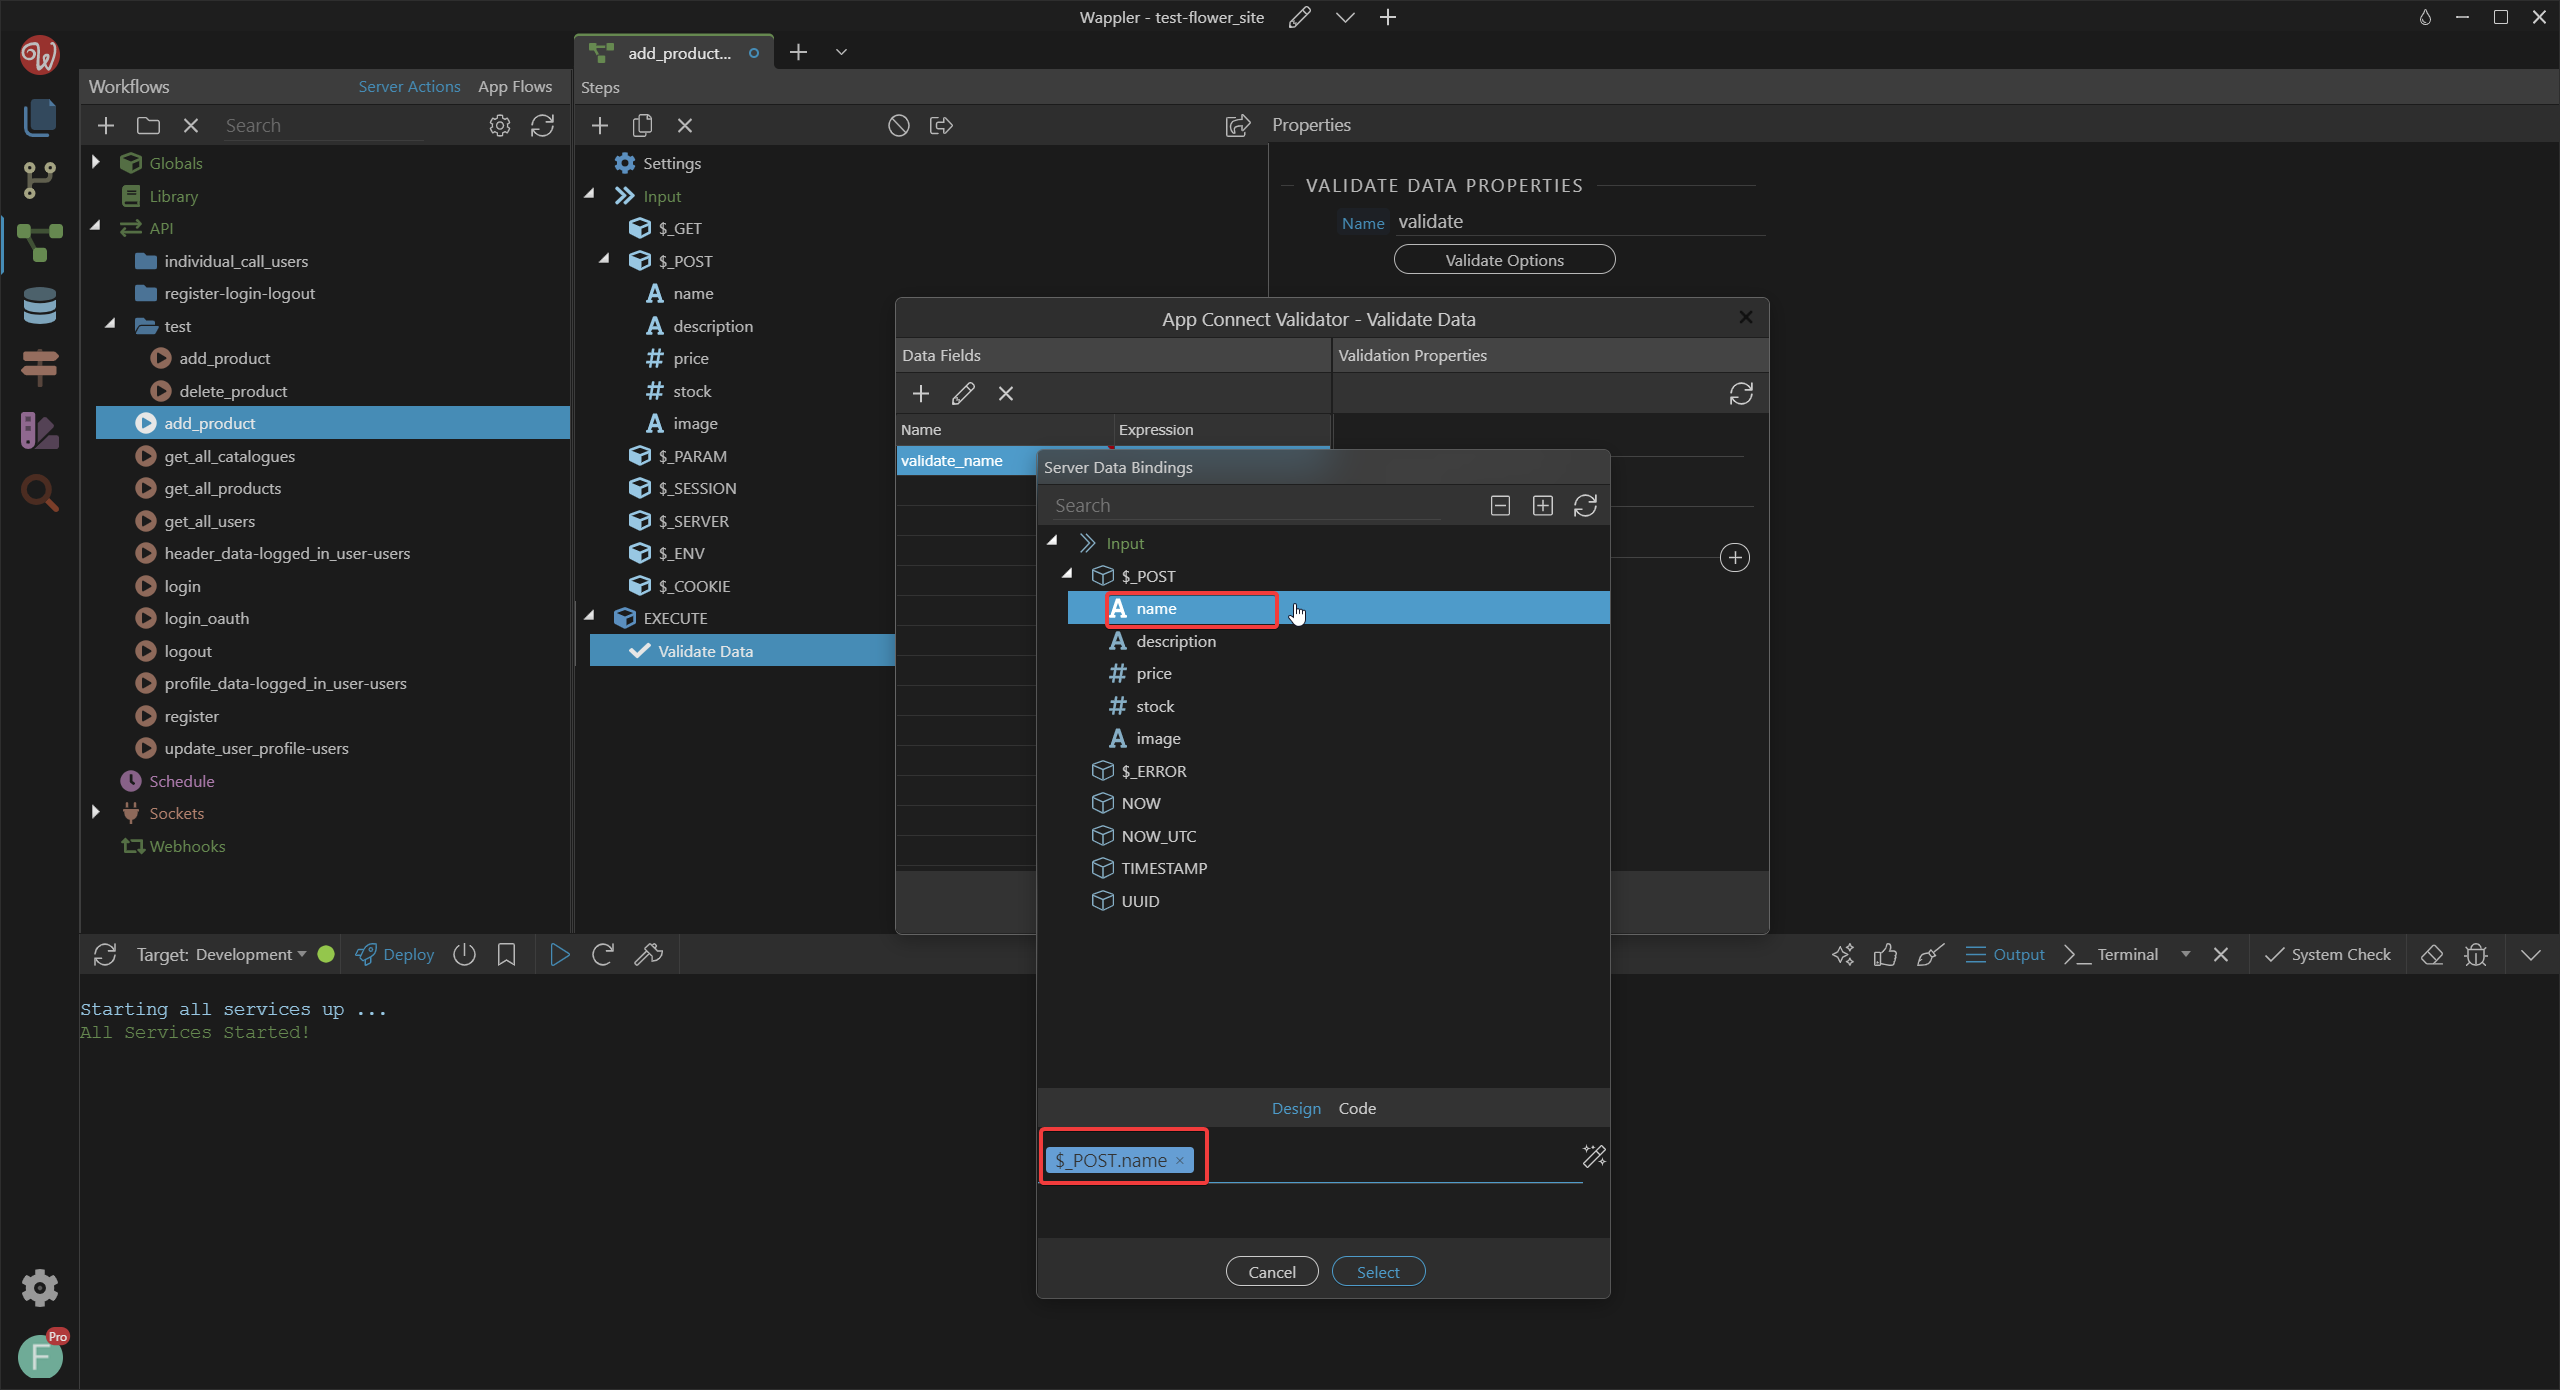
Then a enw windows appears, where you can select what inputs to be validated, search for name. It should then appear in the bottom box, click the bottom select button to finalize.
Then click on the + in the right pane named VALIDATION RULES. In the dropdown select Does not exist in database
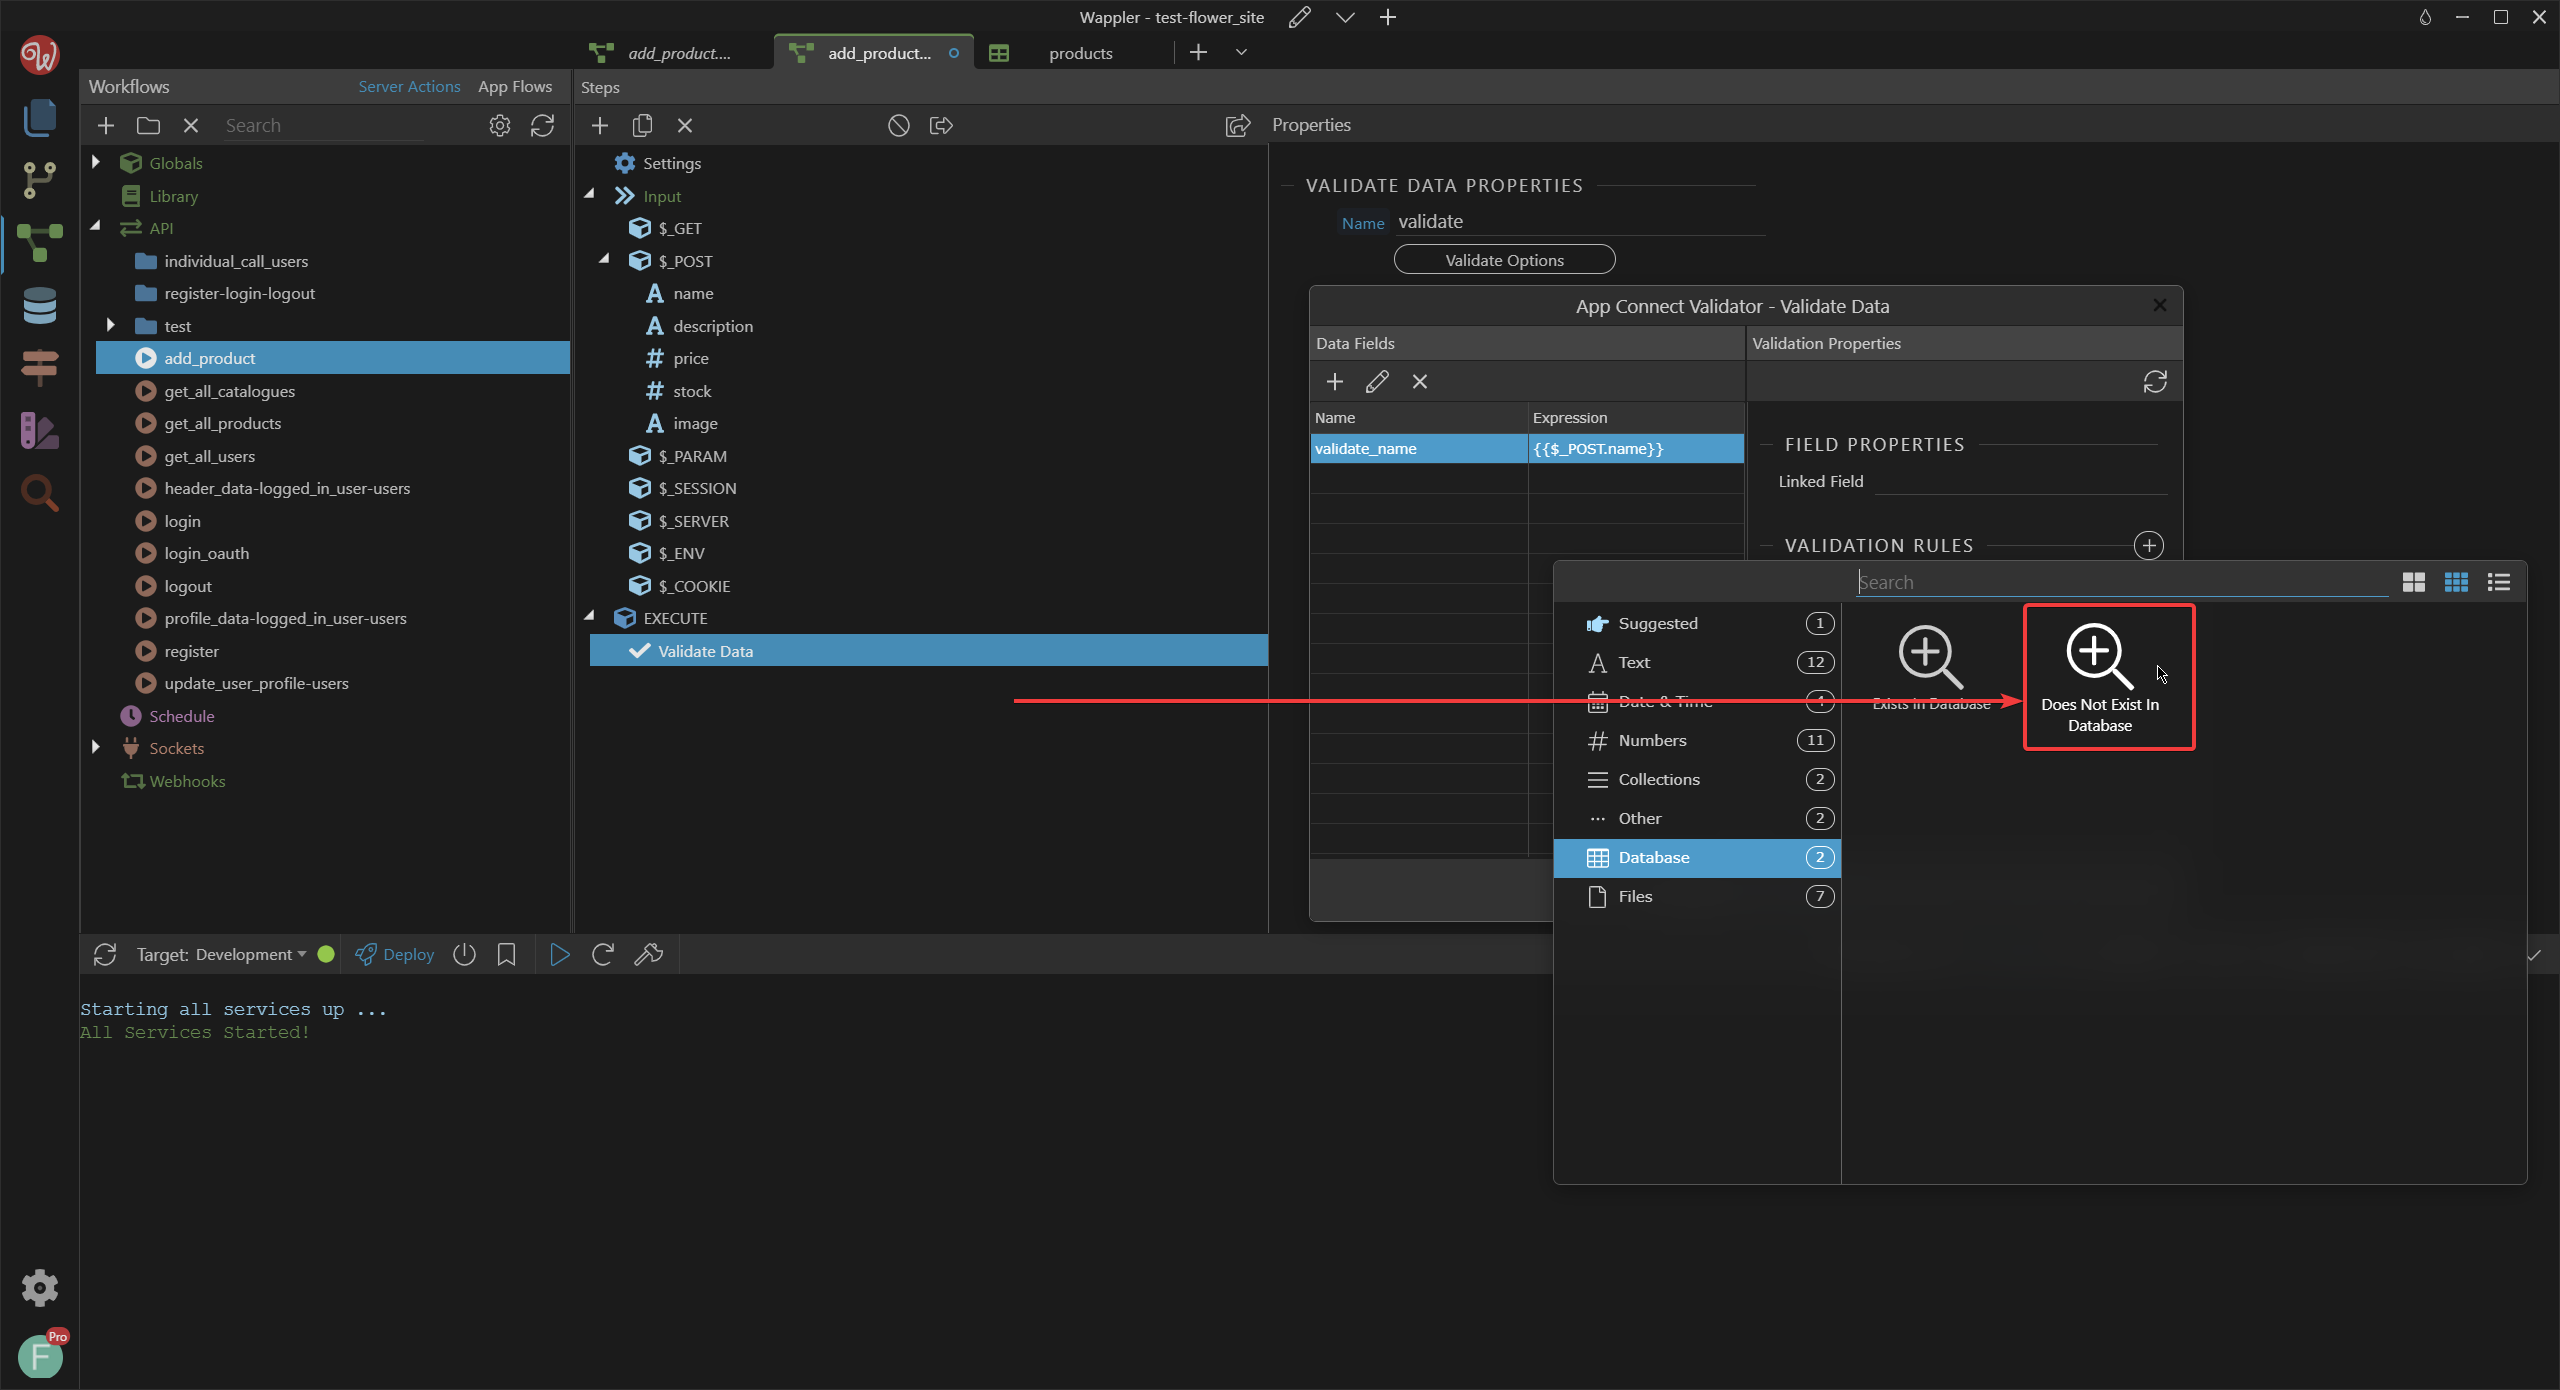
Make sure that you select the correct database and field.
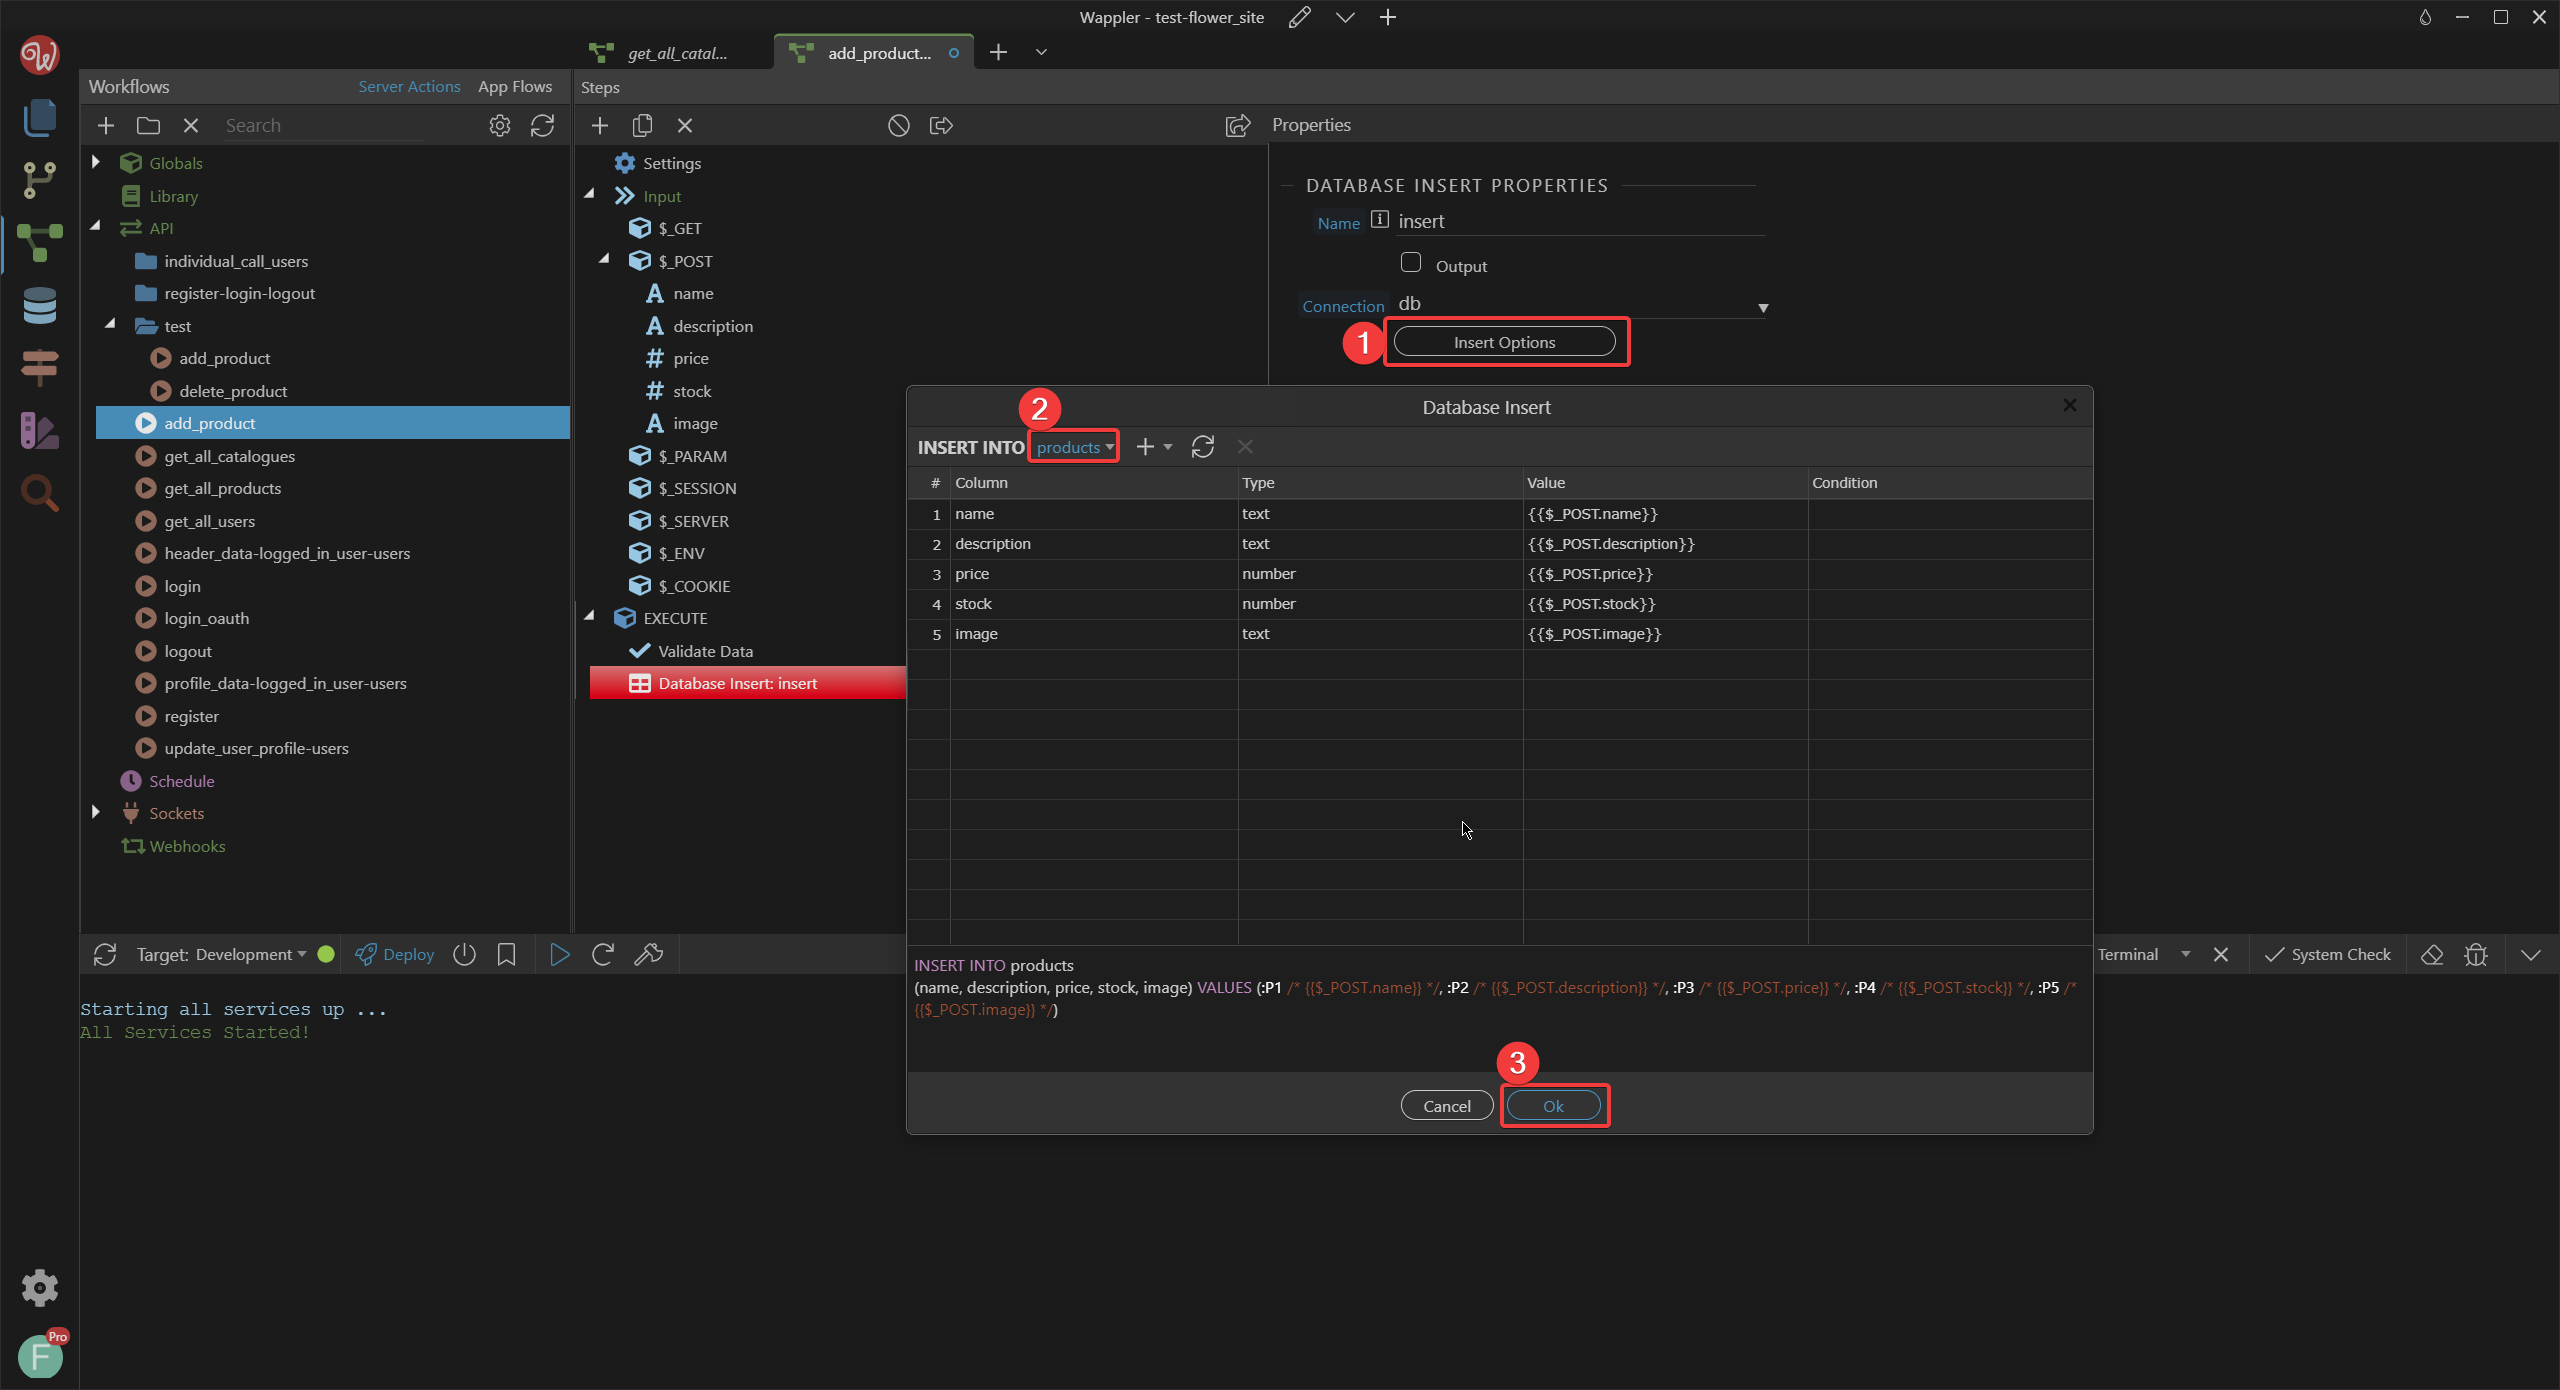
Now let's add the actual insertion step.
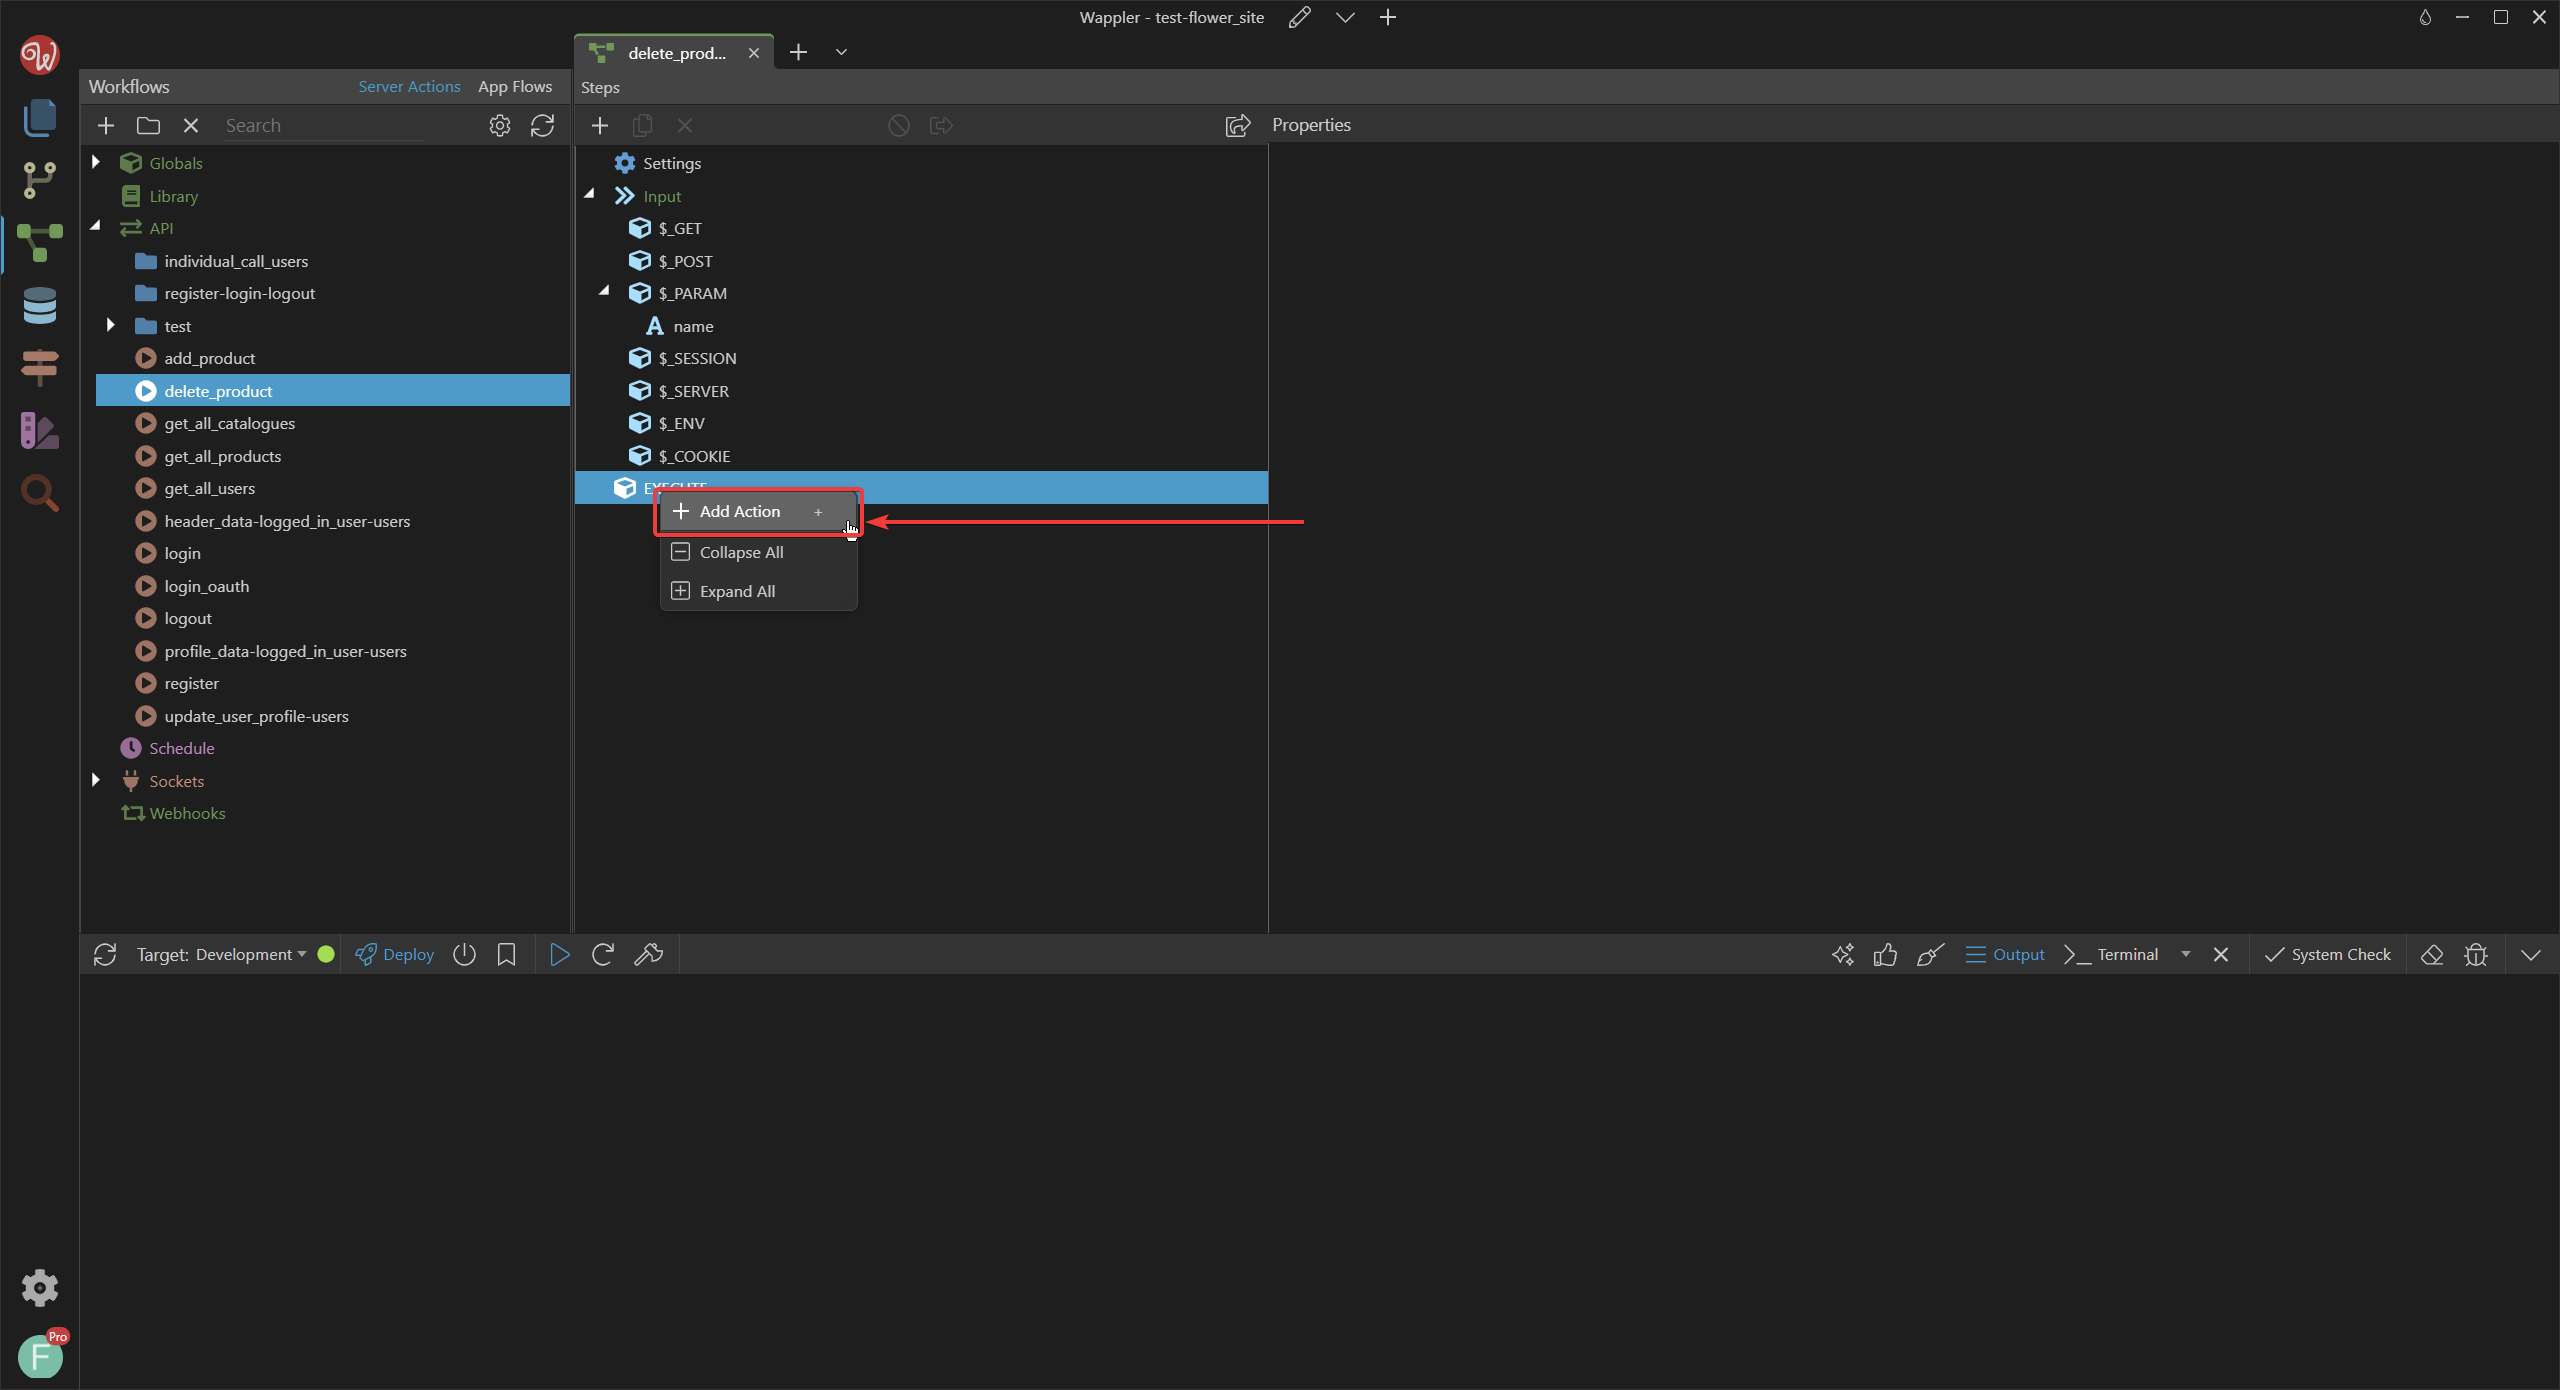
Right click on the EXECUTE node and select Add action.
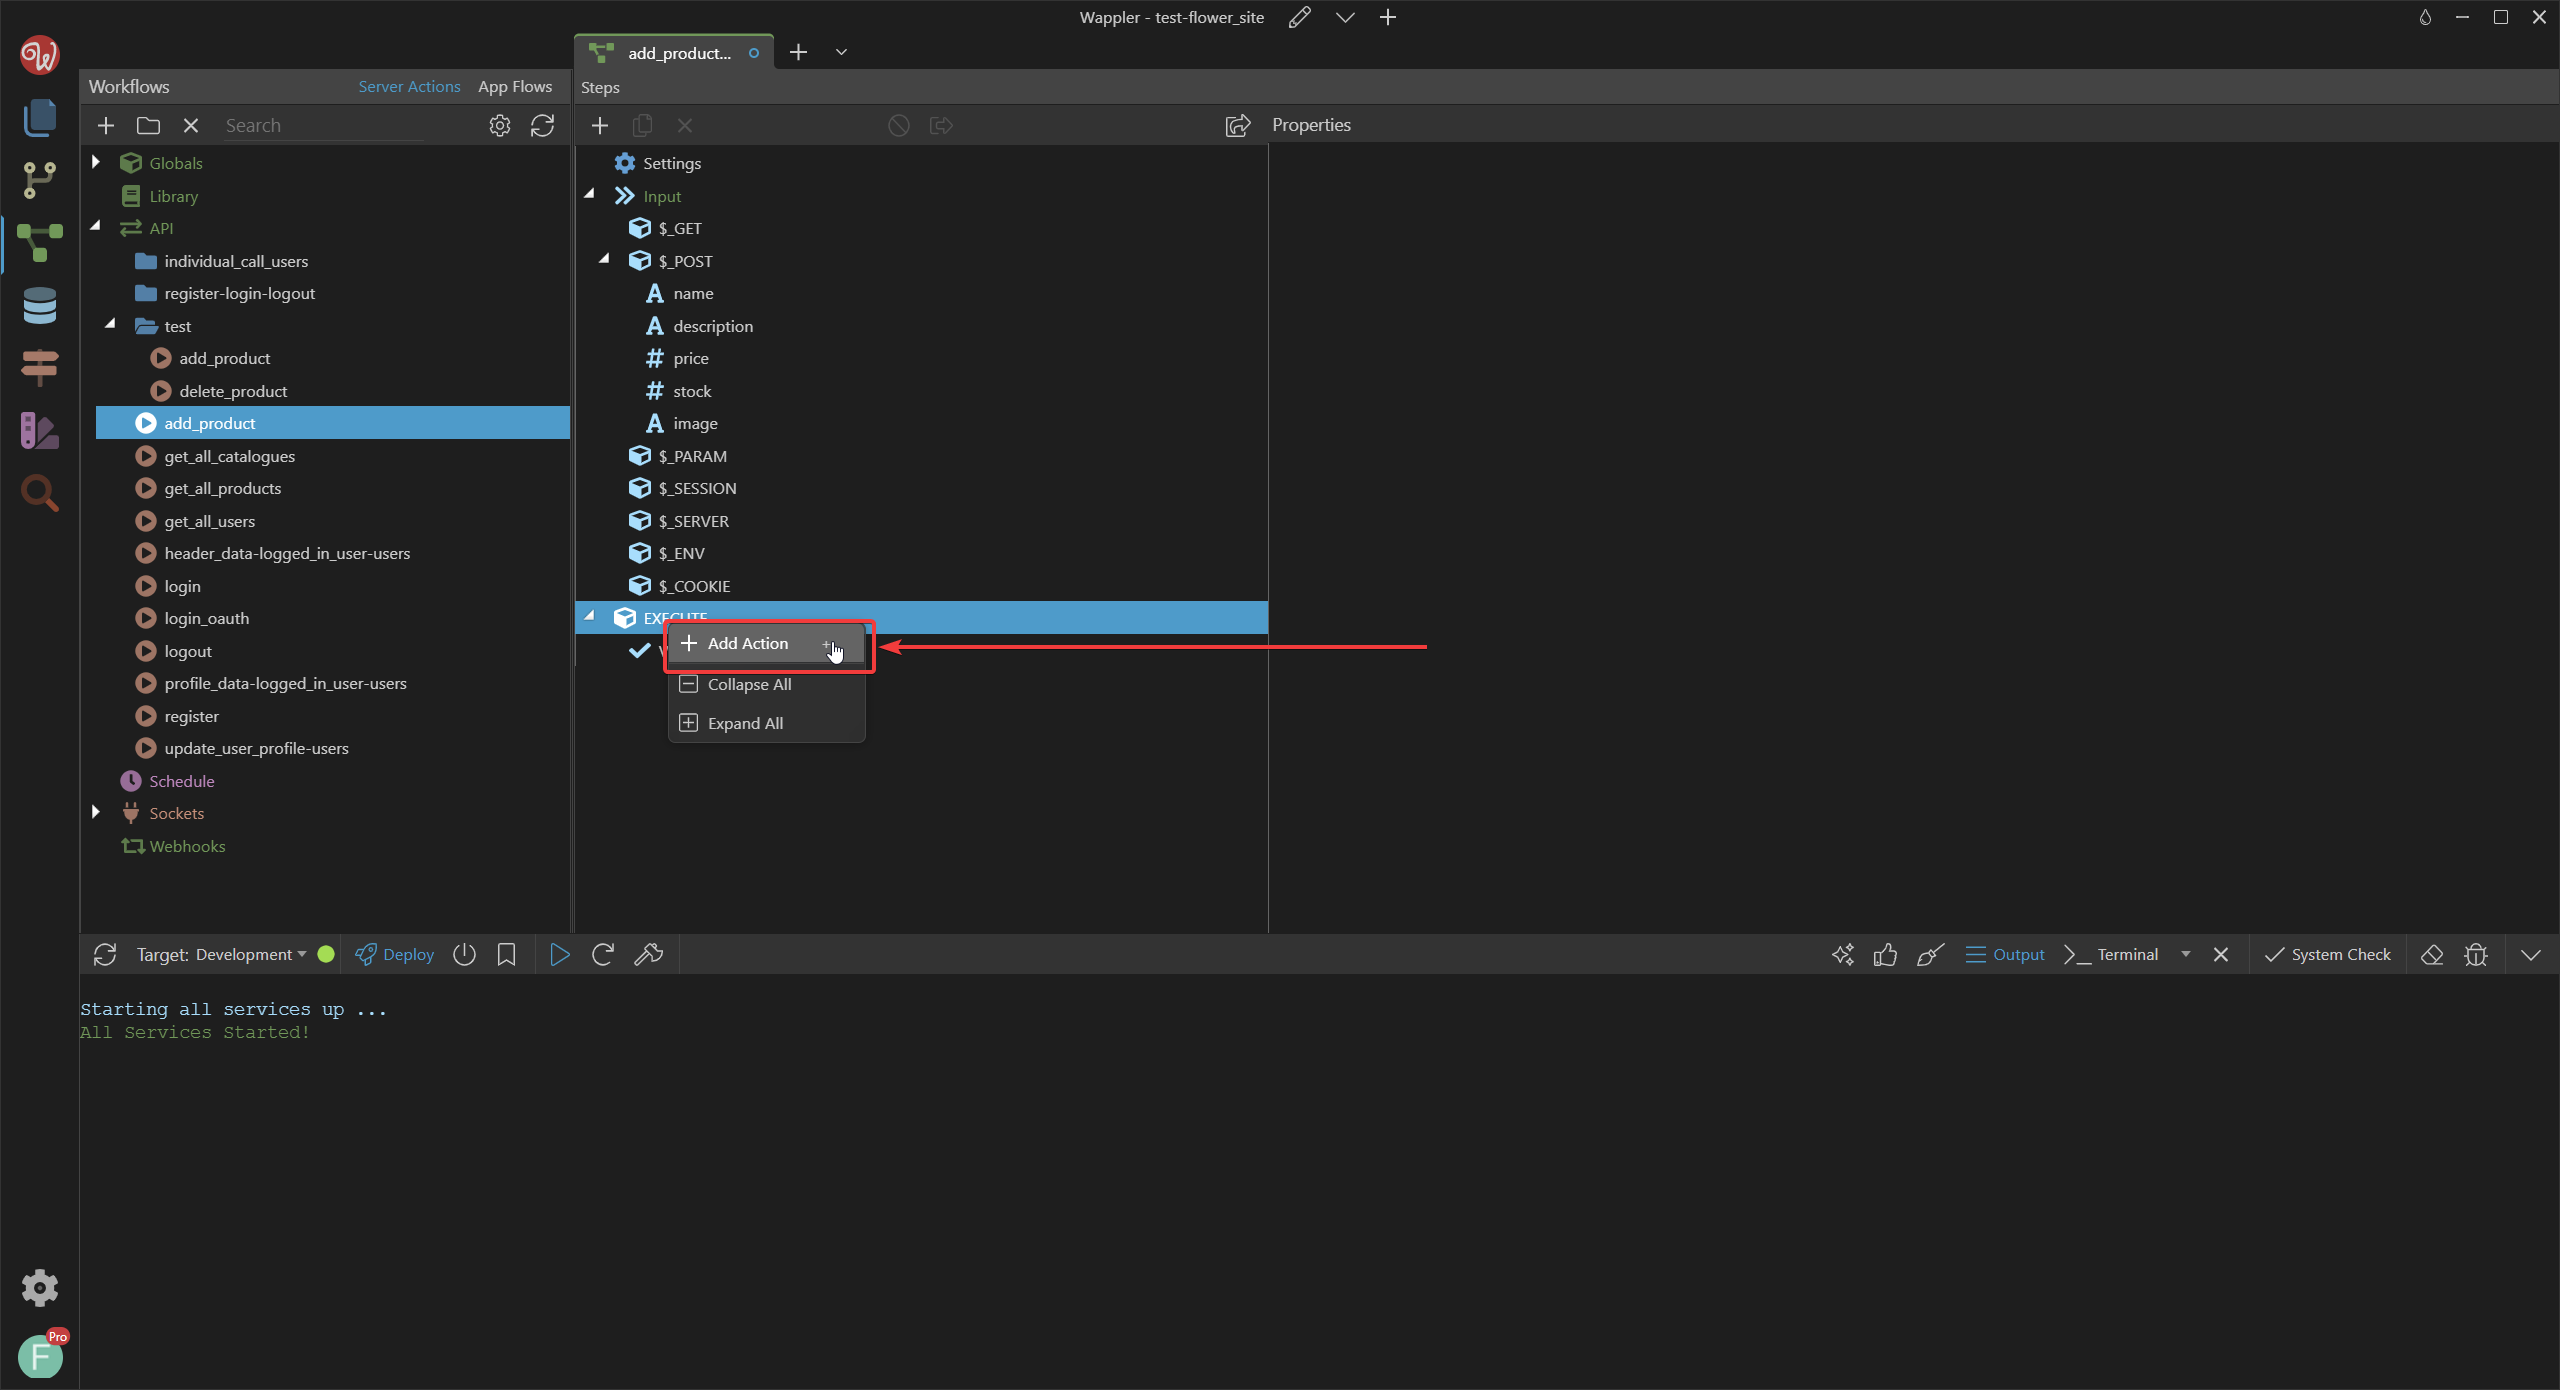
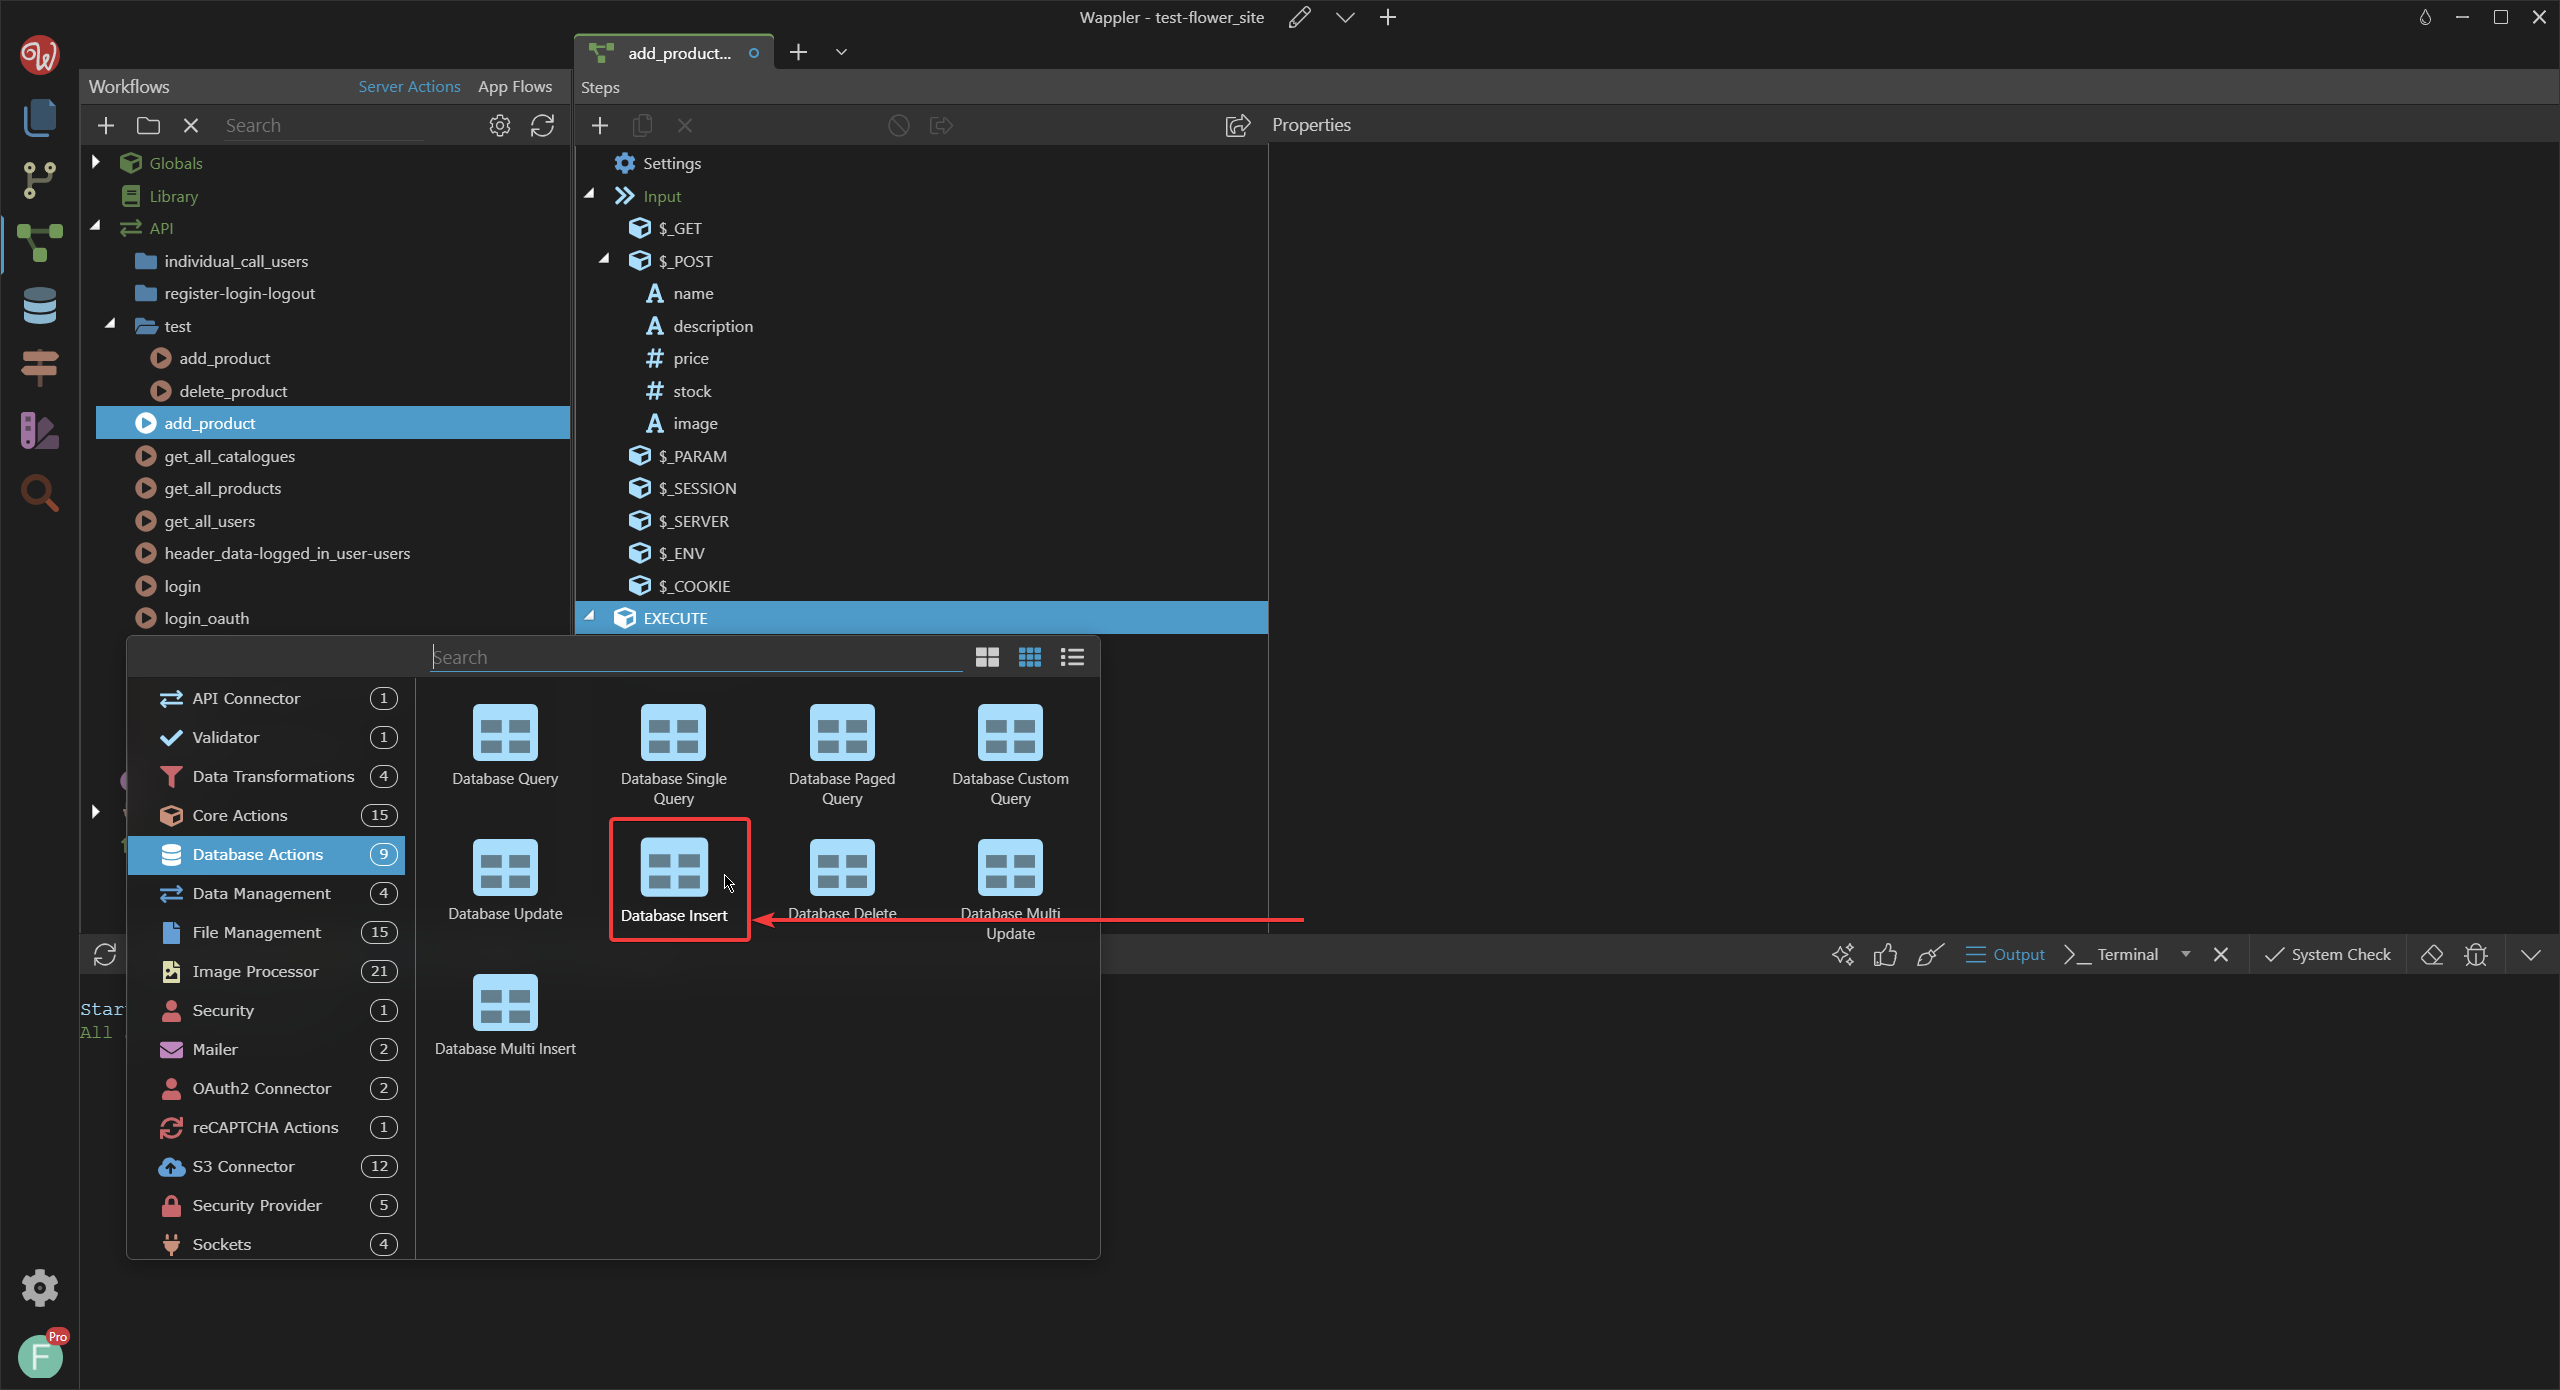
Search for Database Insert
Make sure that the validate step is before insertion, to change them drag with left click before / after.
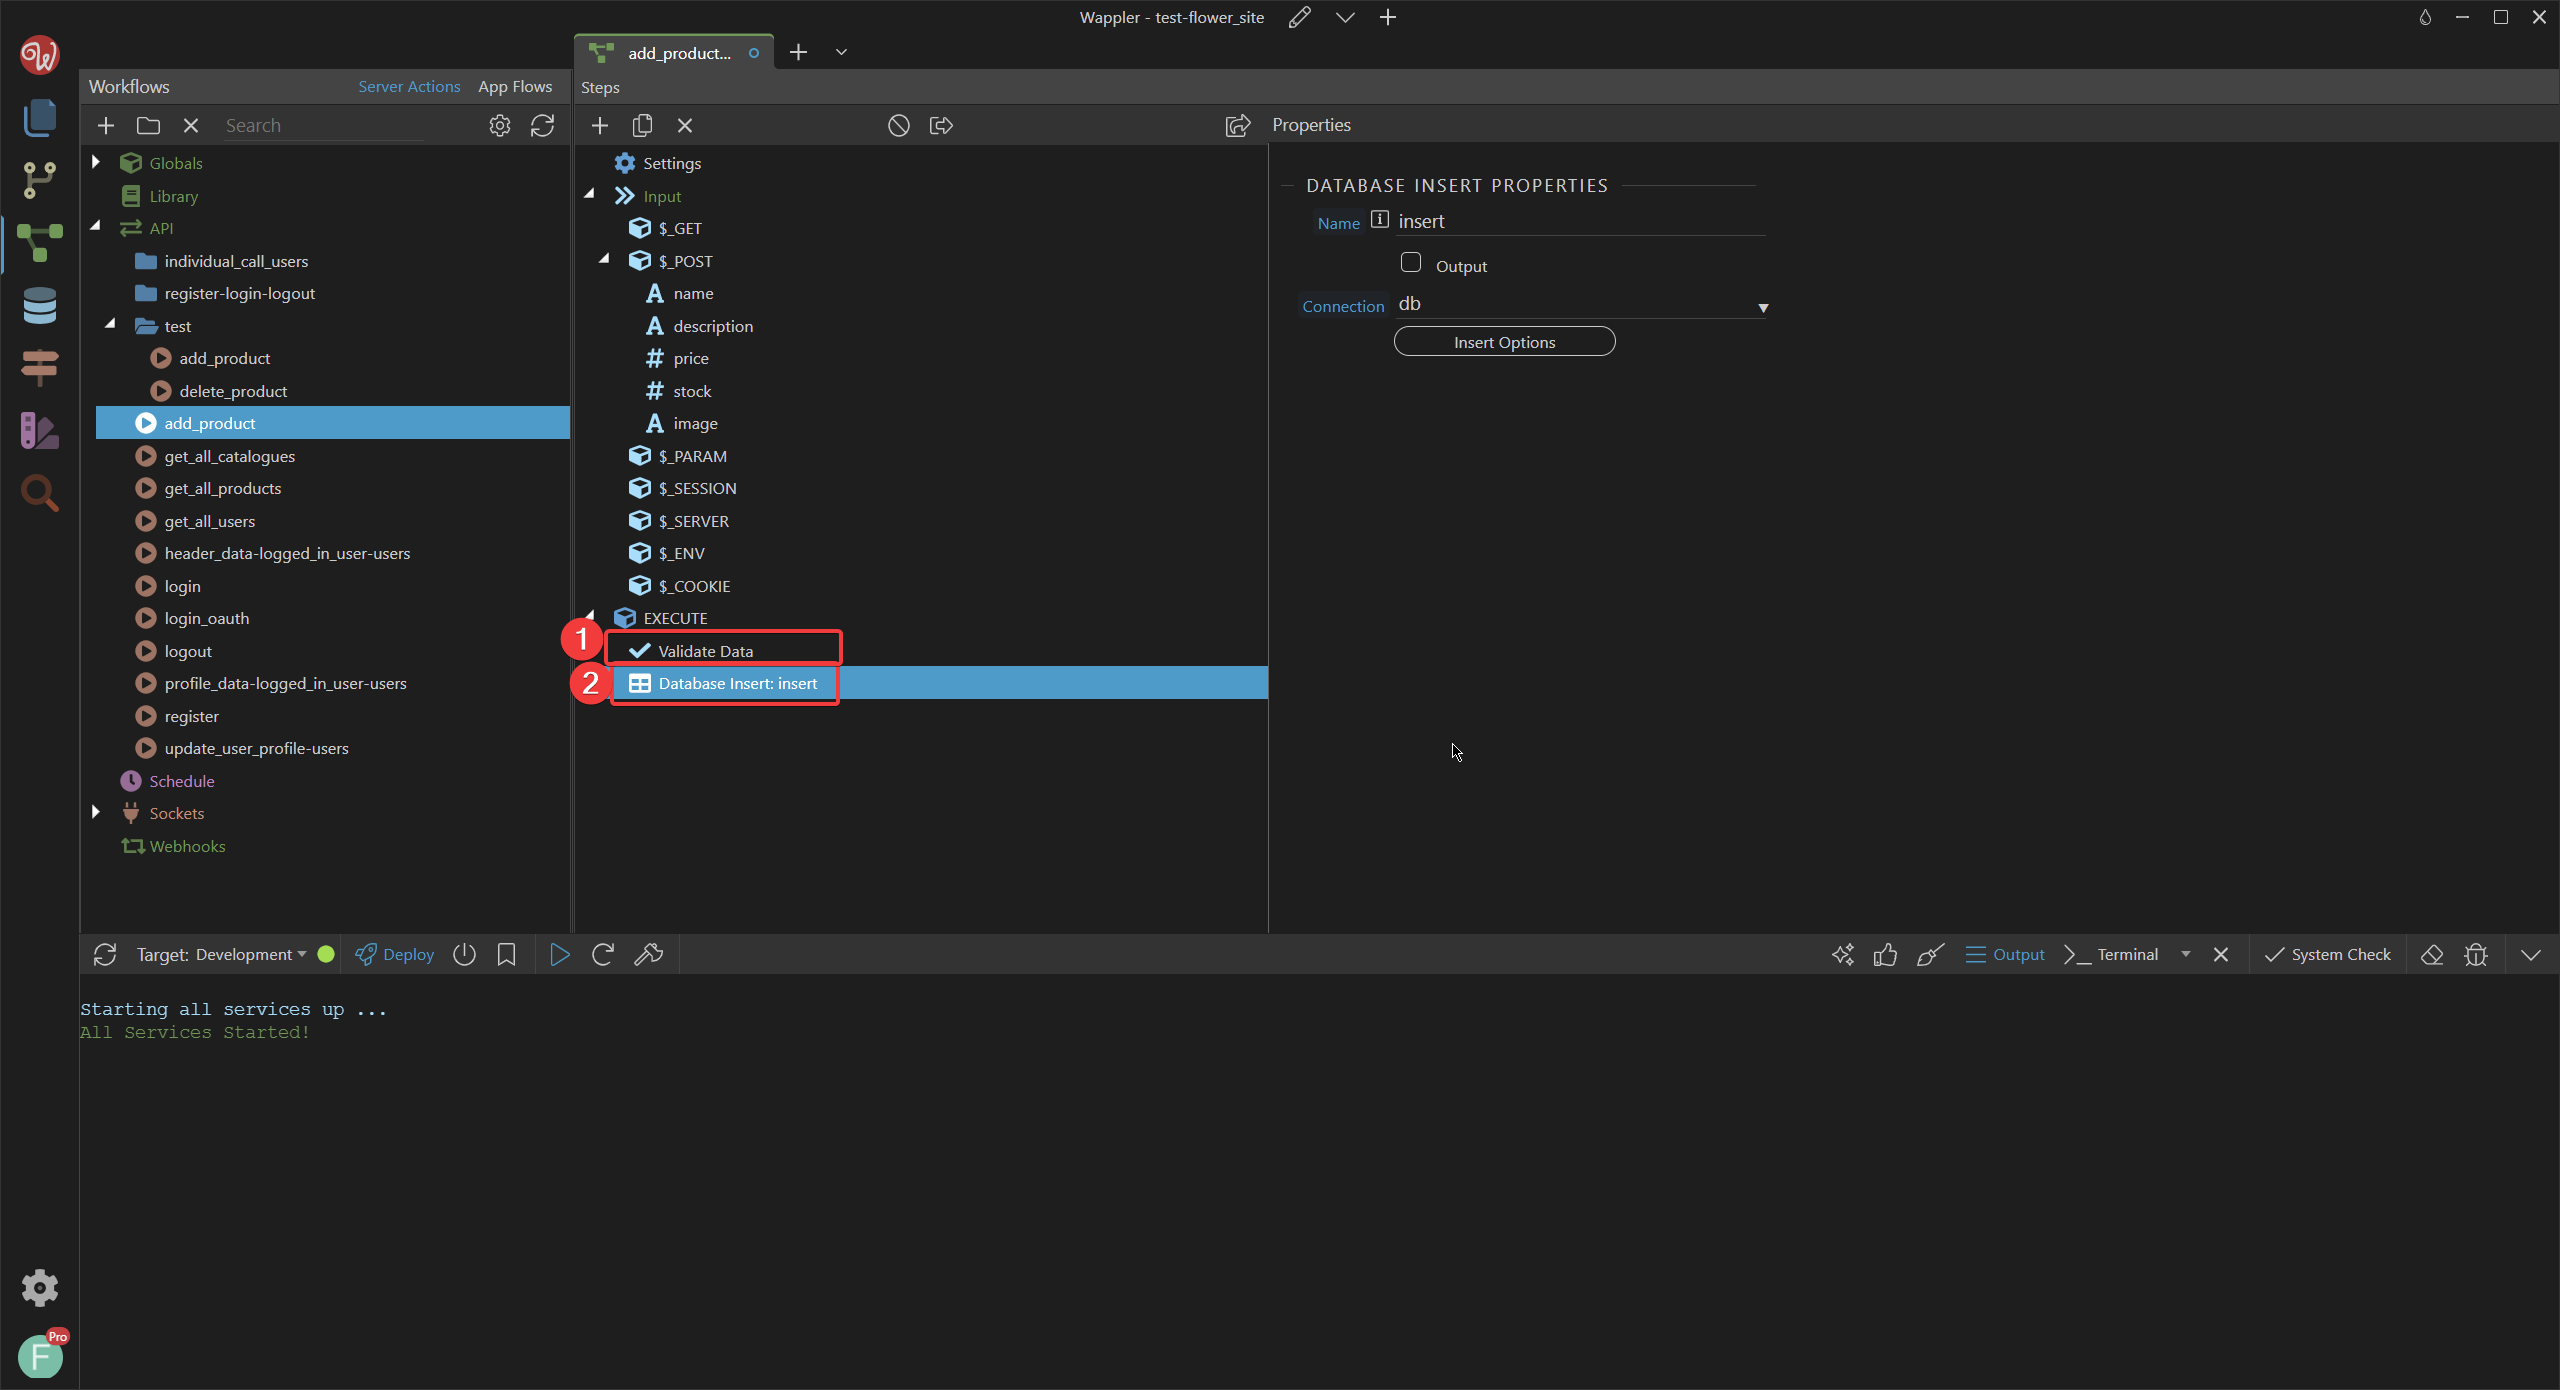
Click on Insert Options then select the correct table to insert into products, then click Ok.
Awsome, now that we have an endpoint lets test it.
Testing insert endpoint (VS Code)
Let's create a new file since we are testing a new endpoint (not necessary but I organize my tests this way)

I name it test-db_actions.js but you can name it different.

Add this code
const { expect } = require('chai');
const request = require('supertest');

const url = 'http://localhost:8100'
const req = request(url)

describe('POST /api/add_product', function() {
    it('adds a product named Marieke to the product table', function(done) {
      req
        .post('/api/add_product')
        .expect(200)
        .end(function (err, res) {
          if (err) throw err;

          return done();
        });
    })
})
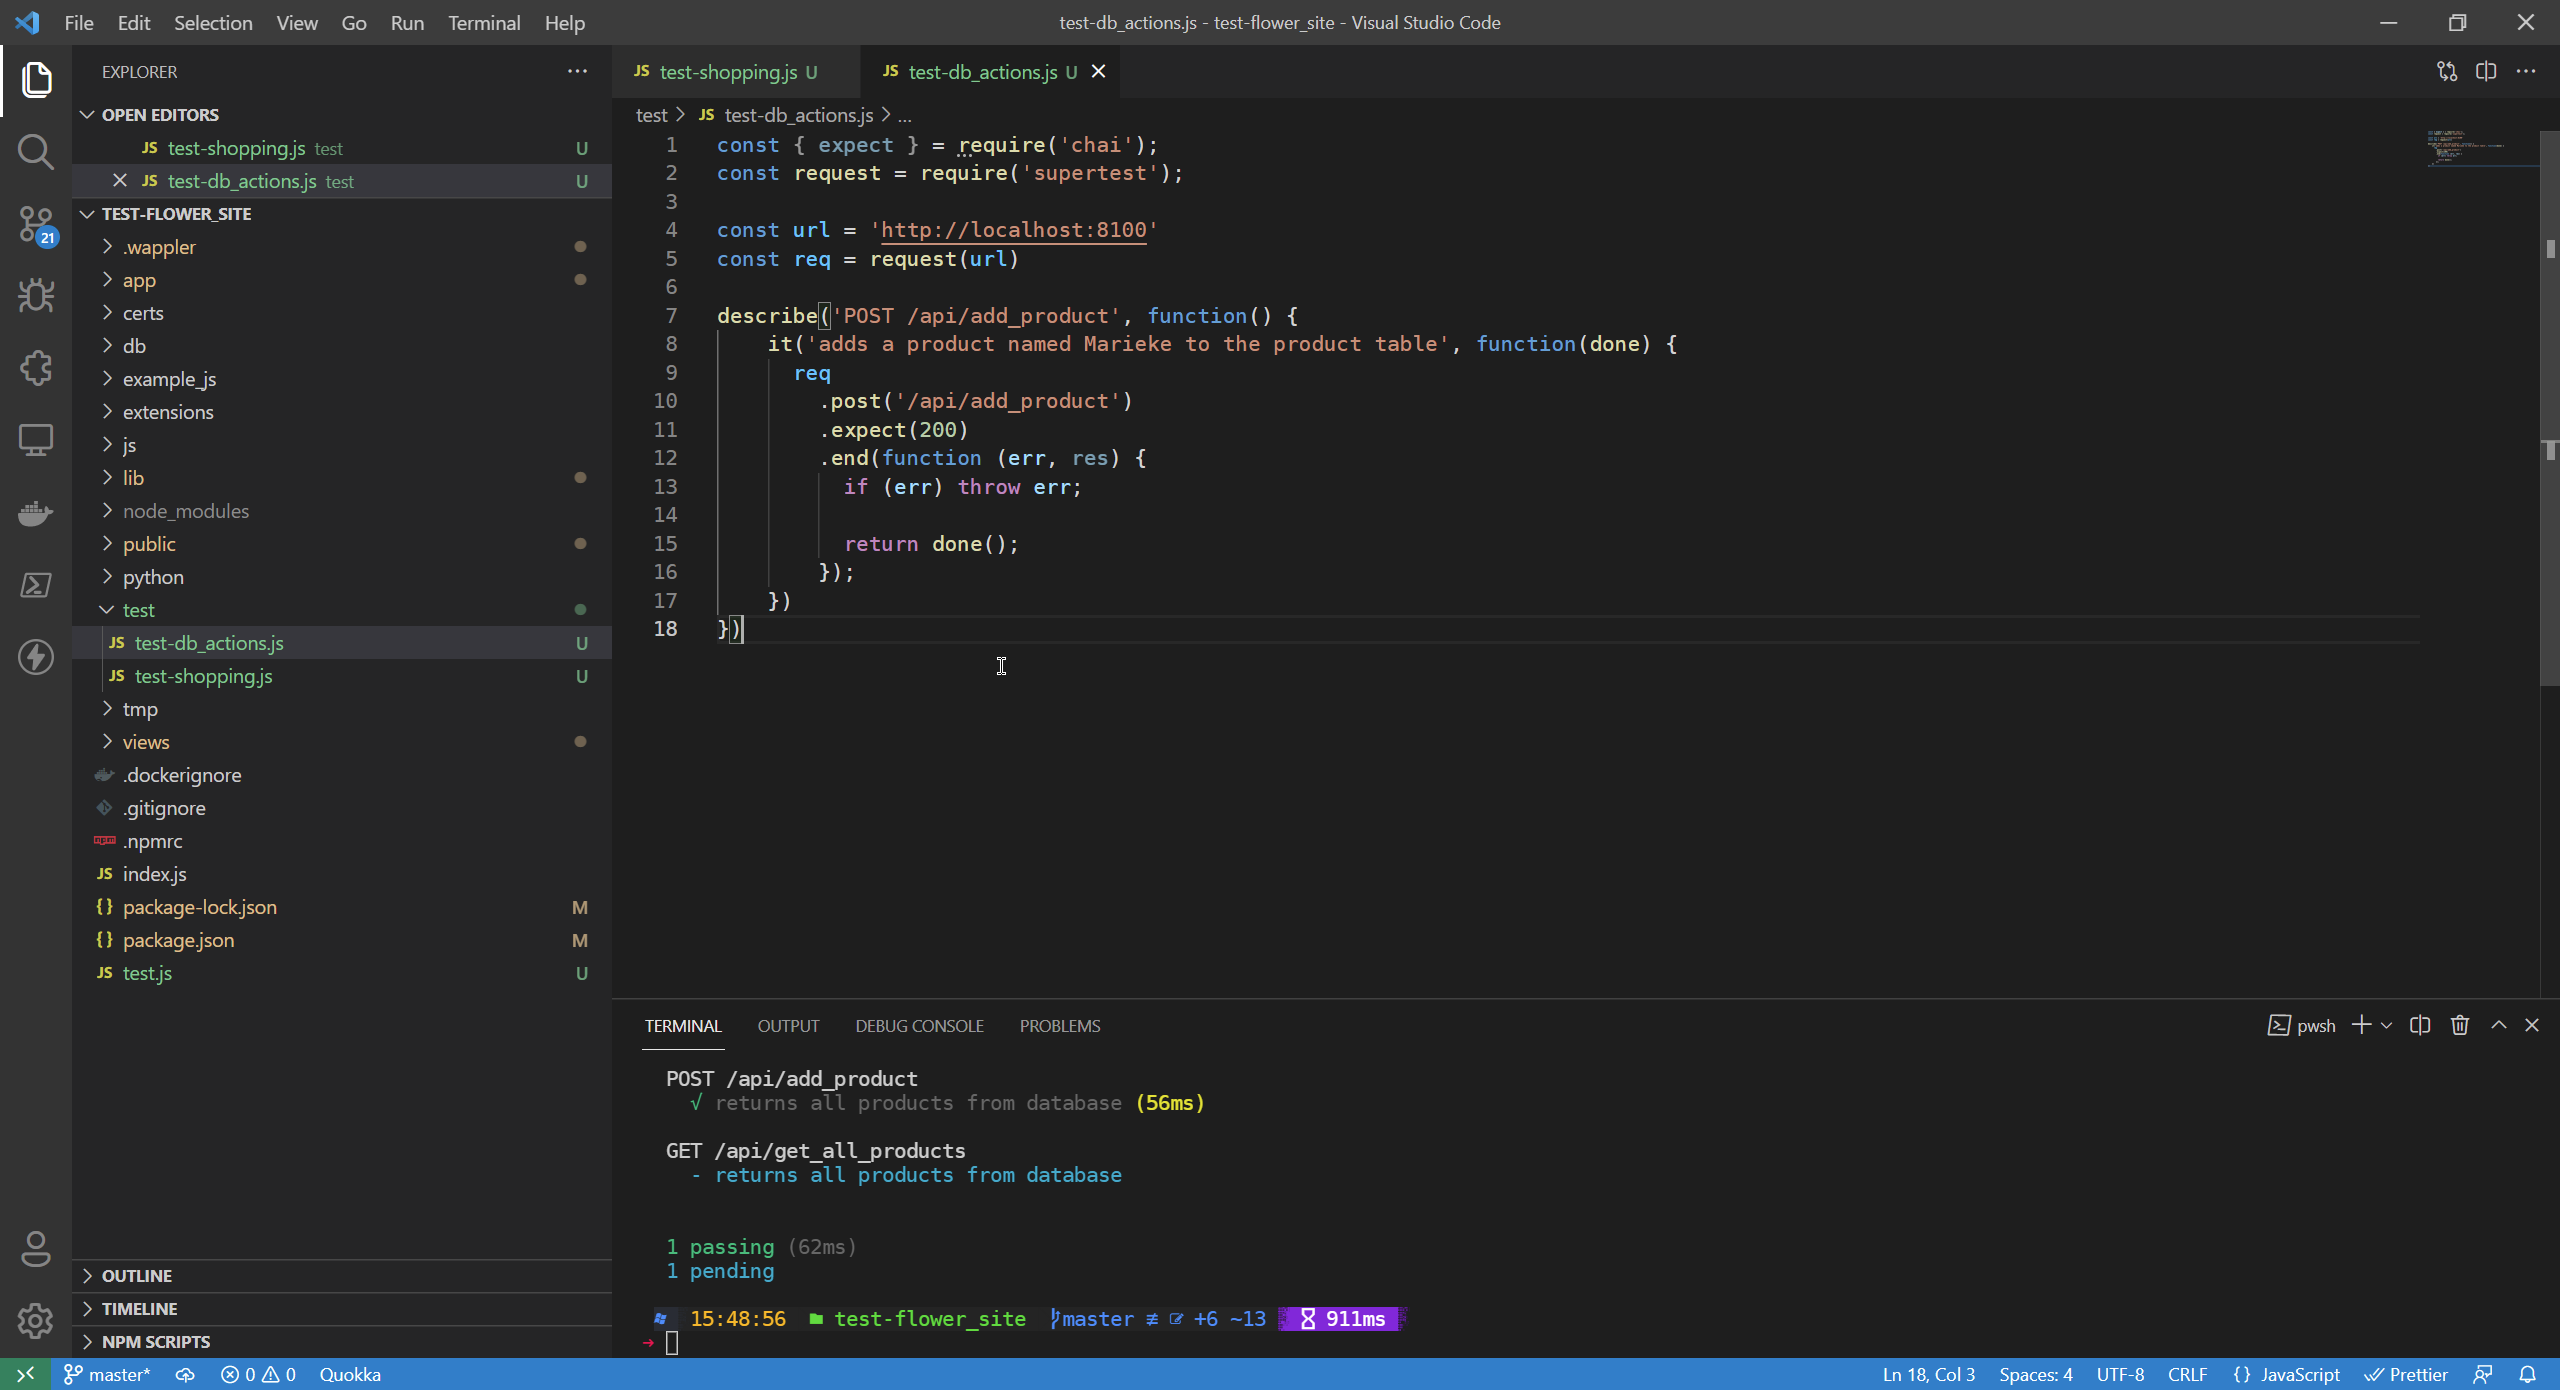
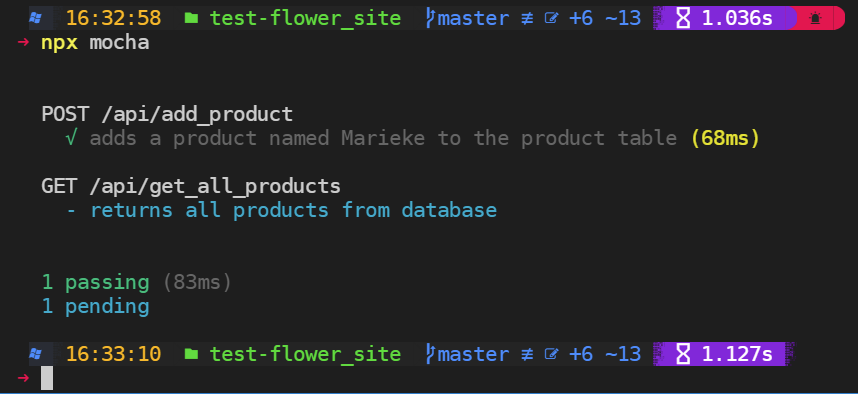
Now if you run npx mocha you will get:
Of course since we are not expecting anything, it says it was successful even though we did not add any data into the request (the actual product).
So, let's add some data:
const { expect } = require('chai');
const request = require('supertest');

const url = 'http://localhost:8100'
const req = request(url)

describe('POST /api/add_product', function() {
    const data = {
        name: "Marieke",
        description: "",
        price: "4",
        stock: "10",
        image: "Na_Marieke_5556.jpg"
    }

    it('adds a product named Marieke to the product table', function(done) {
      req
        .post('/api/add_product')
        .send(data)
        .expect(200)
        .end(function (err, res) {
          if (err) throw err;

          return done();
        });
    })
})

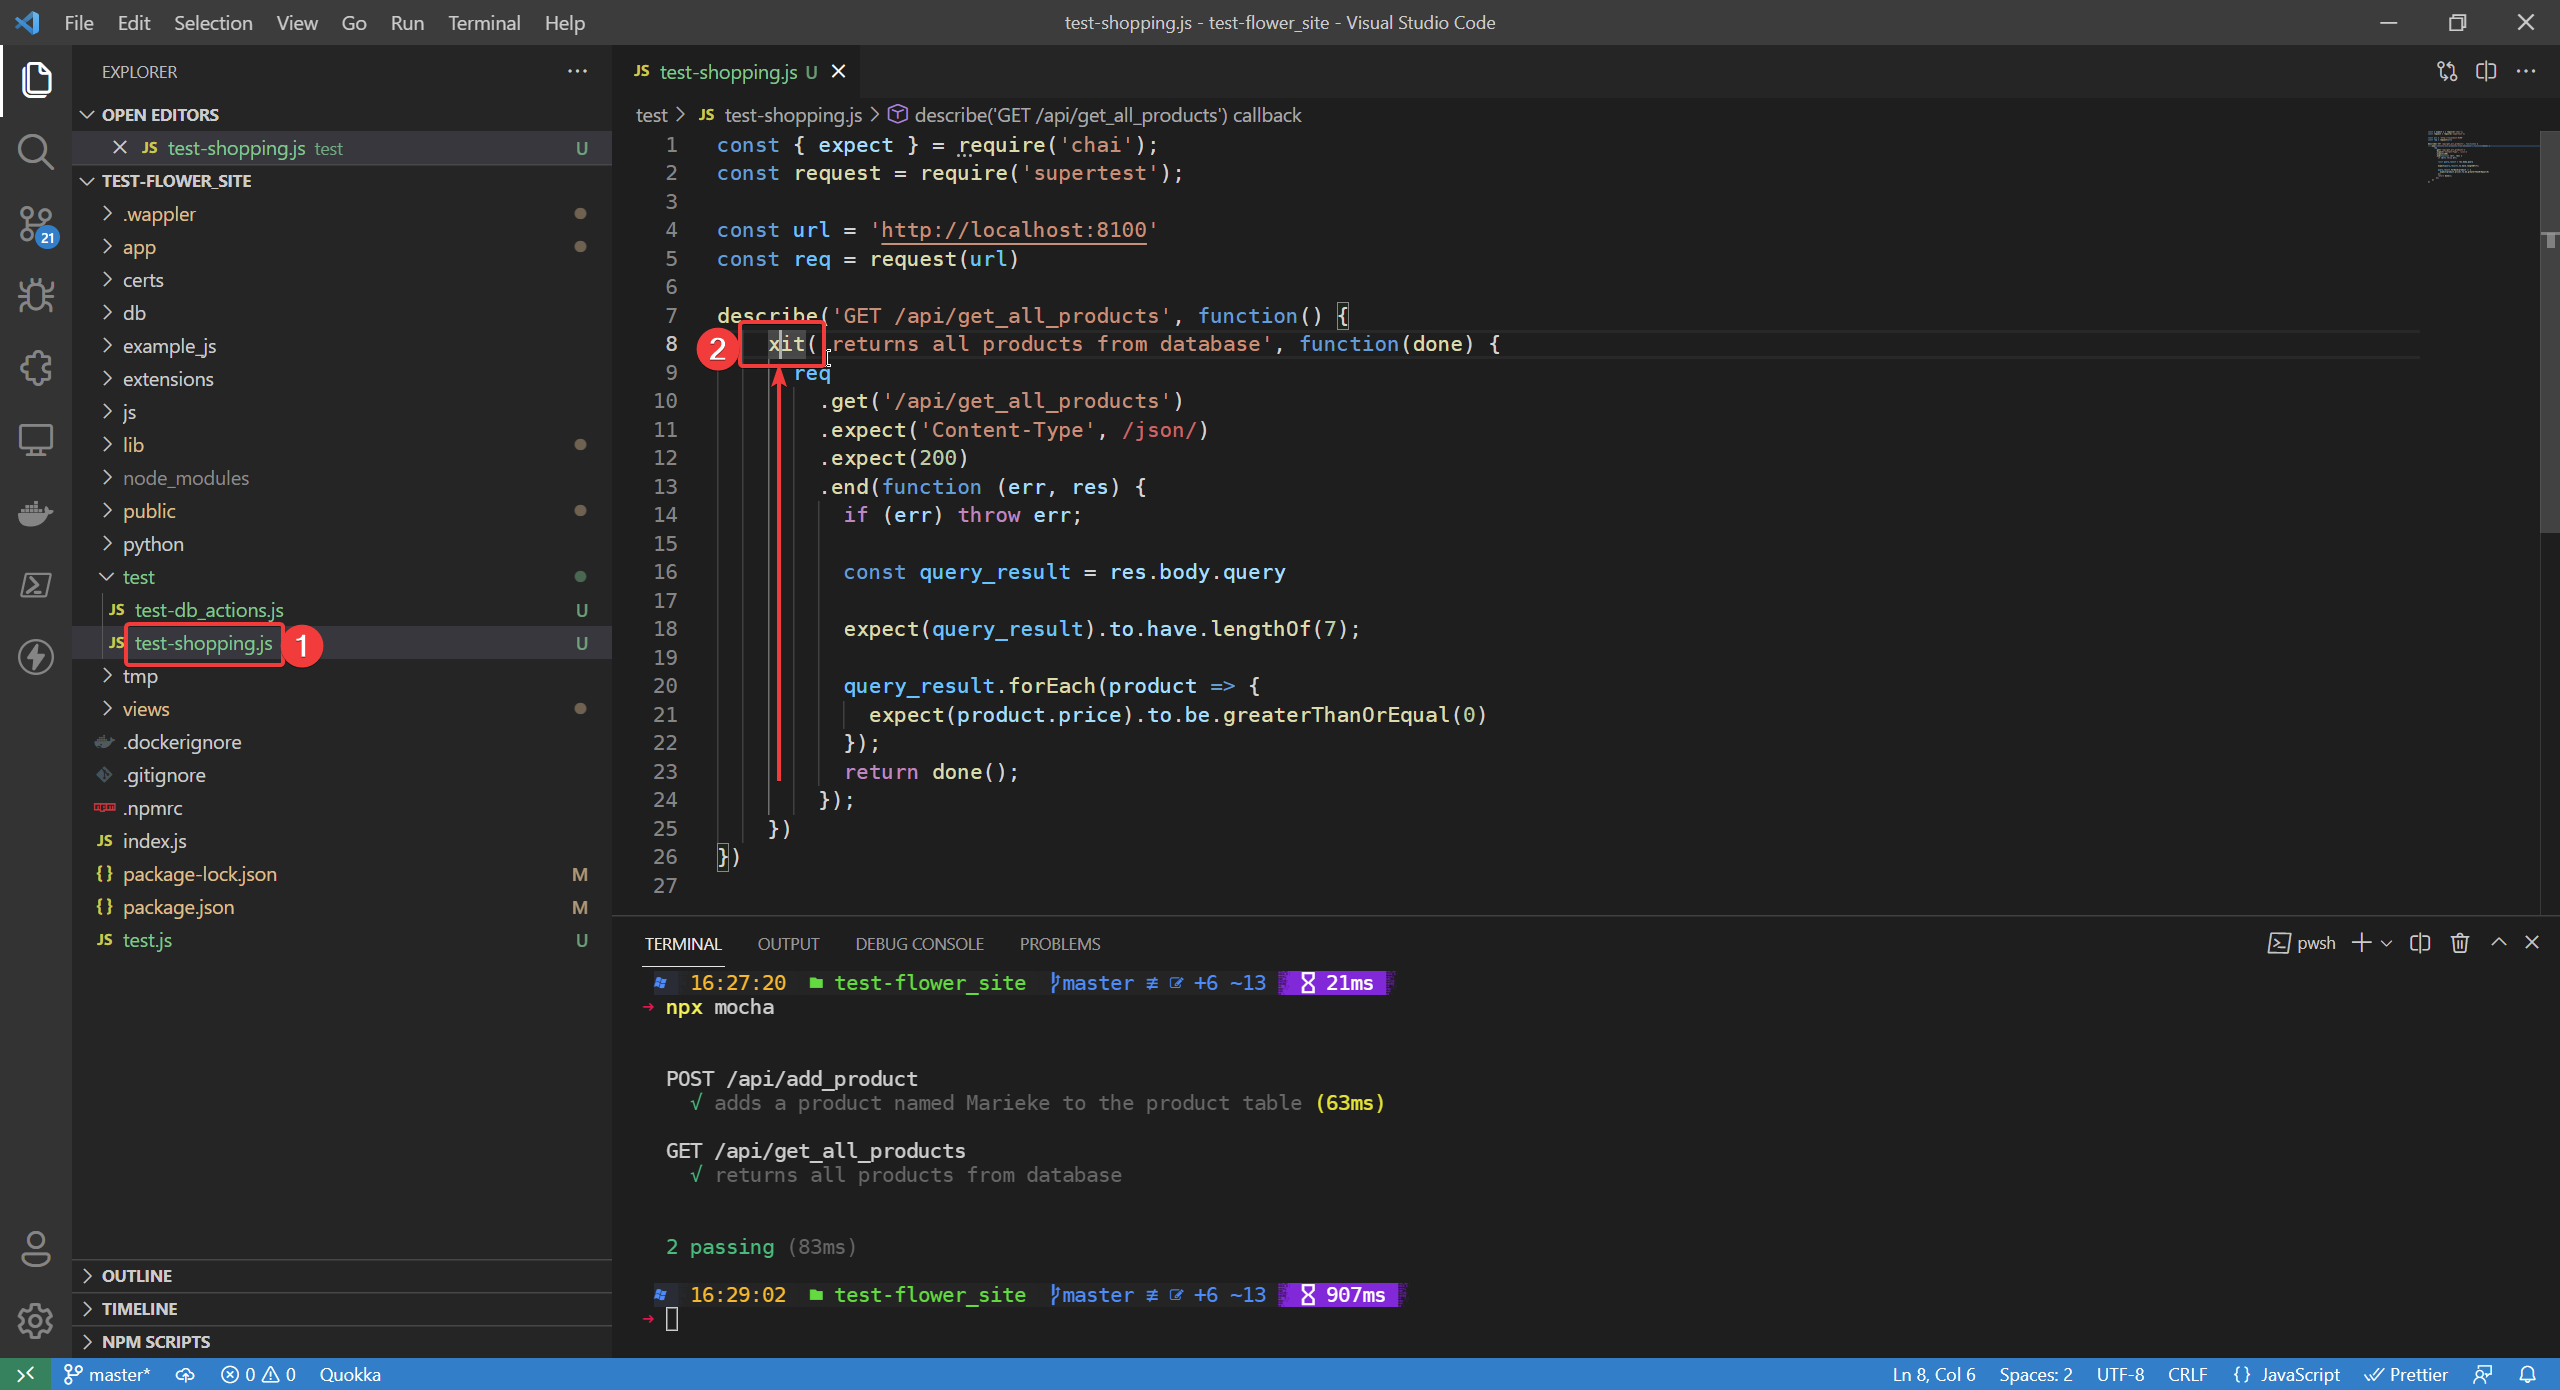
Now if you have been following the tutorial, we made an expectation in the previous test file that the total nr of product is 7, which will now change since we add a new product now. To make that not fail, you either comment it out or you can make that test skip. I will make it skip by chainging the it function to xit (as in cancel it).
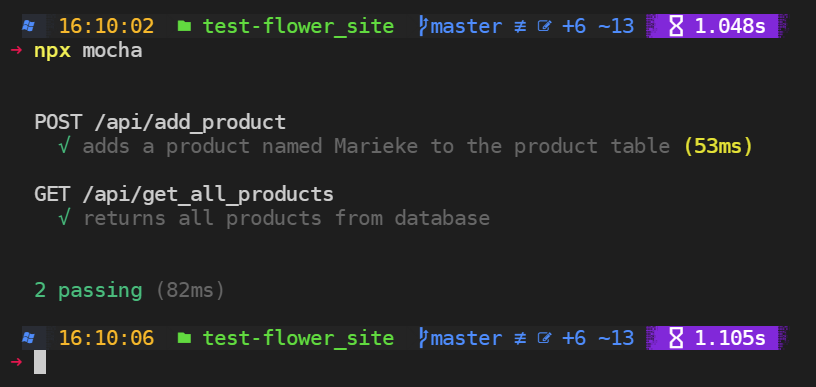
Running this the first time should include the product in the database:
Now we have a way to add data in our tests to our database, next step is making a route for it to follow RESTful API notation.
RESTful API insertion
Let's go to the Routes tab in Wappler and click on the thunderbolt icon to create a new Server Connect.
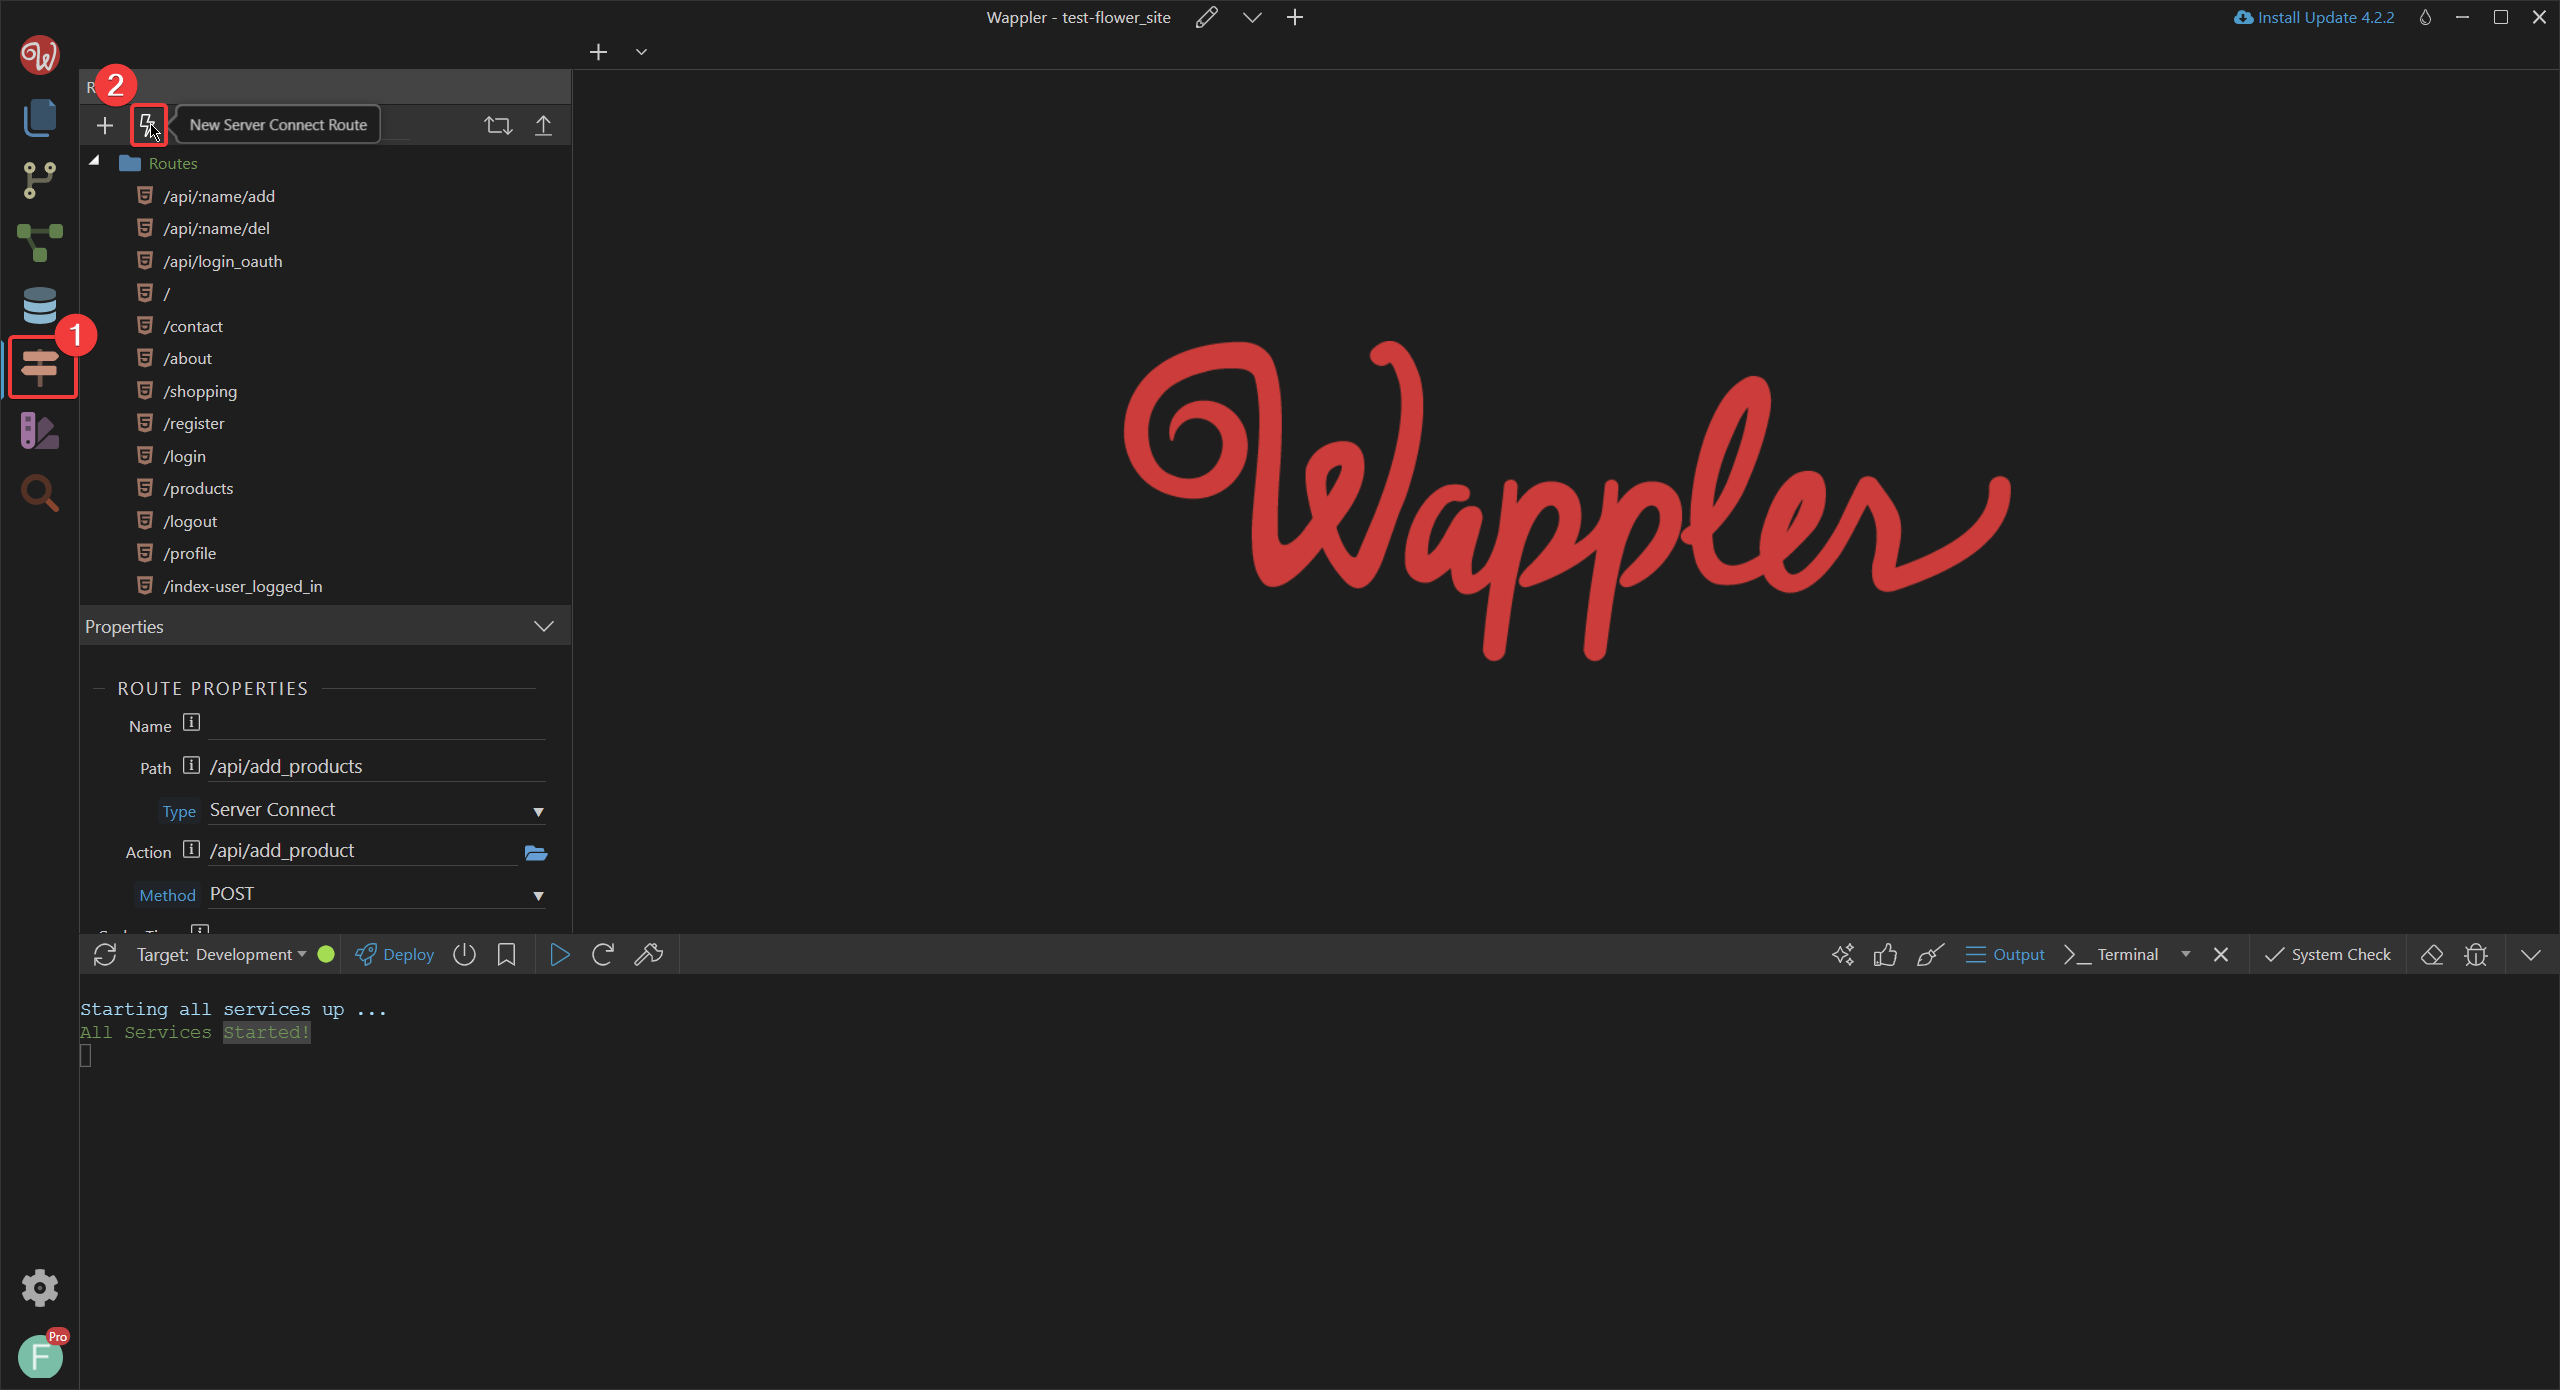
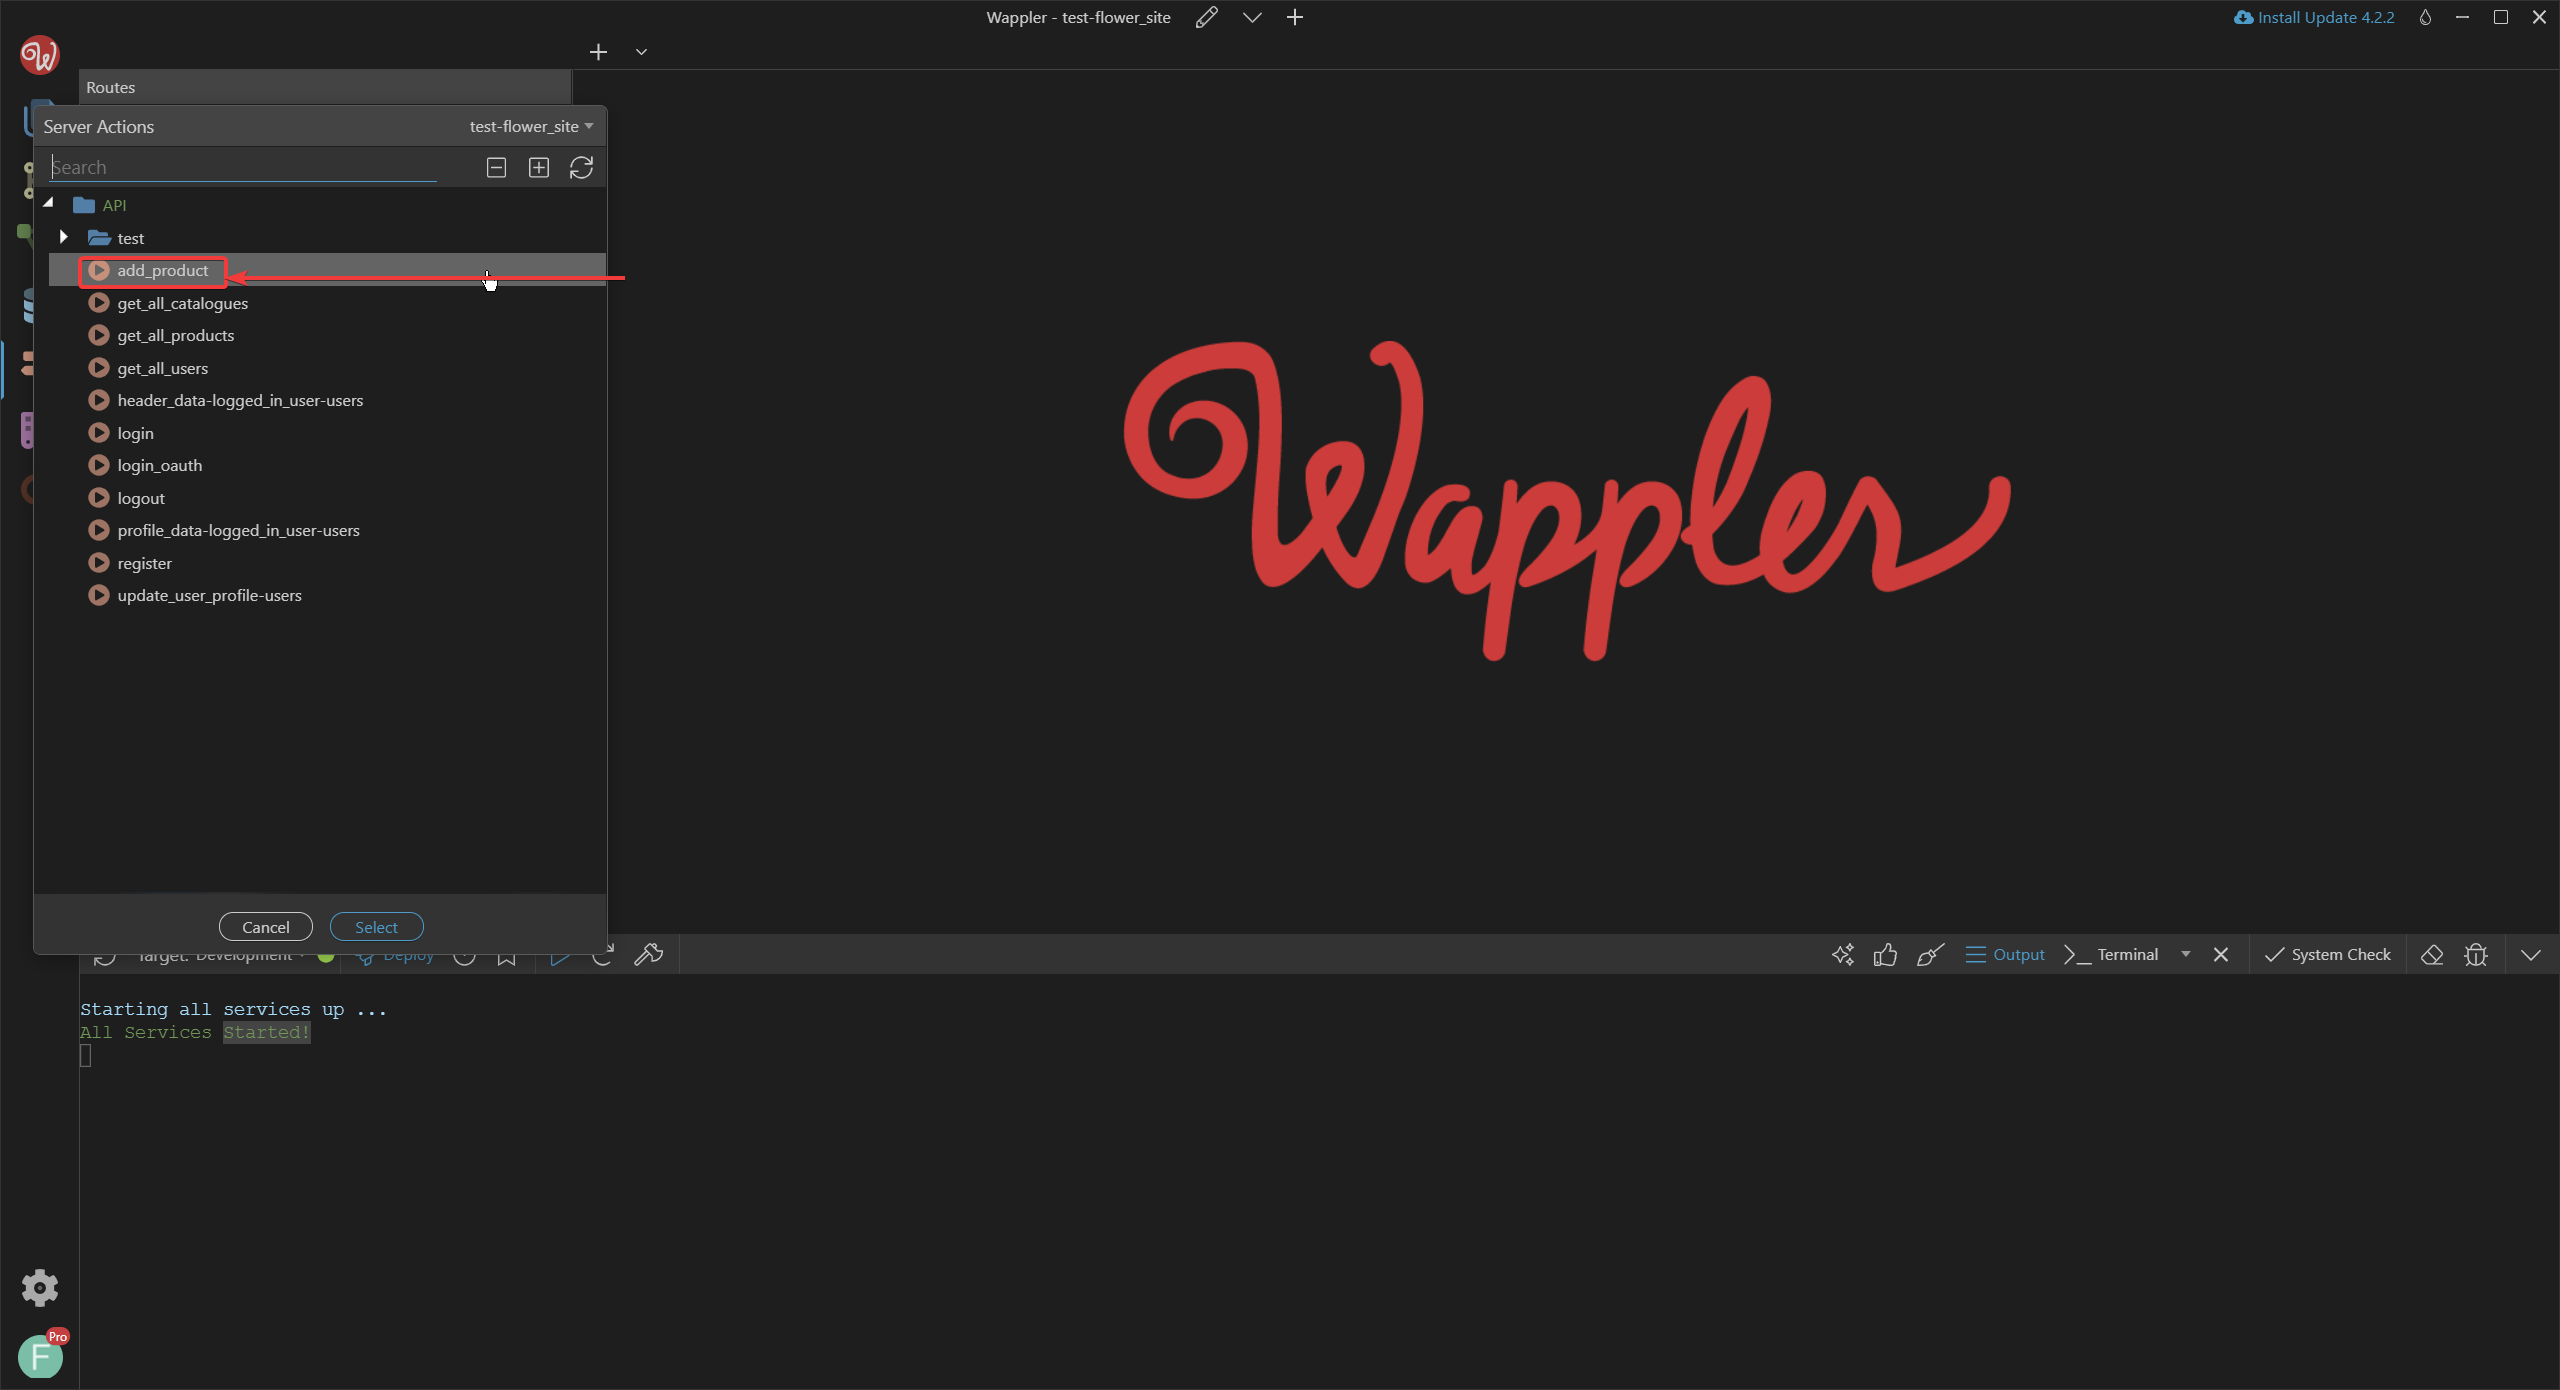
Choose from the dropdown the add_product action.
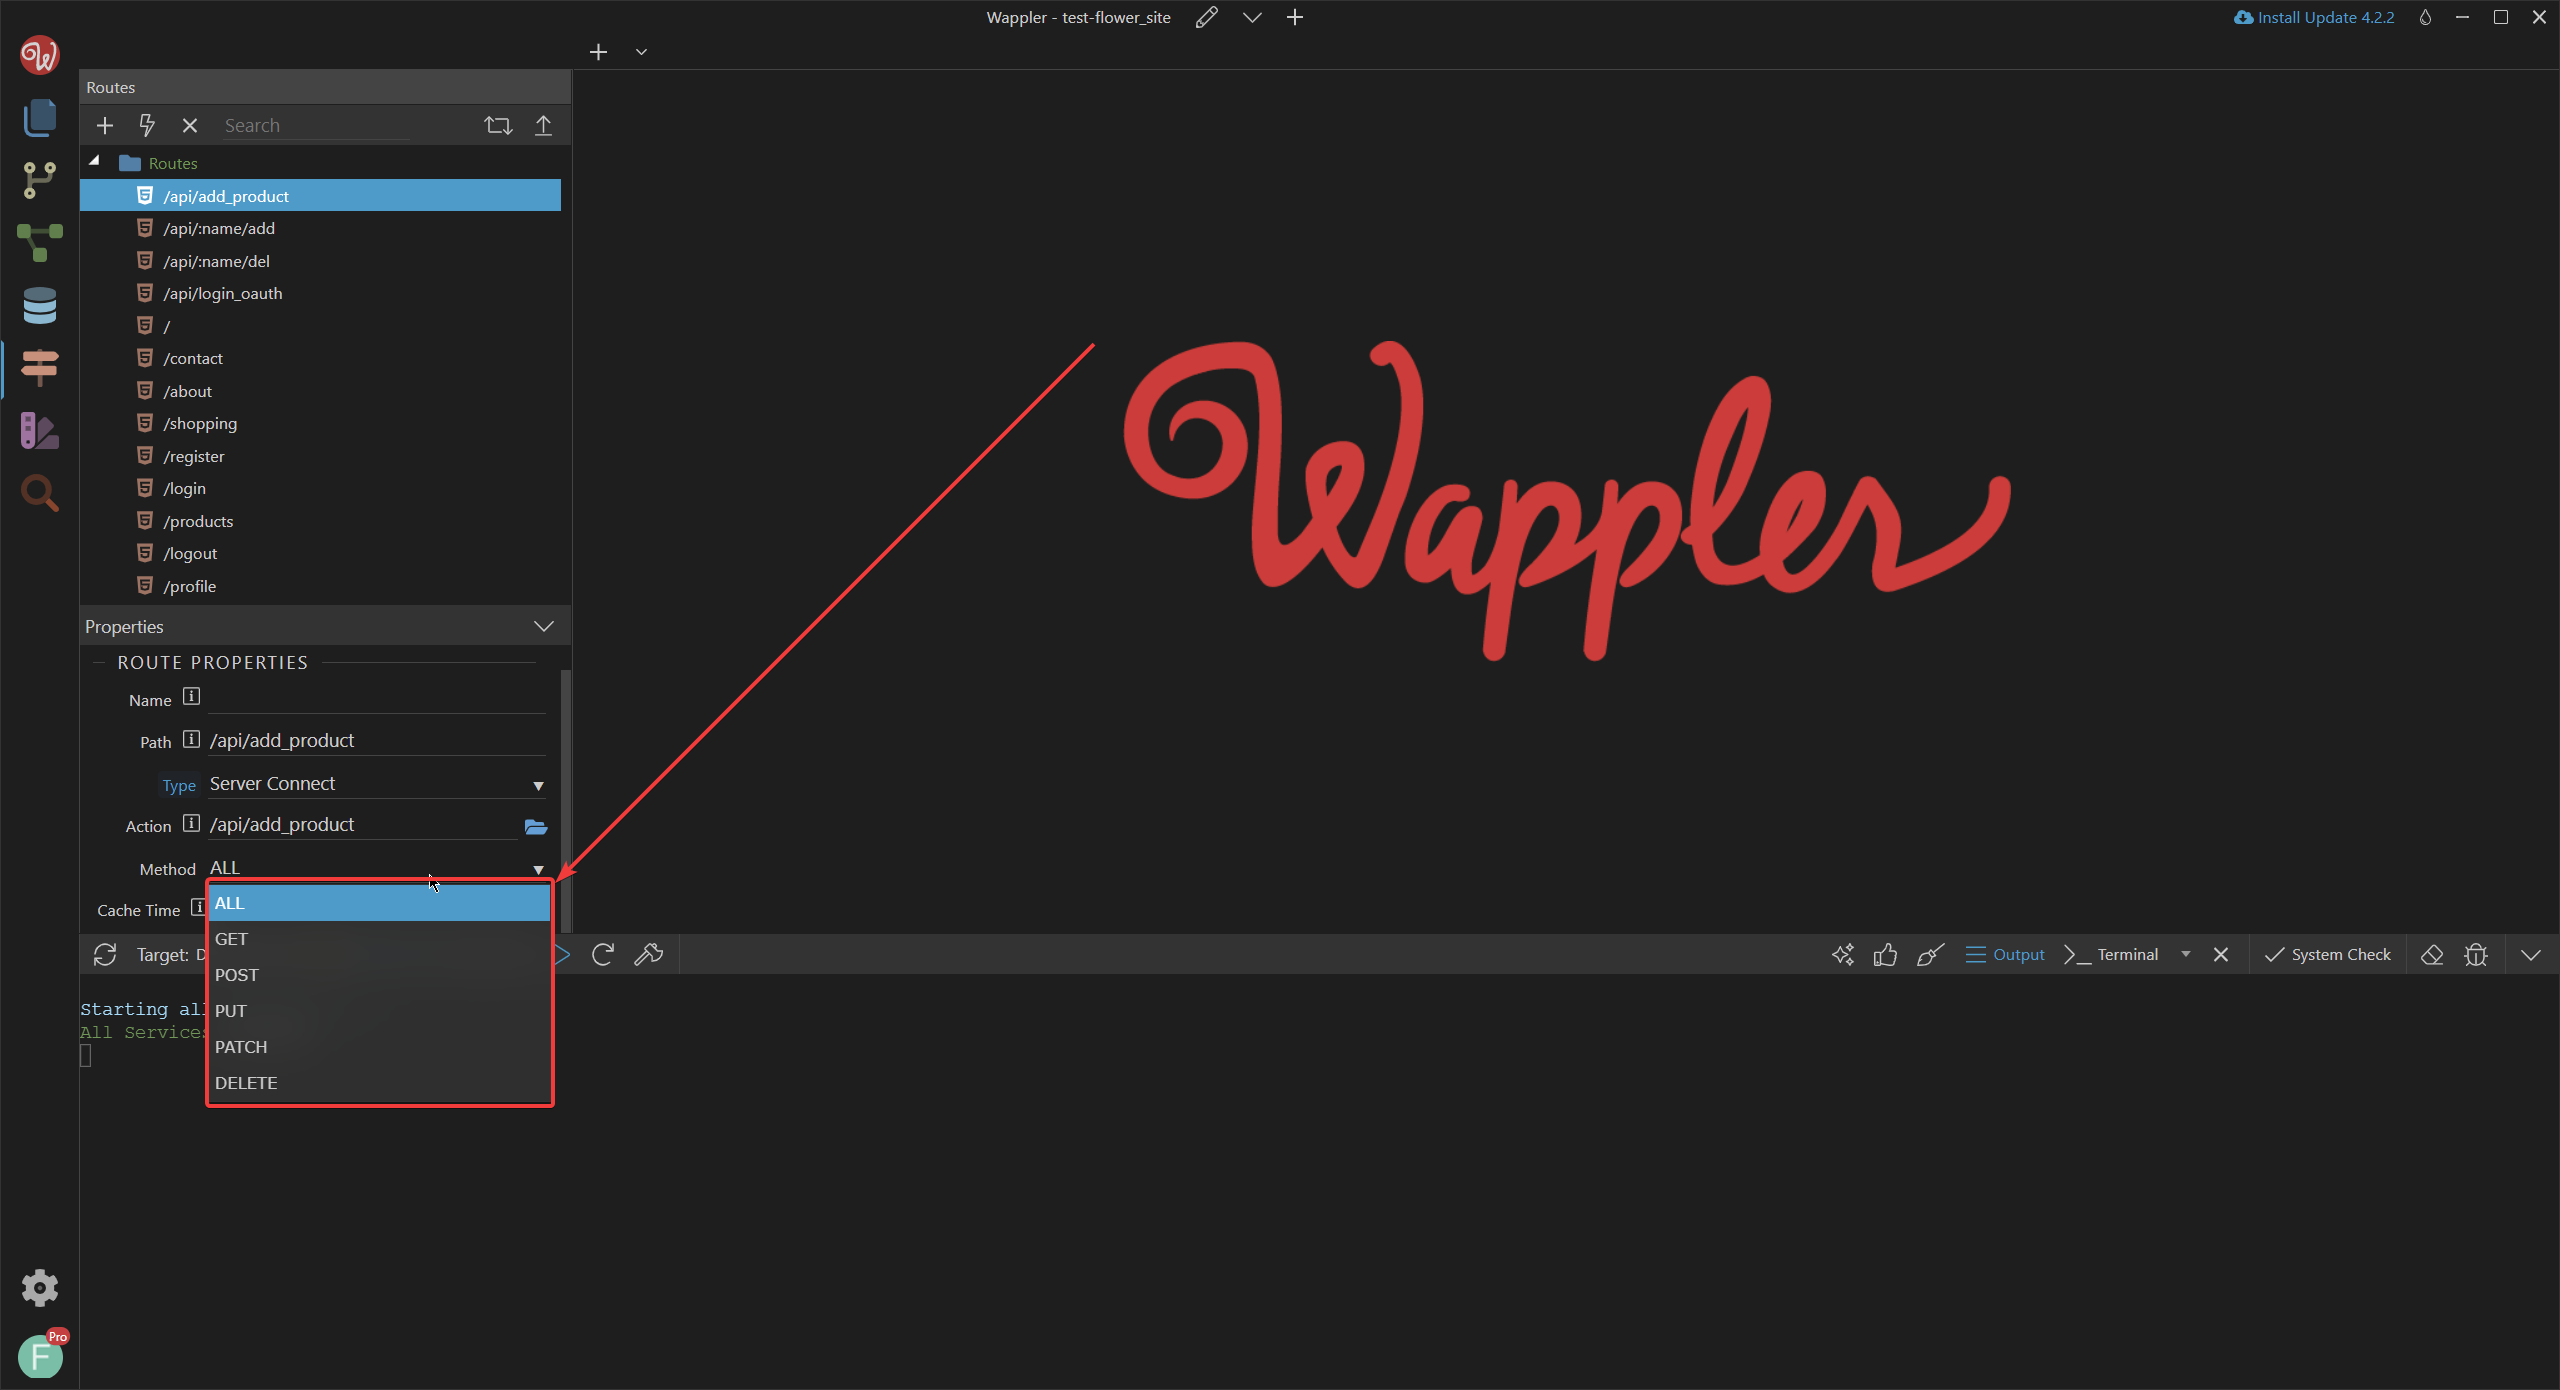
Now we should keep in mind how we apply REST framework. We have the option to choose what method call to be valid.
I highly recommend reading up on how to design a rest api with HTTP methods GET, POST, PUT, and DELETE.
But for our case here is the gist of how it should be used (I am prepending /api/ to separate pages from resource endpoints, otherwise how could wappler know if I navigate to products if it should load a page (HTML, CSS, JS, etc) or send the restful data all of the products (JSON data)):
| HTTP method | what it should do | endpoint example |
|---|---|---|
| GET | should query the database for one or more products | /api/products |
| POST | should CREATE new products | /api/products |
| PUT | should UPDATE an already existing product | /api/product/{name} or {id} |
| DELETE | should delete one or more product(s) | /api/product{name} or {id} |
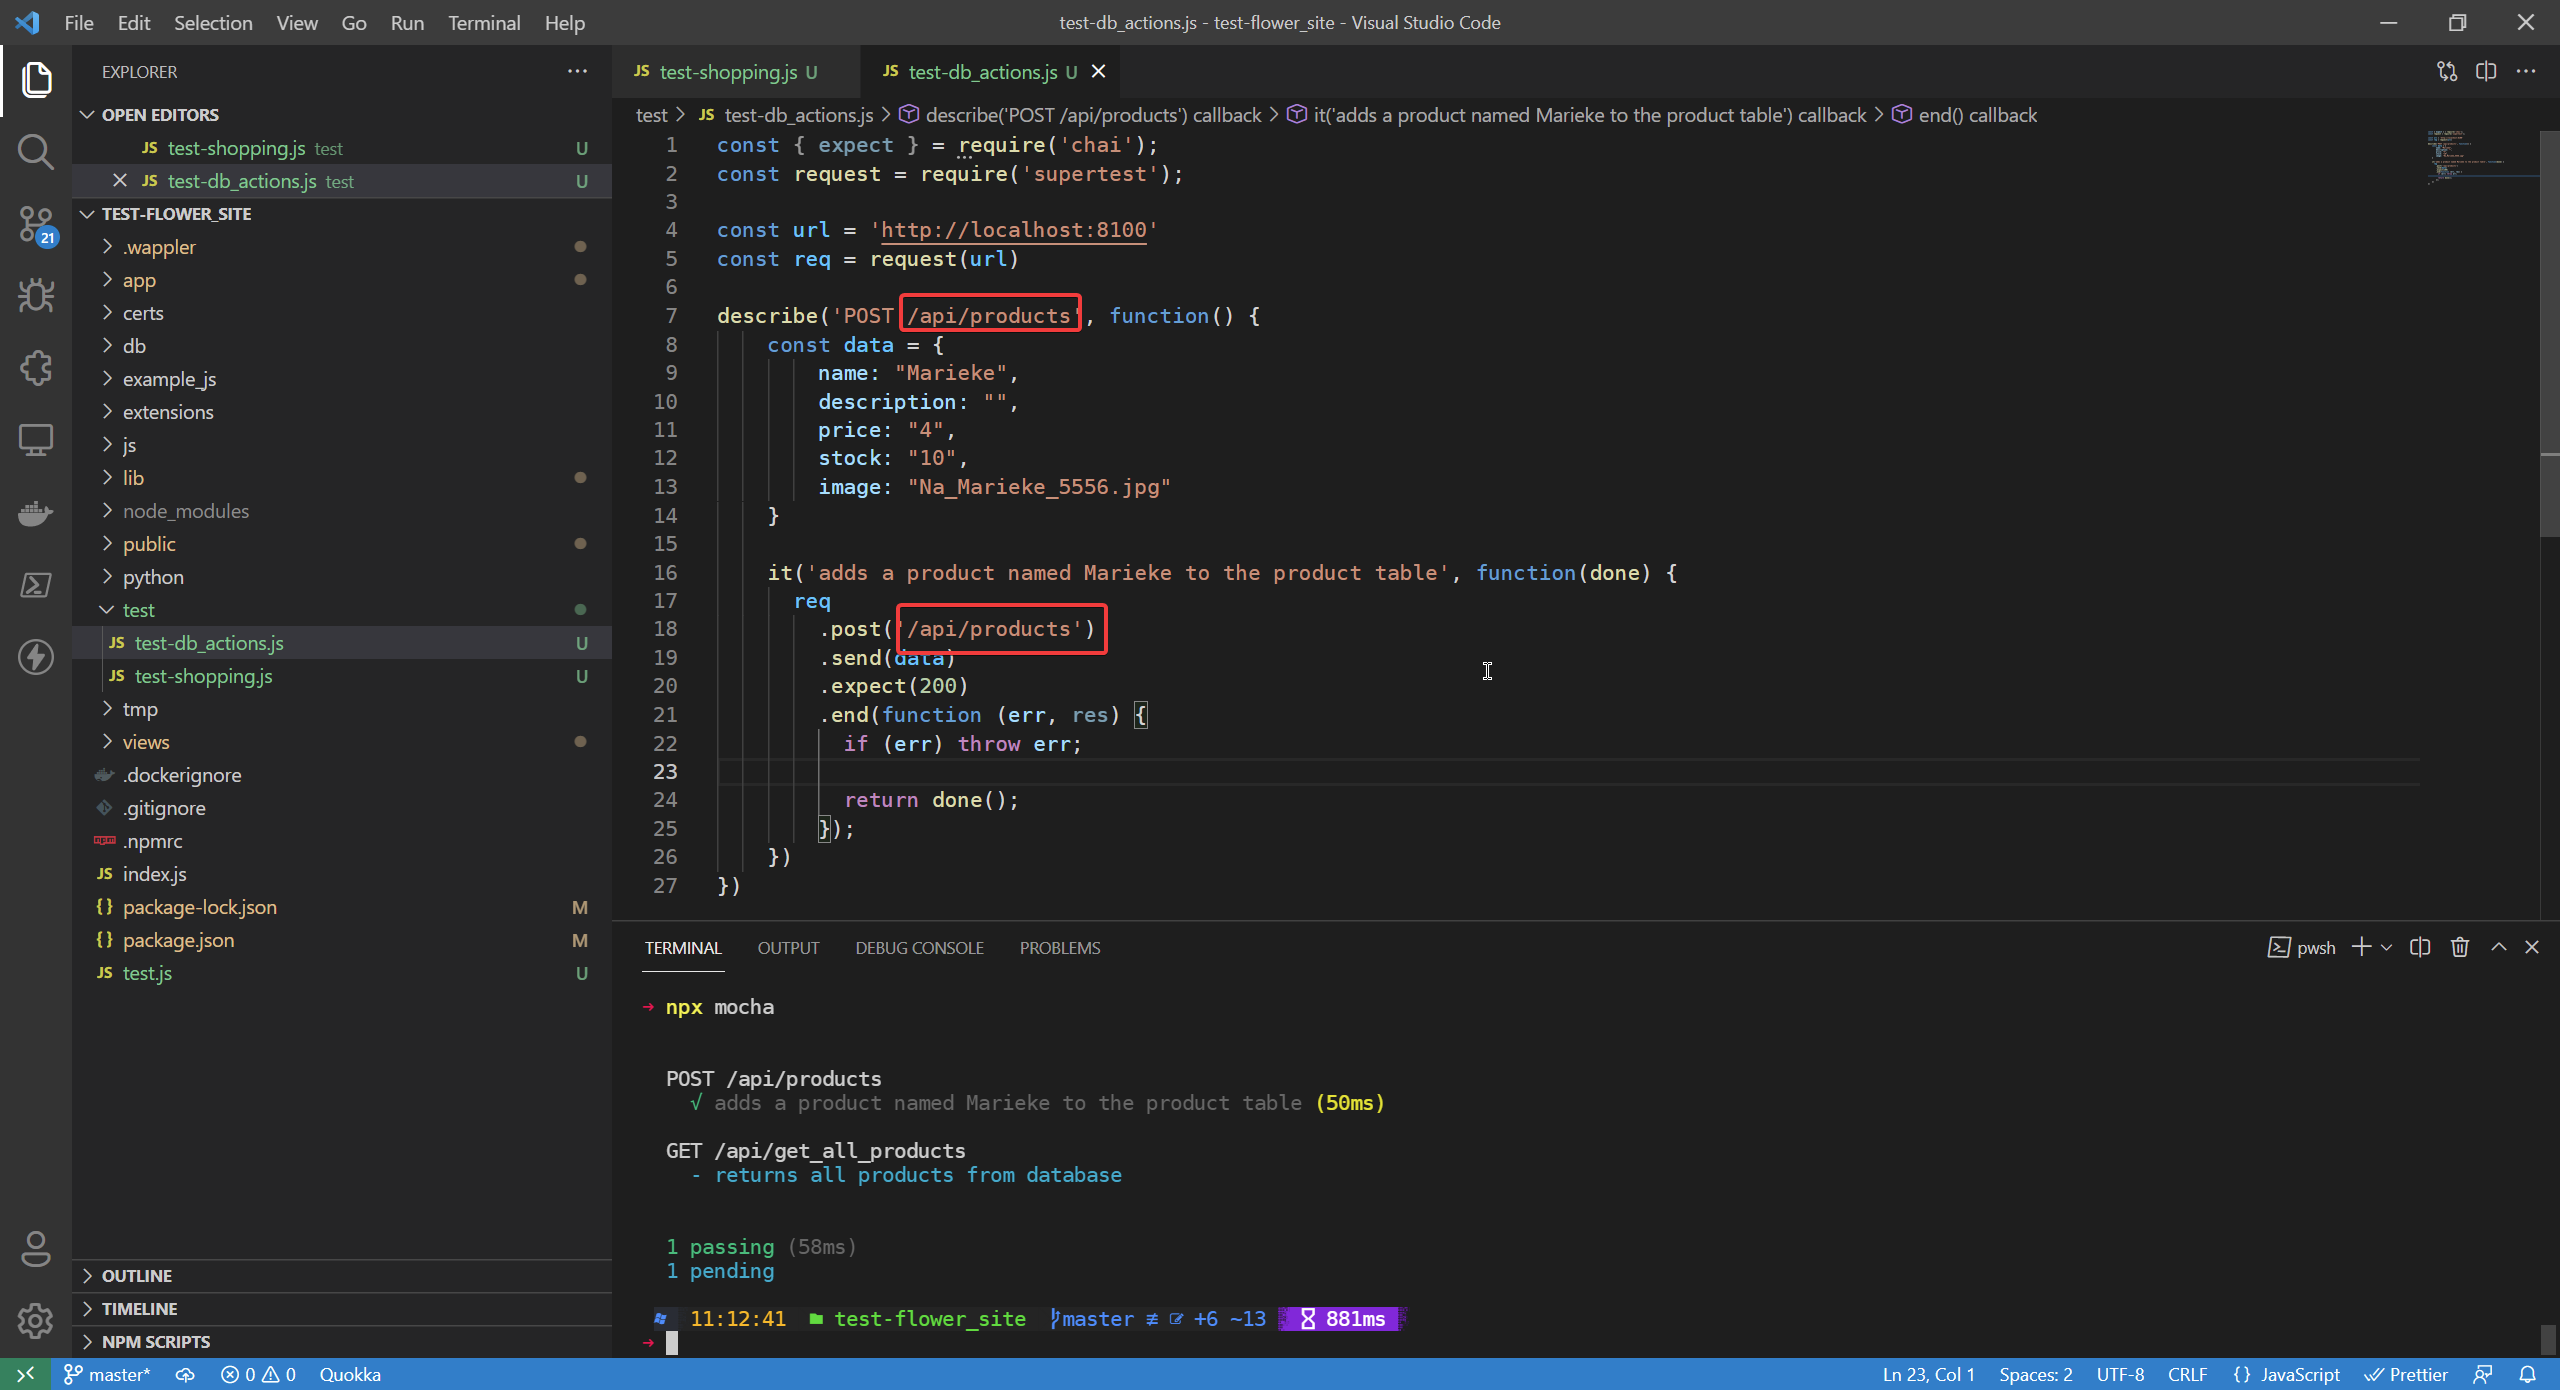
So based on the above we should choose POST method for our call and rename it to /api/products.

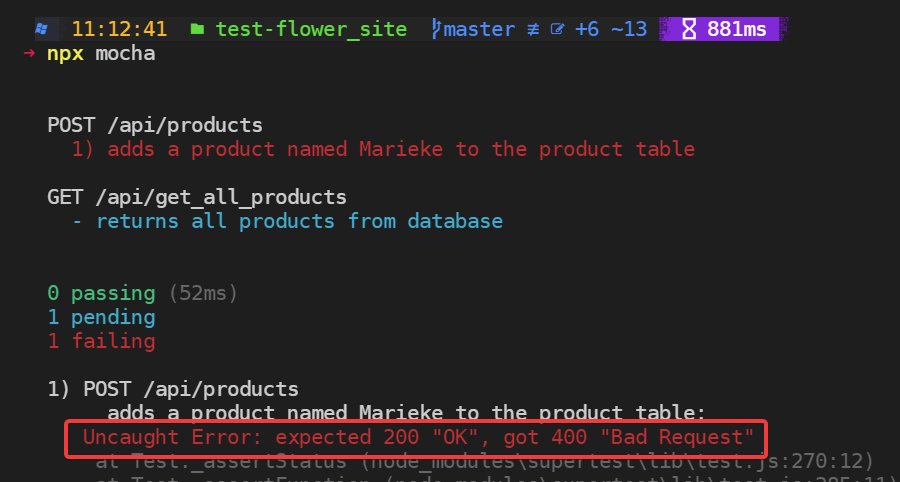
Now let's change the endpoint in our testing code too.
NOTE~ Do not forget if you are rerunning the
npx mocha, if you still have theMariekeproduct in the database you will get an error since that entry already exists. Go to the database view in Wappler and delete the entry, or follow the tutorial until we build the delete endpoint.
Delete endpoint
Creating Delete endpoint in Wappler
We start by creating a workflow:
Inside the workflow we create a param variable:
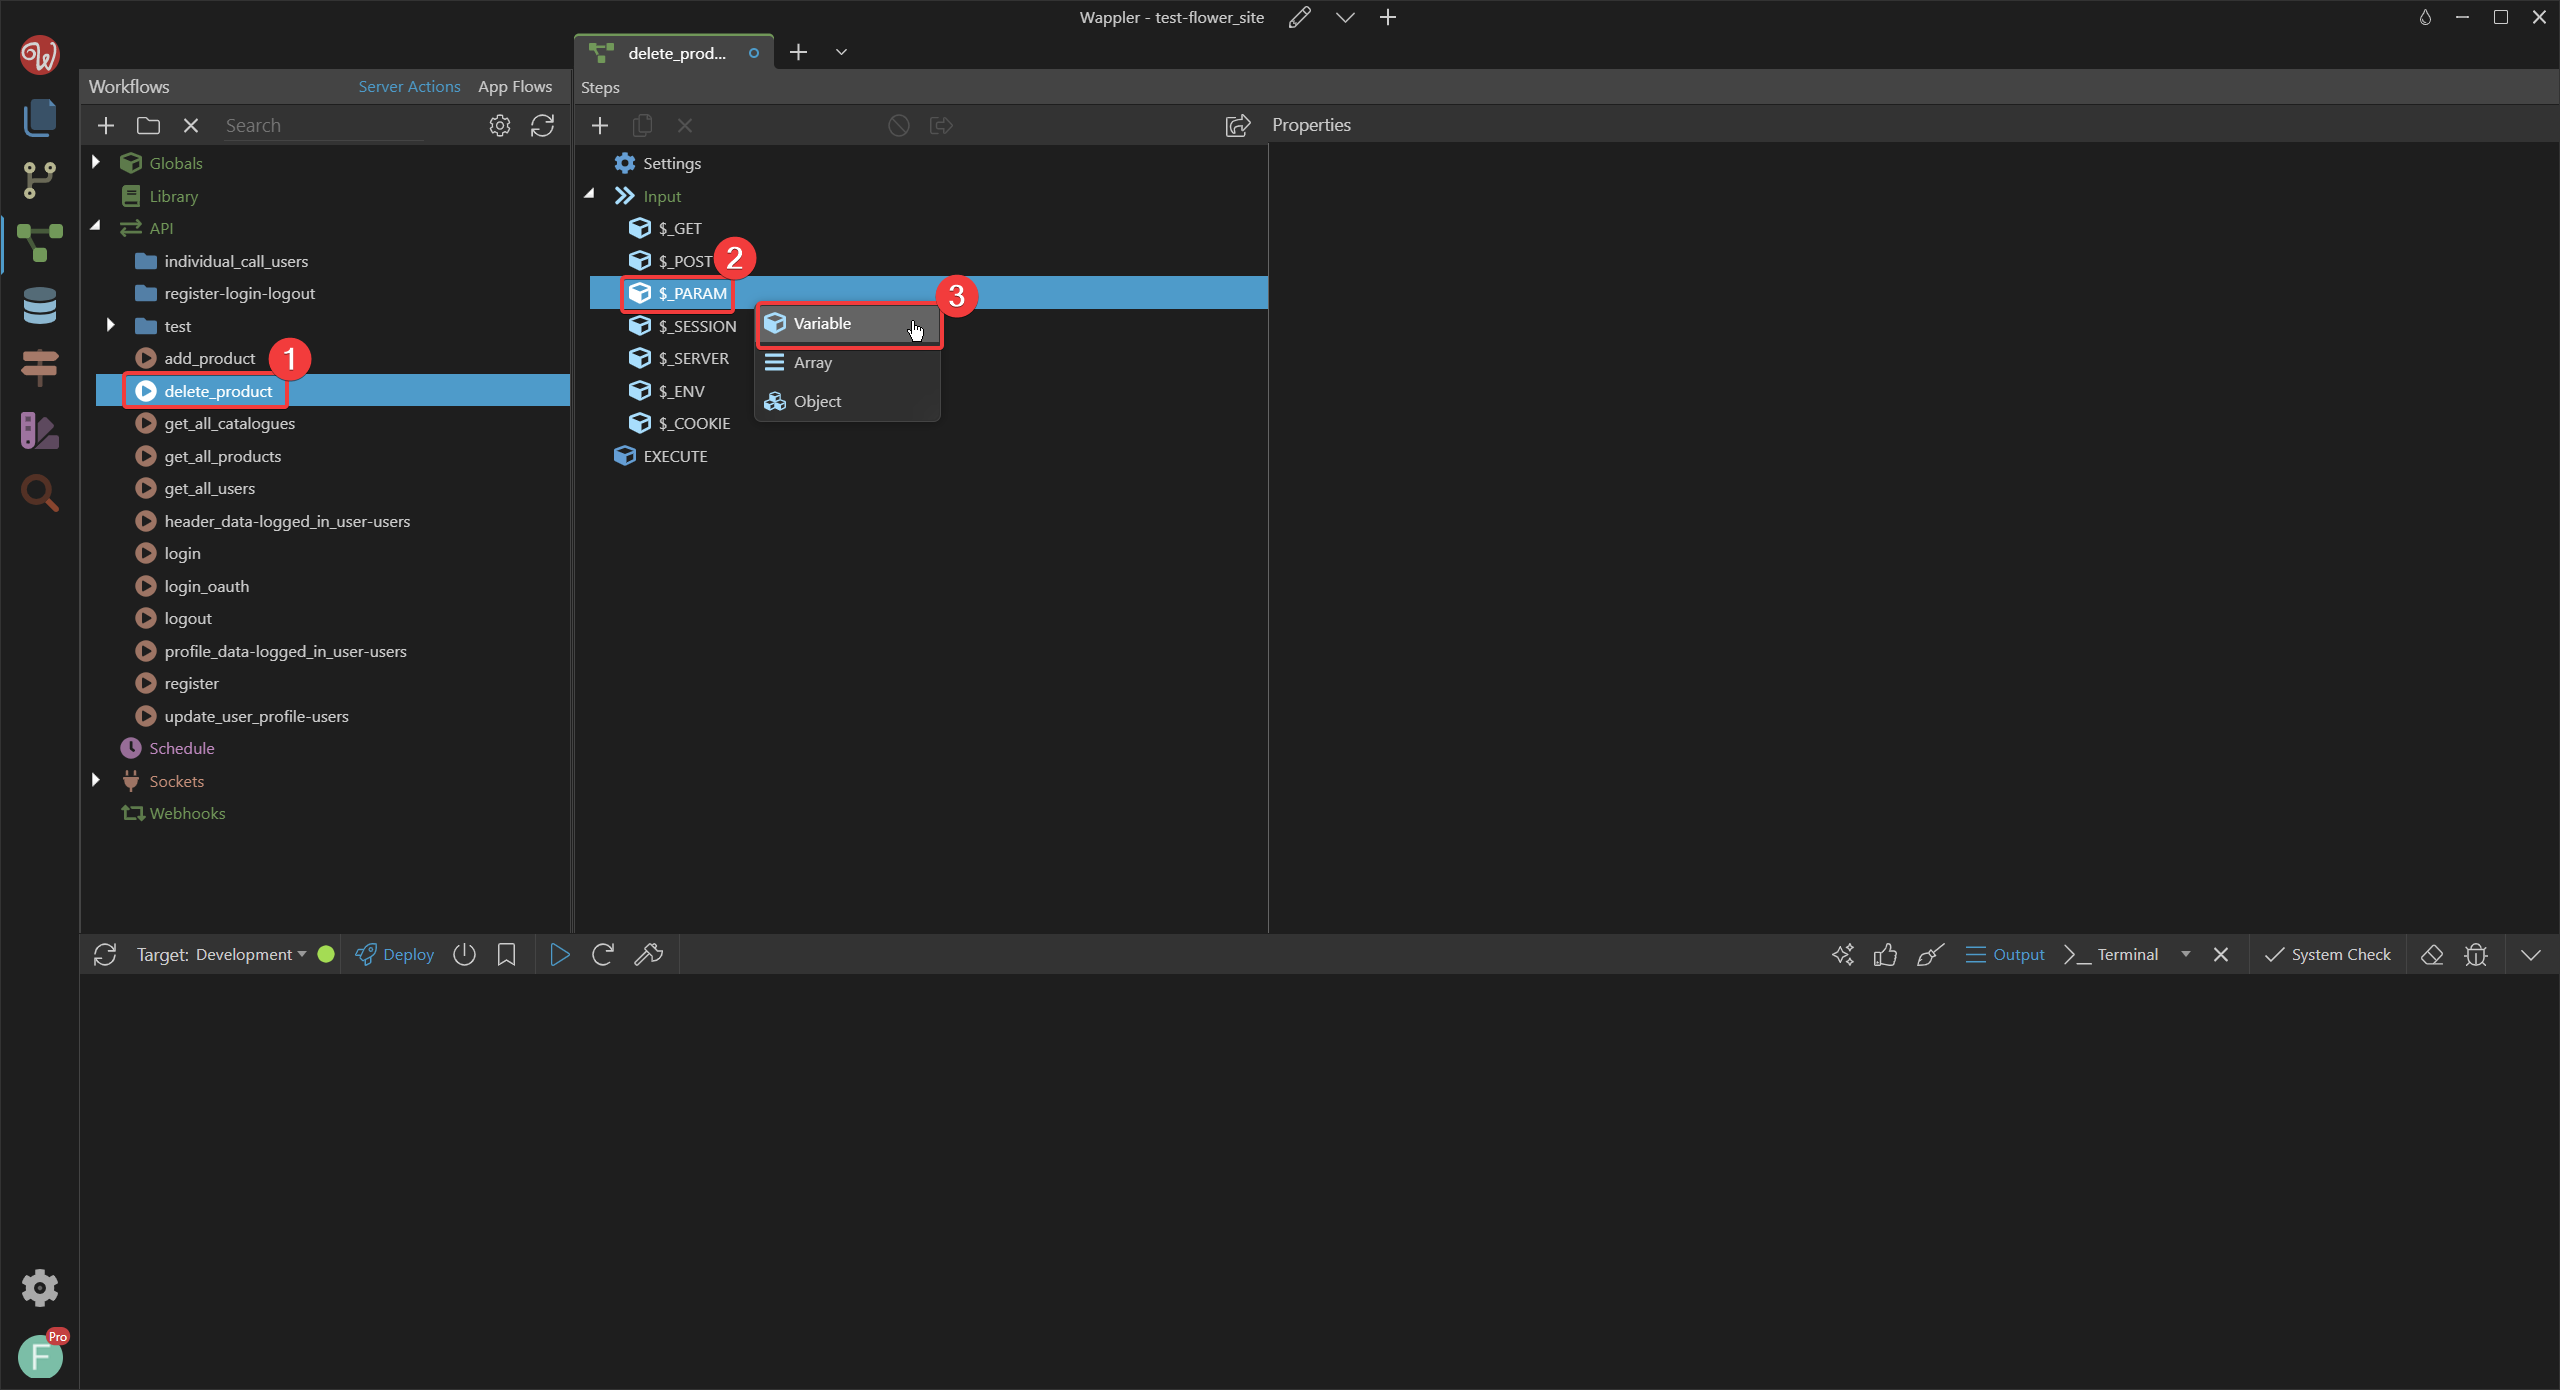
Which I named
name, since we will be using the name to delete a product.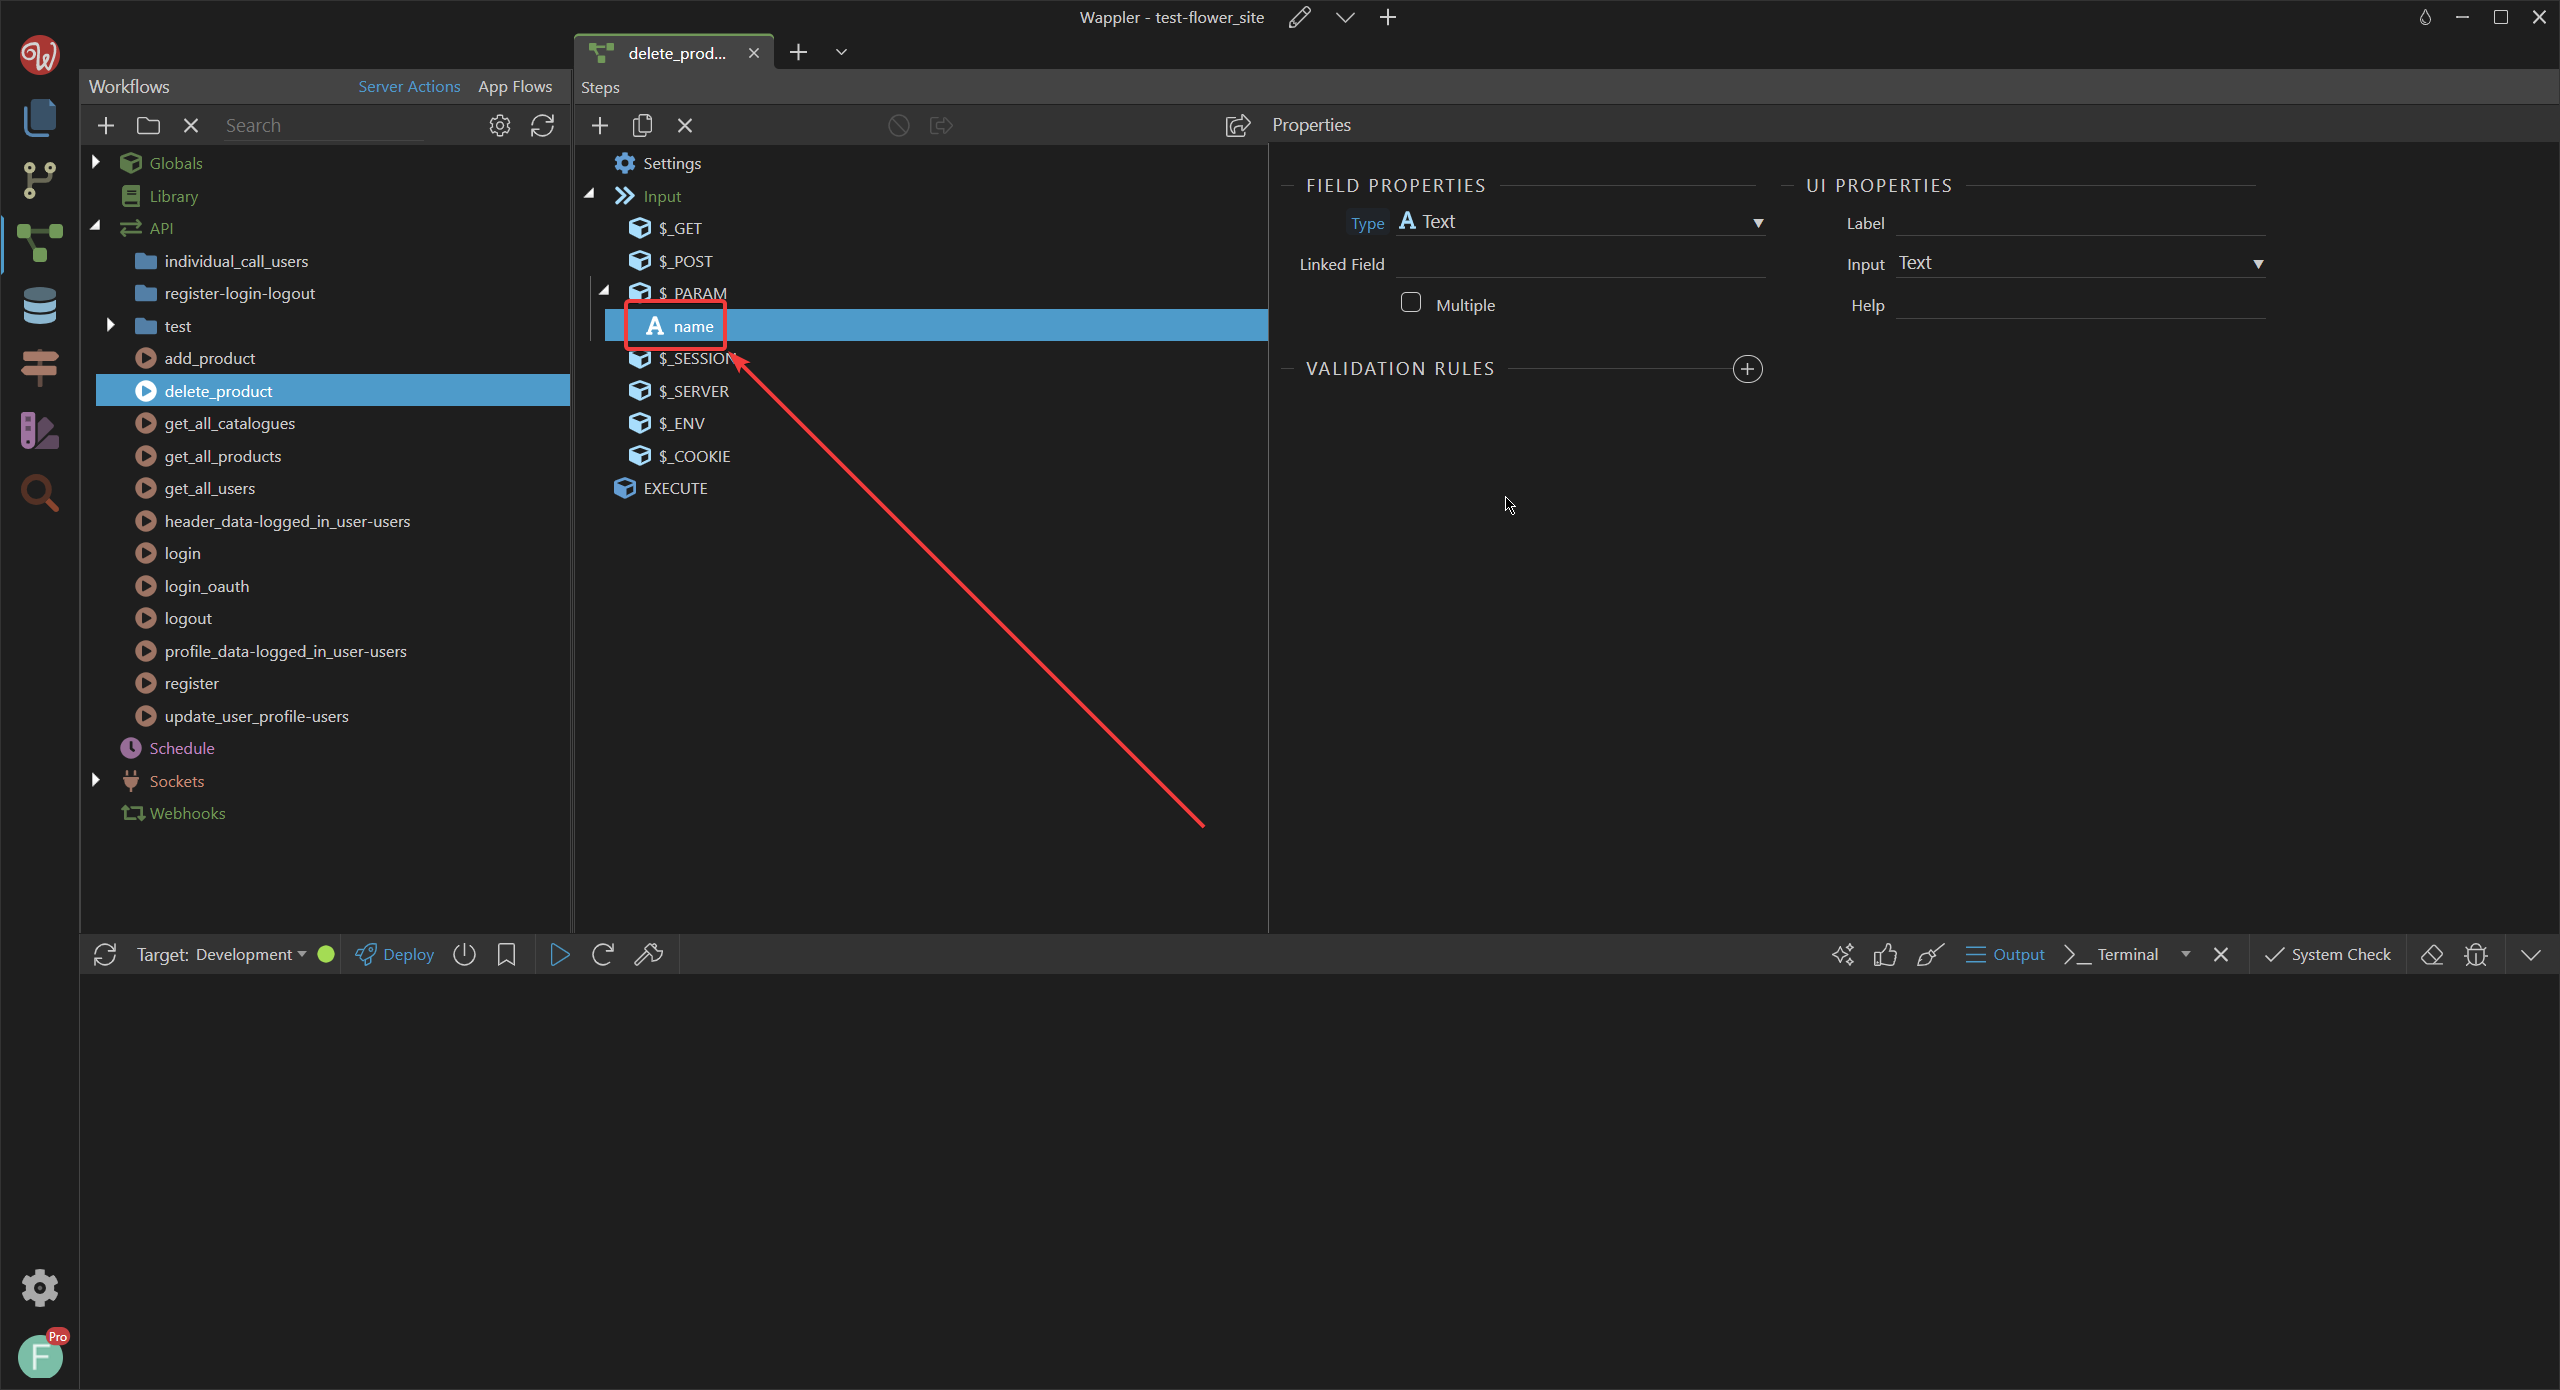
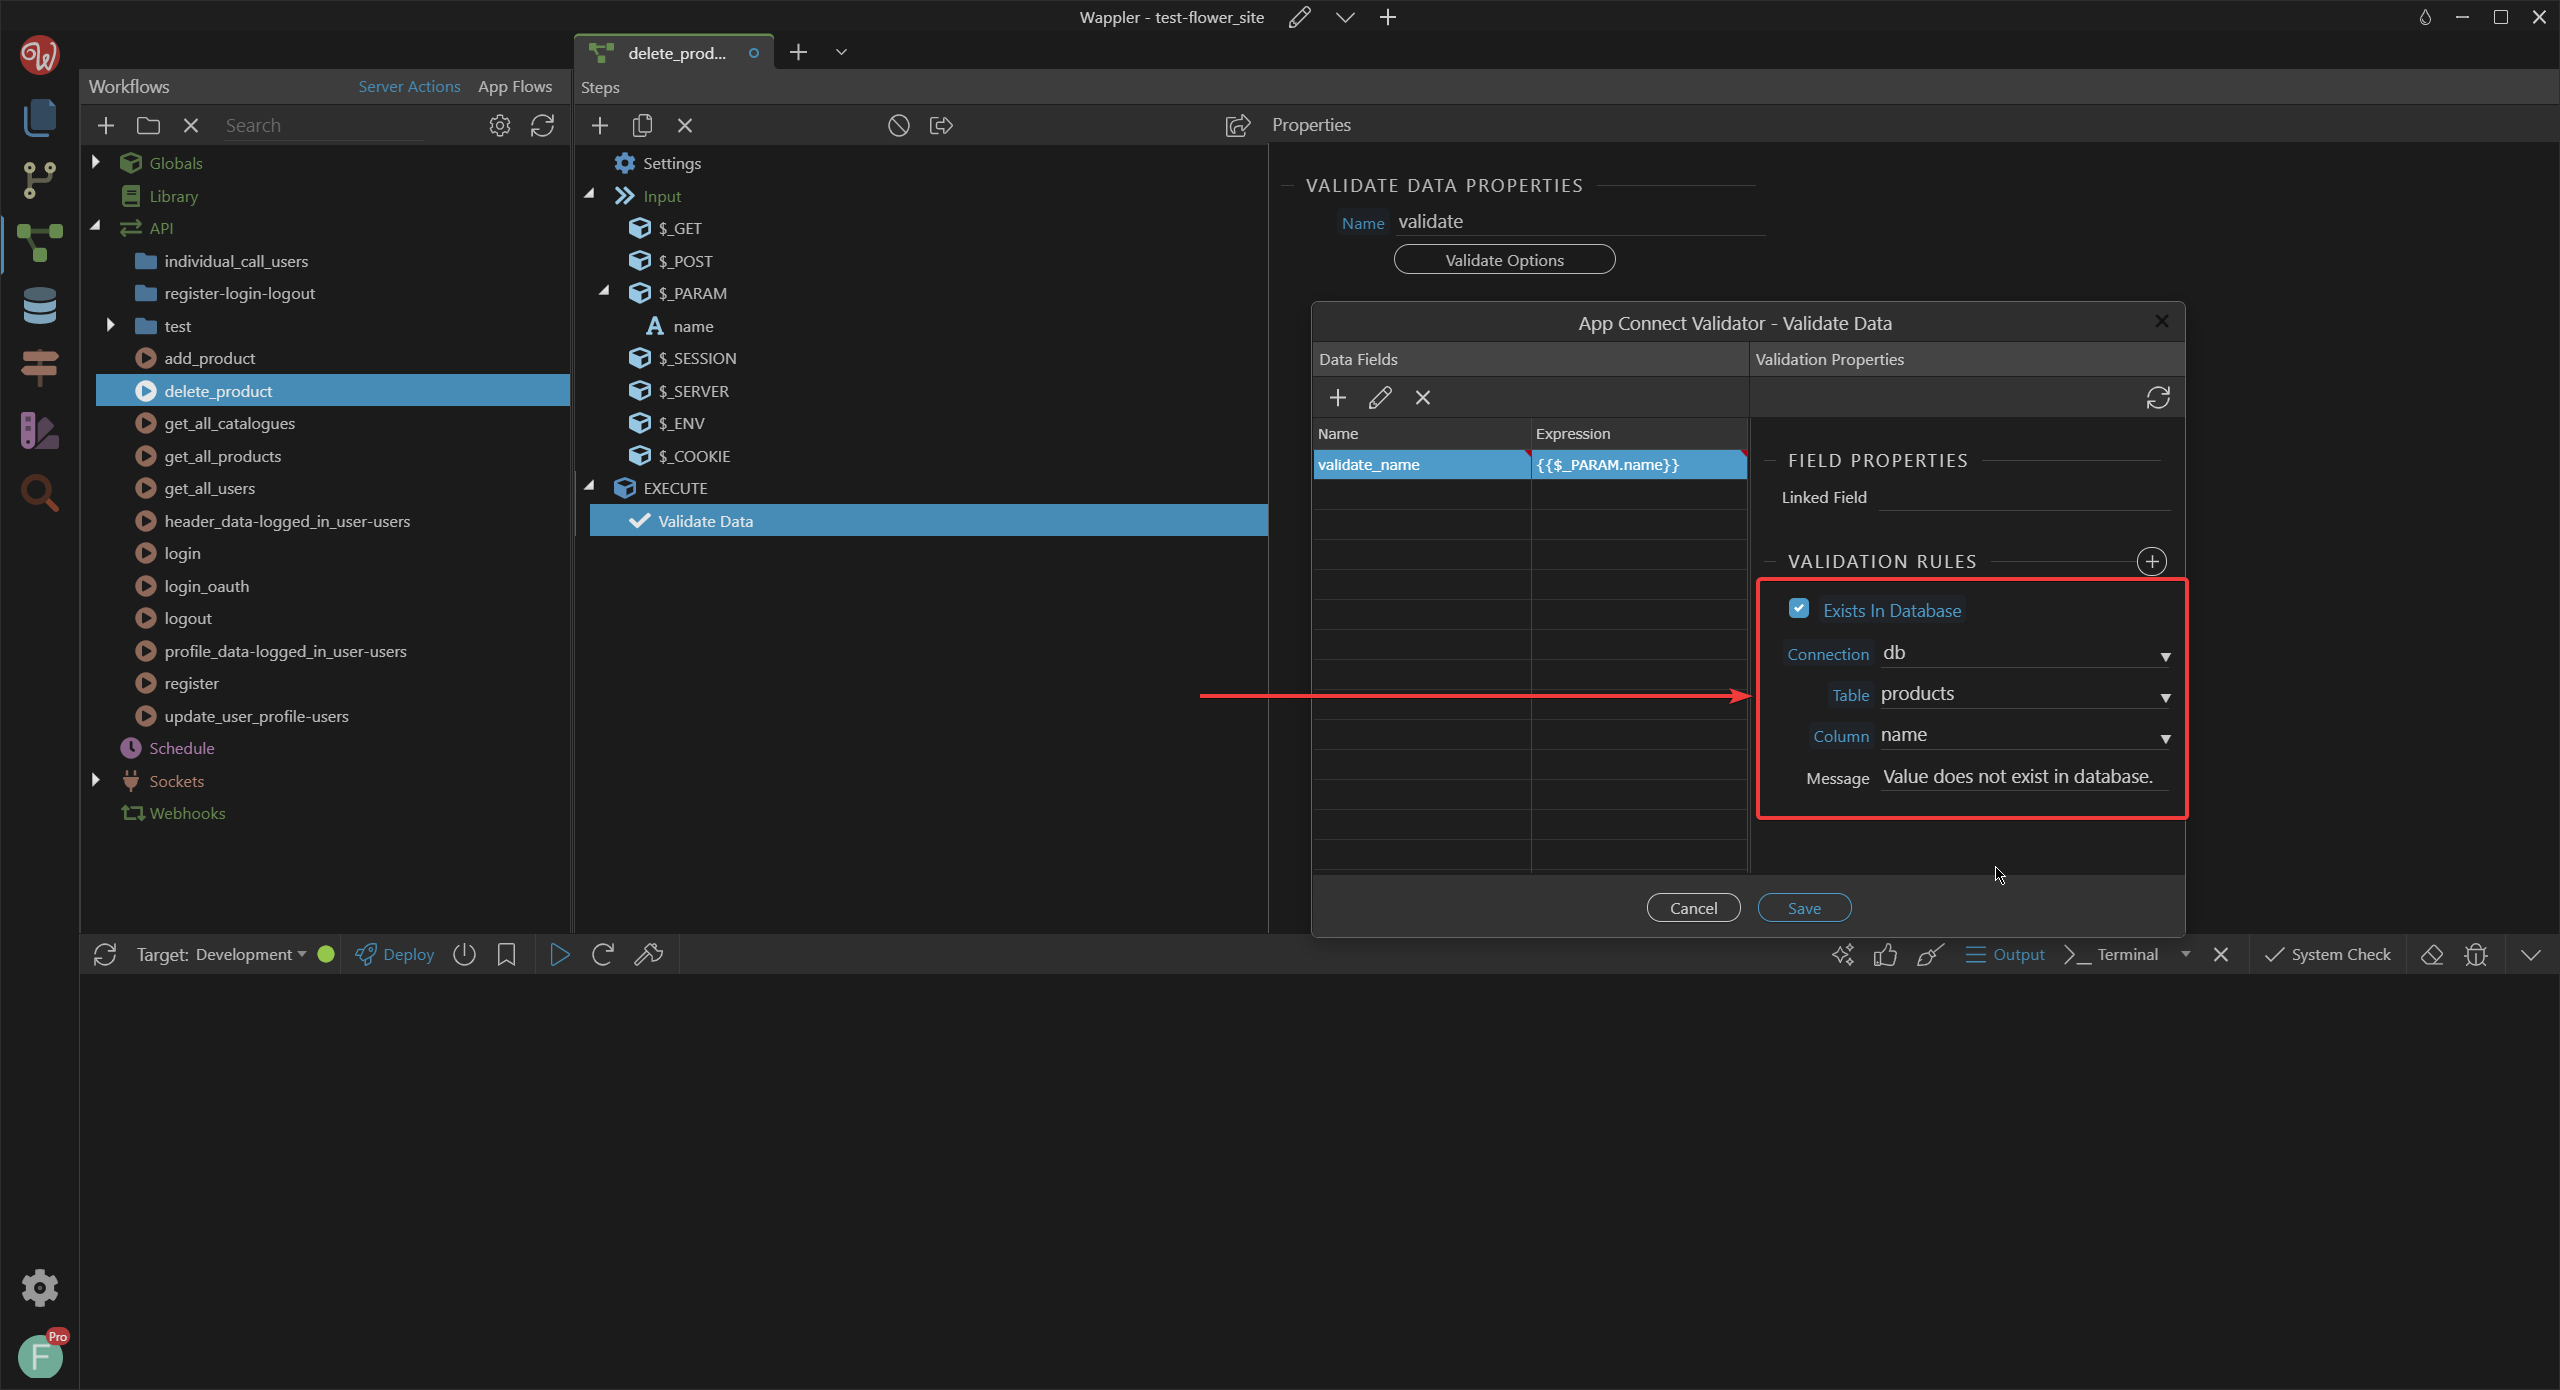
Just like when we created the add_product workflow, we will validate this too:
Then we create the validation rule:

Select the correct database table and variable to check against.
Choose delete databse
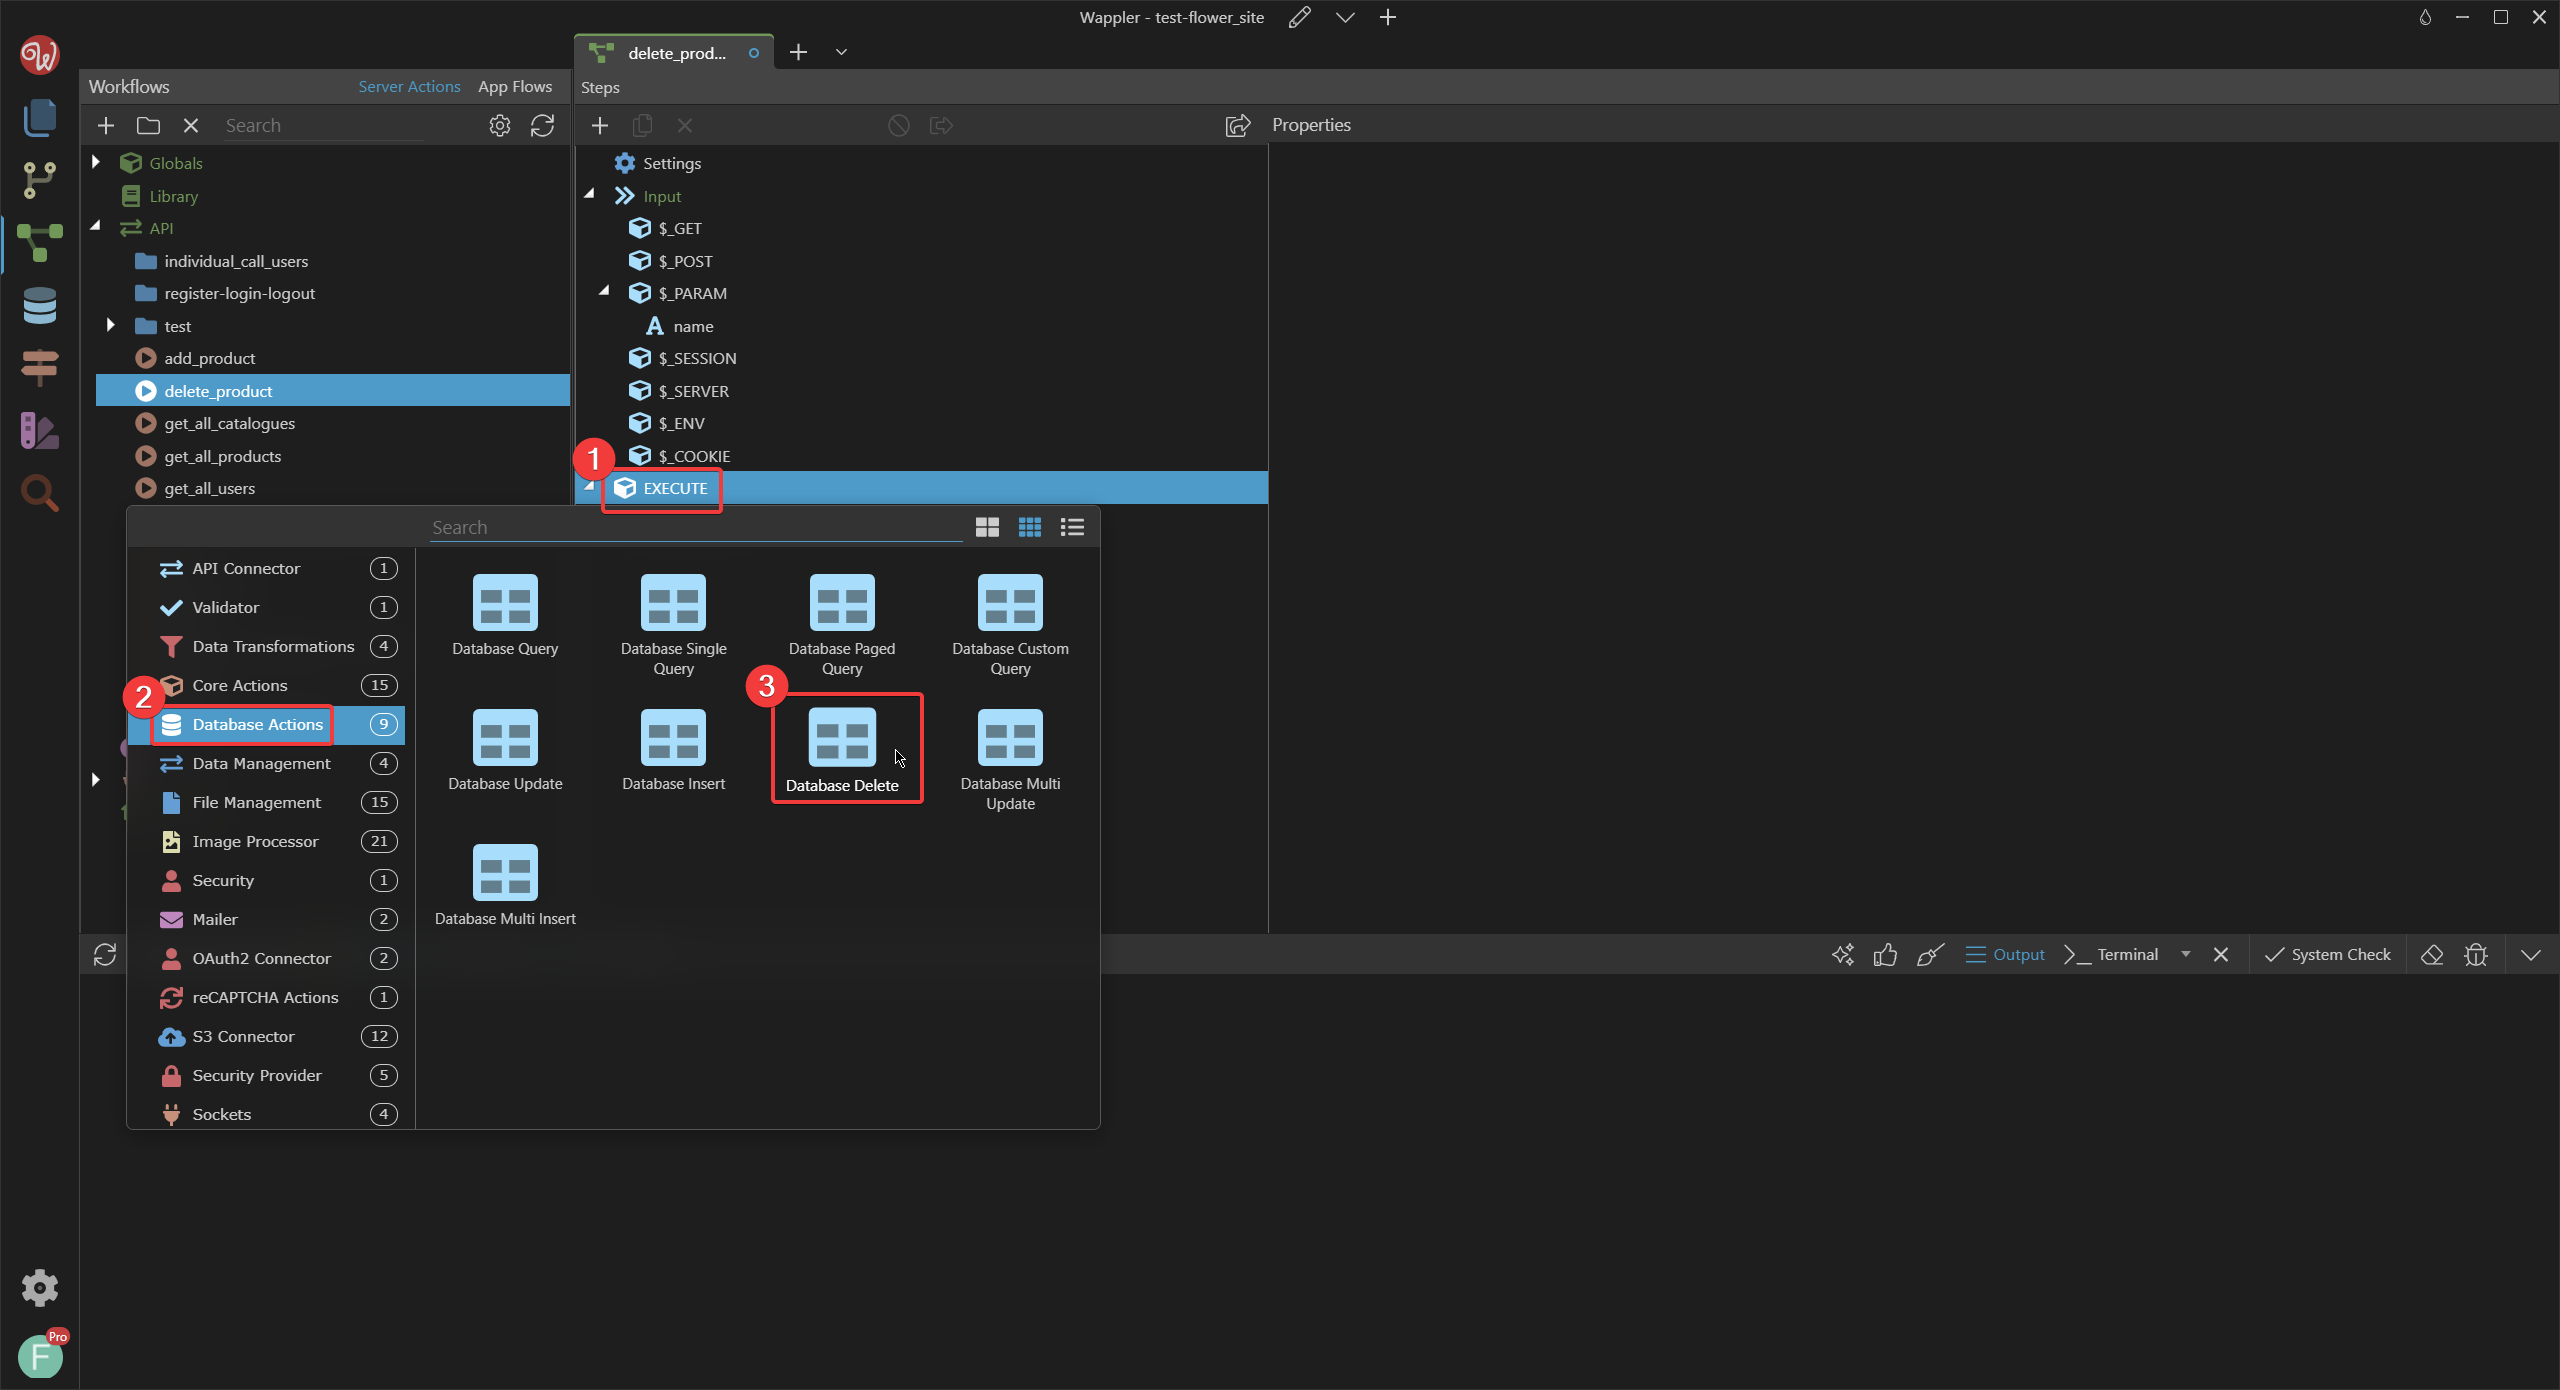
Setup the deletion action in the correct table and variable. Make note of the order of the validation and deletion.

Do not forget to save with
Ctrl + S.
Let's configure now the Route in Wappler in a RESTful way.
RESTful API deletion
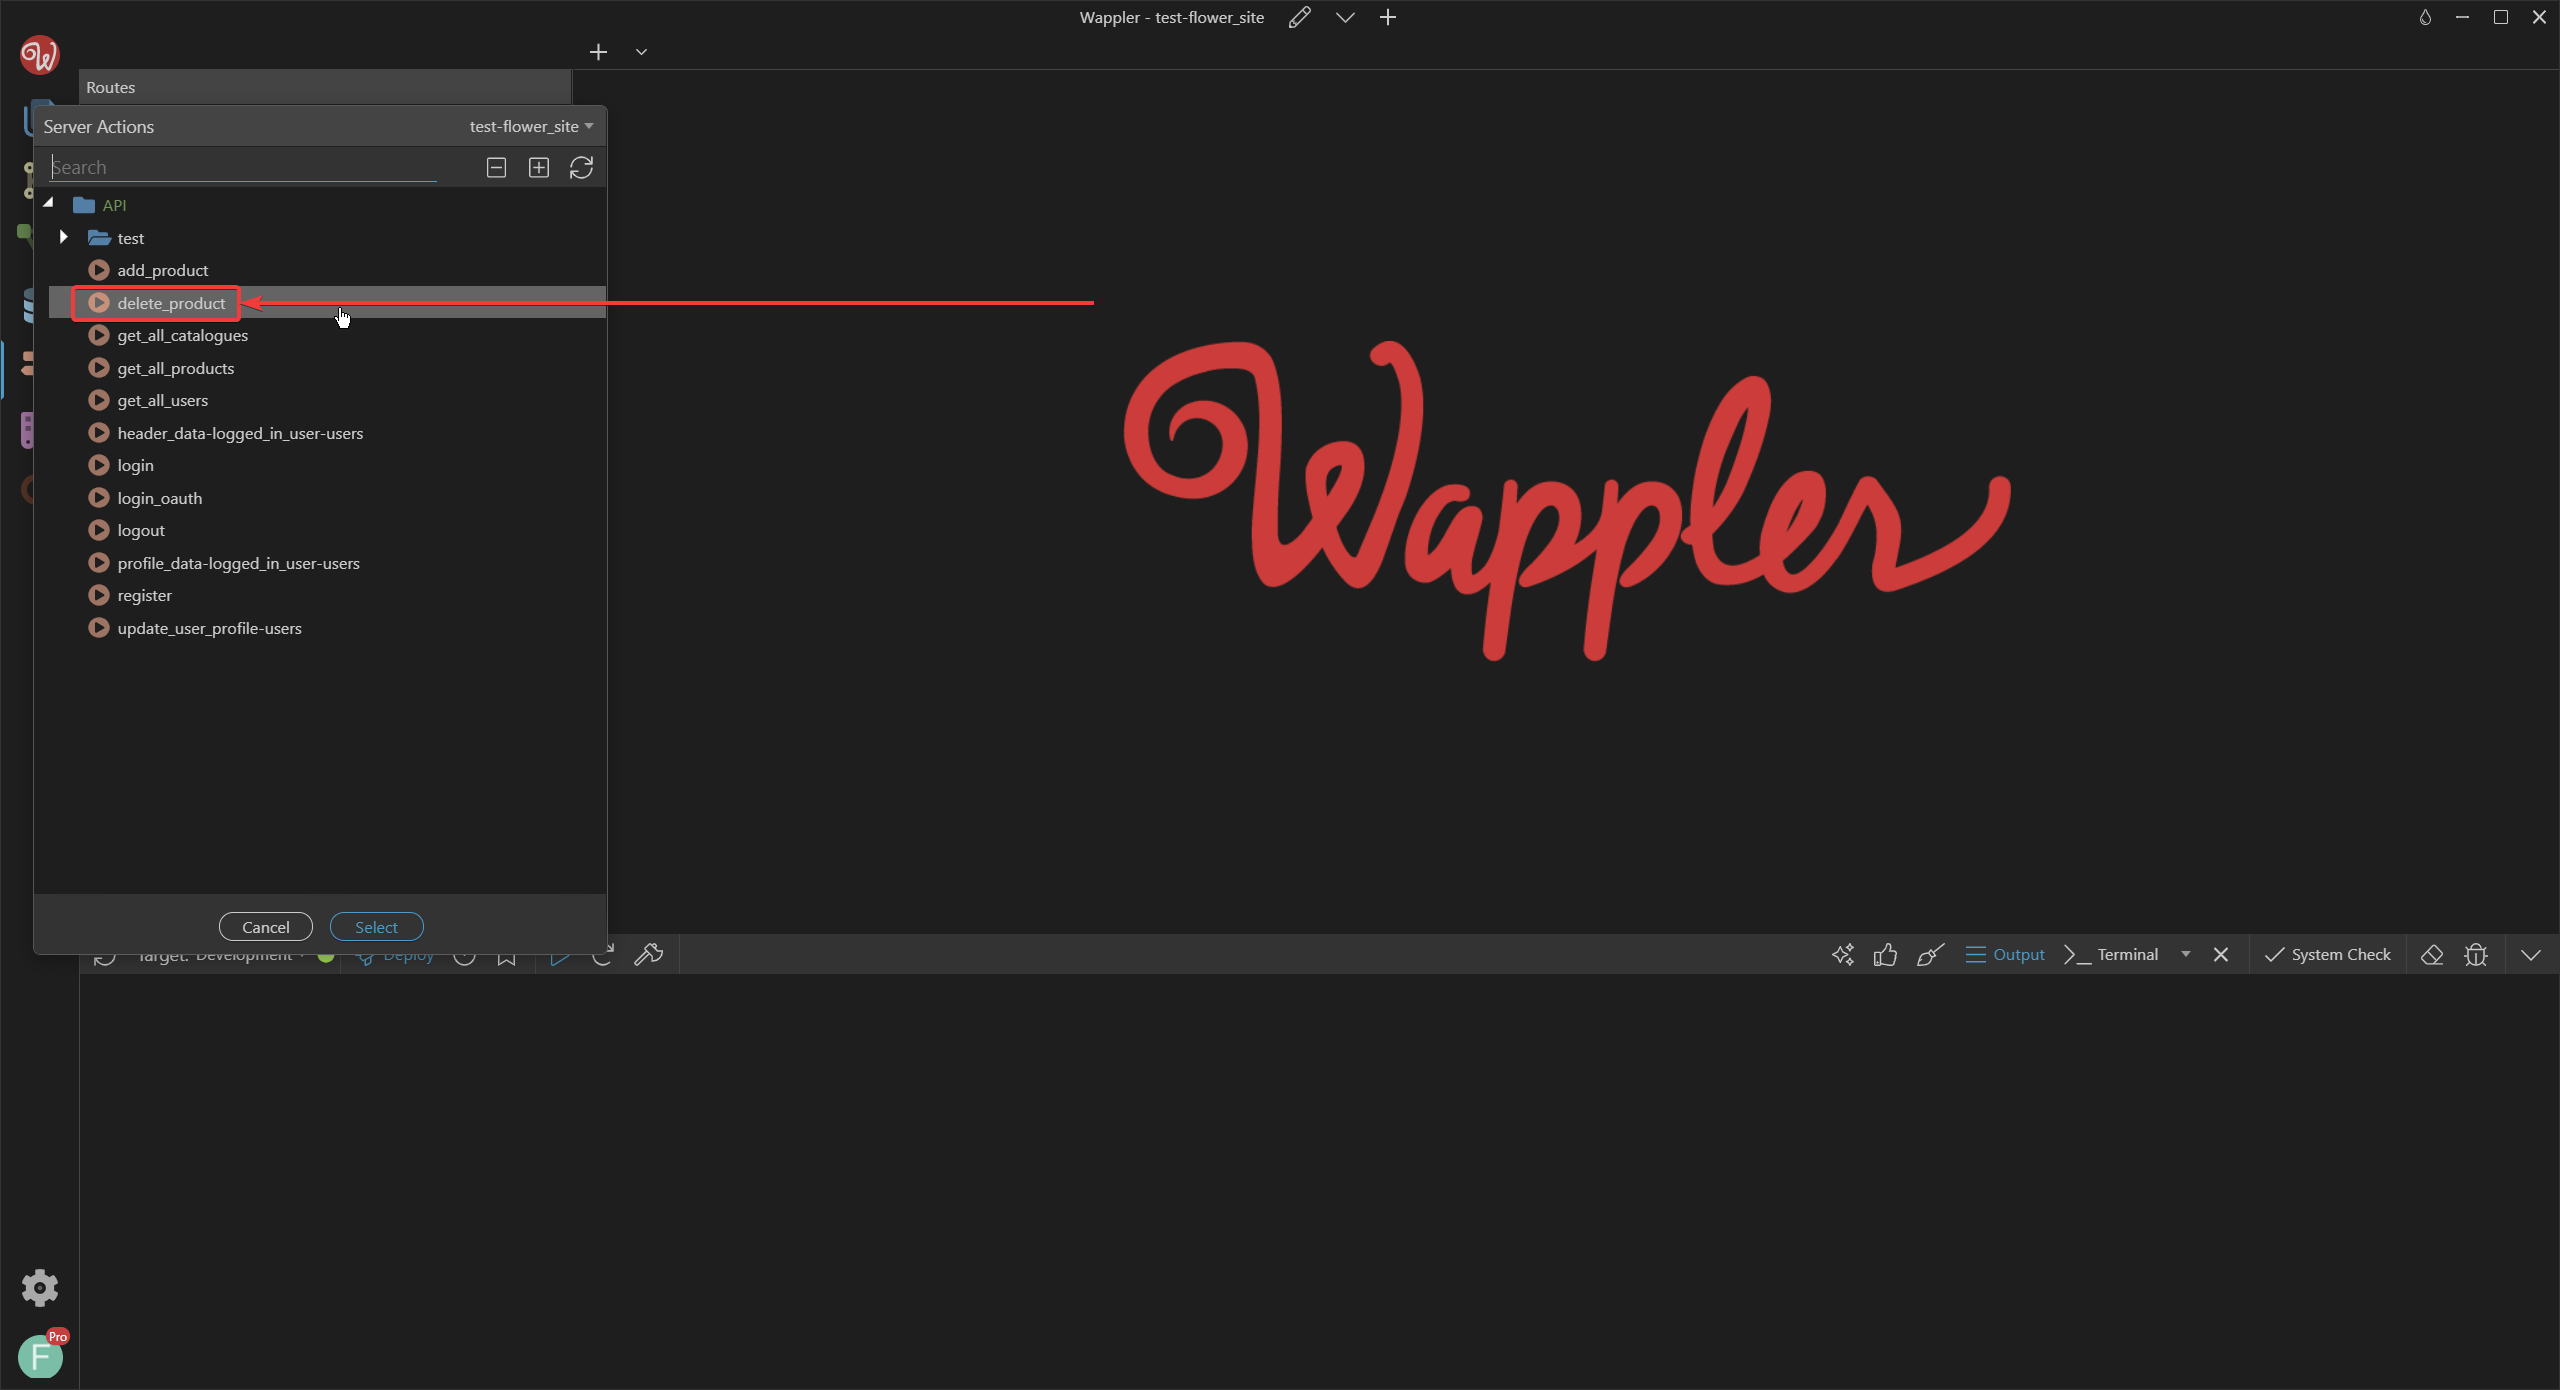
Click on the Thunderbolt sign.
Select the delete_product workflow.
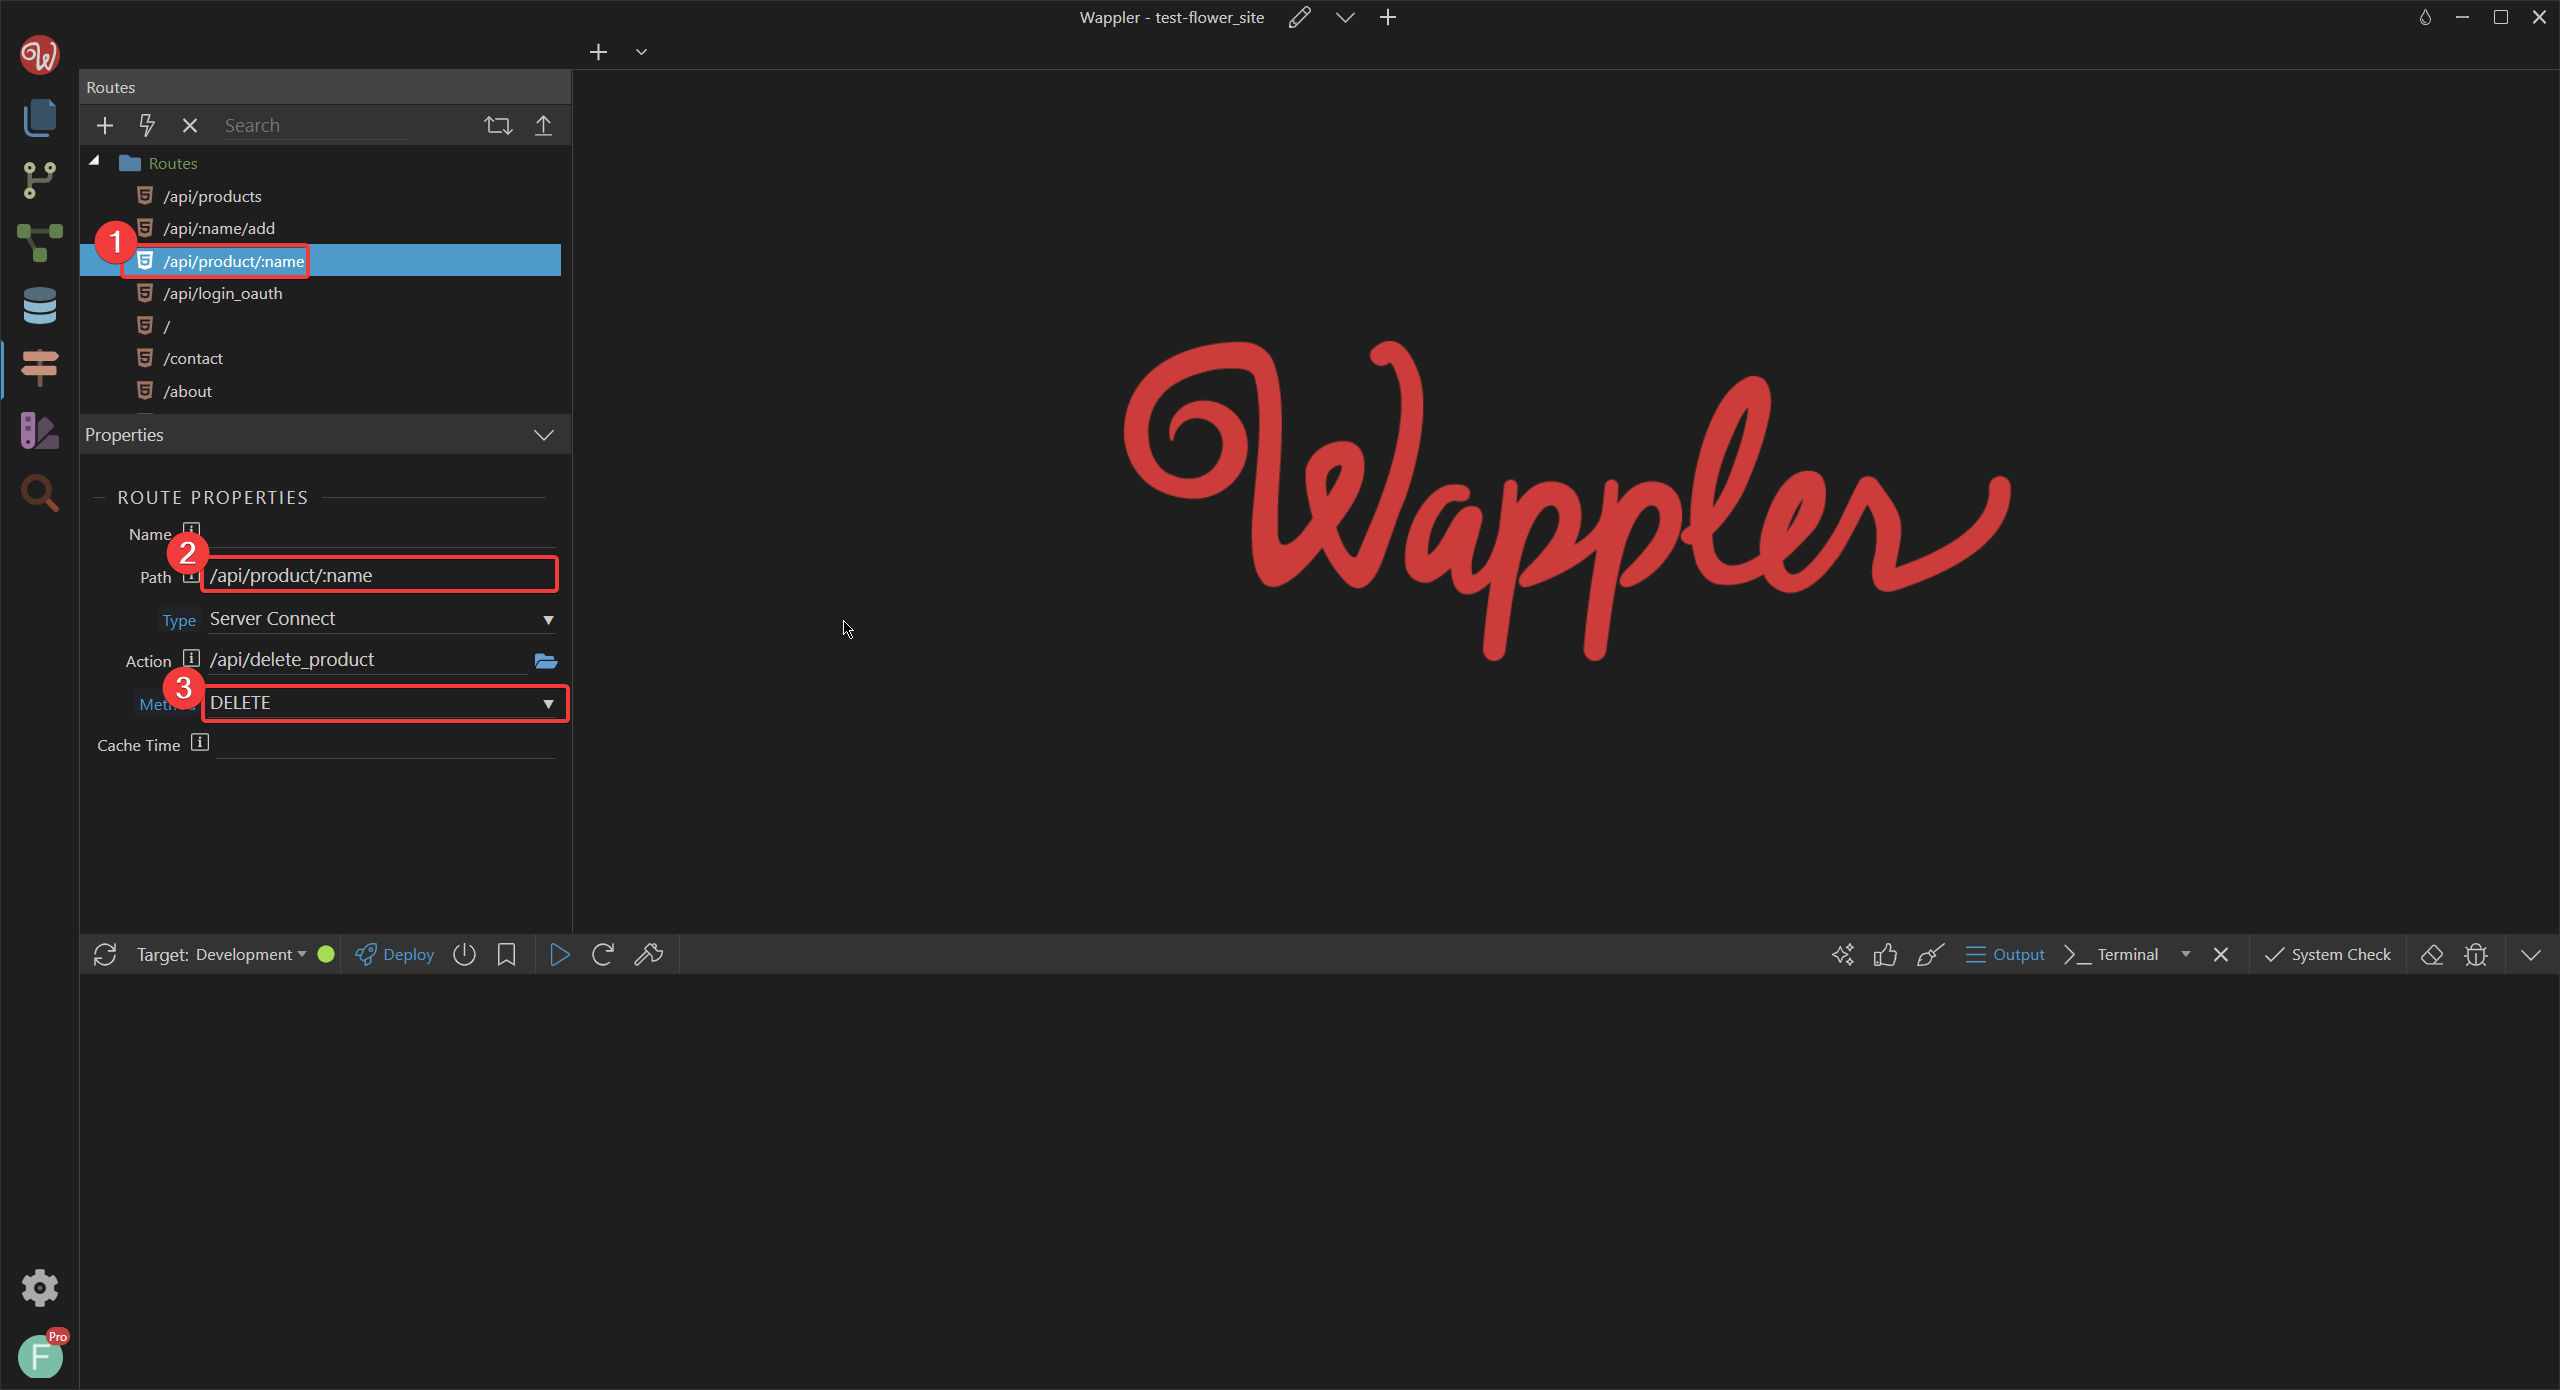
Change the path to be /api/product/:name, and the method to be DELETE
With that, let's head to VS Code and make a test for it.
Testing delete endpoint (VS Code)
We will use the test-db_actions.js file, and append this to the next it.
    product_name = data.name

    it('deletes the product named Marieke from the product table', function(done) {
      req
        .delete('/api/product/'+product_name)
        .send(data)
        .expect(200)
        .end(function (err, res) {
          if (err) throw err;

          return done();
        });
    })
as such:
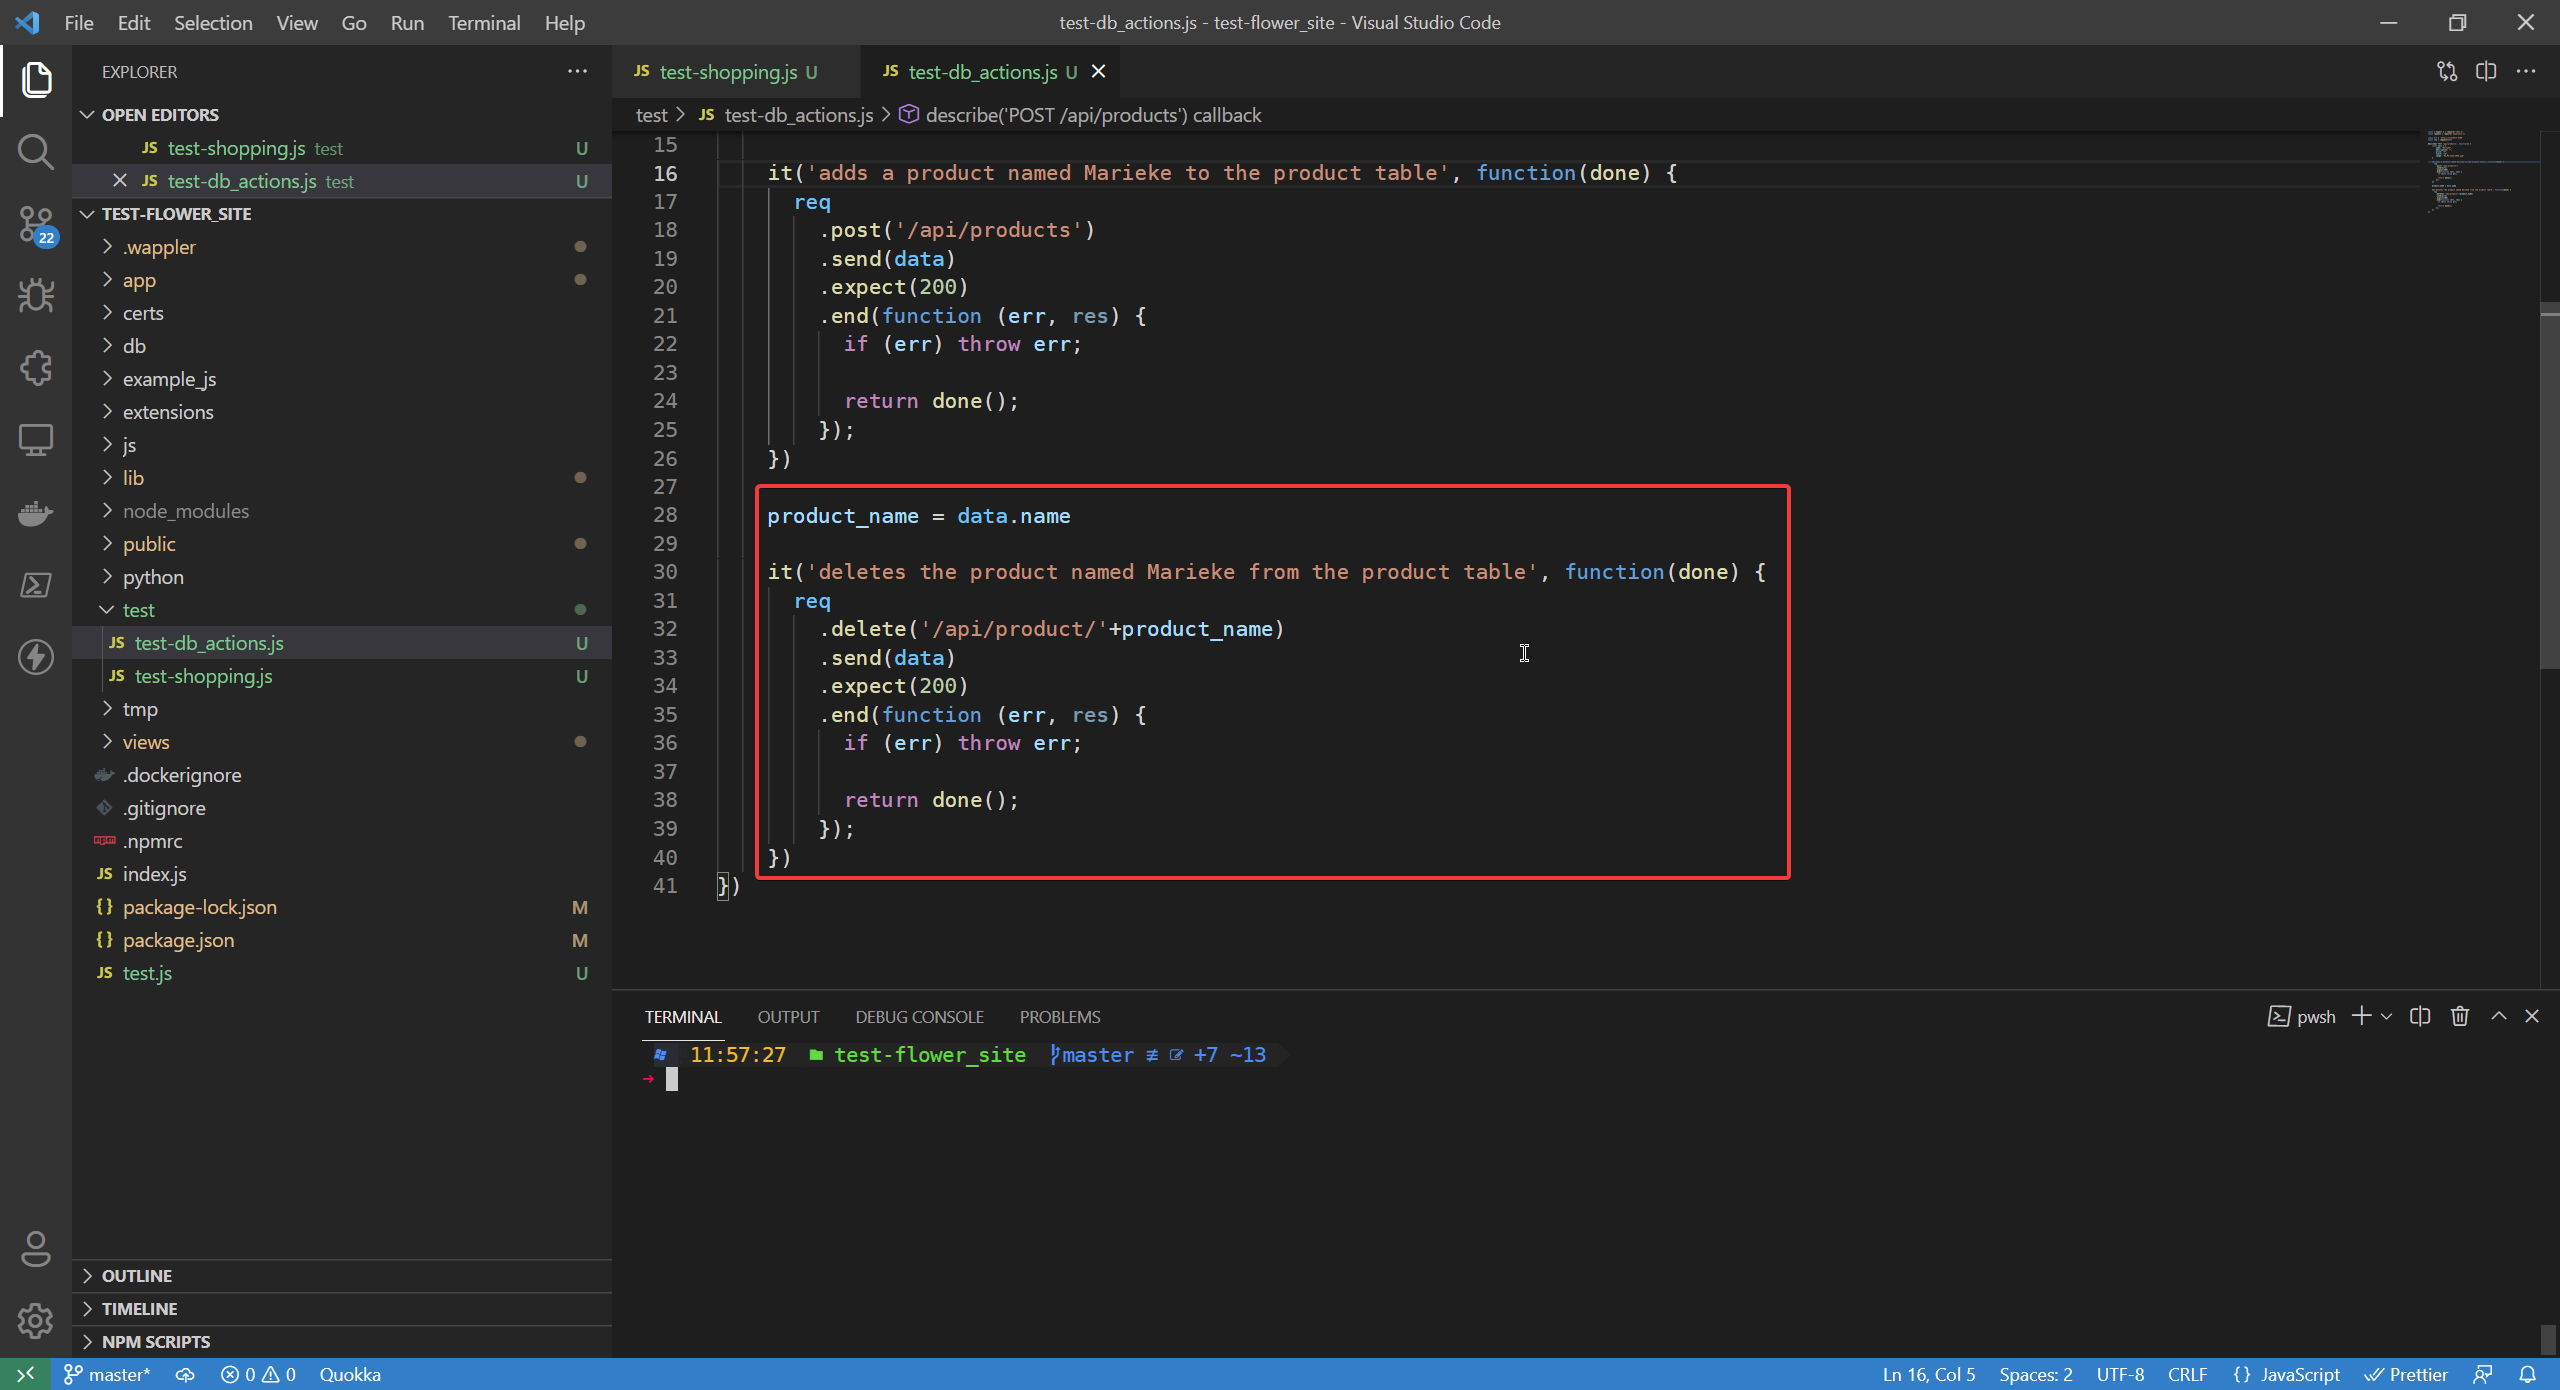
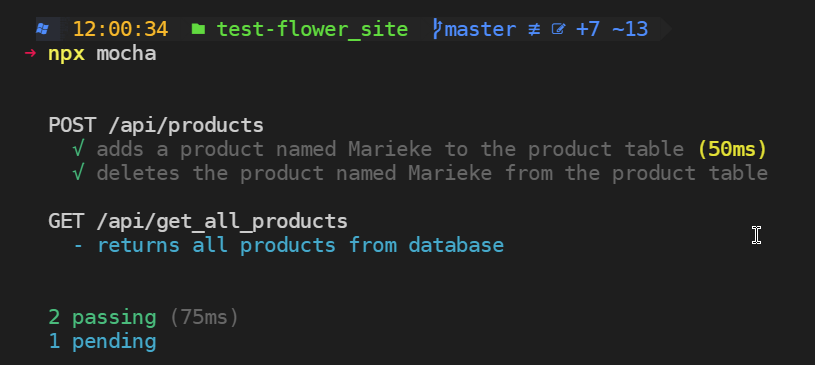
Now assuming you do not have Marieke in the database (in which case you should delete it), if we run npx mocha you will see that it succeeds
Now we have everything we need to conduct an extensive test
Putting it all together
I will make the previous tests pending by renaming the it functions in there to xit (cancel it)

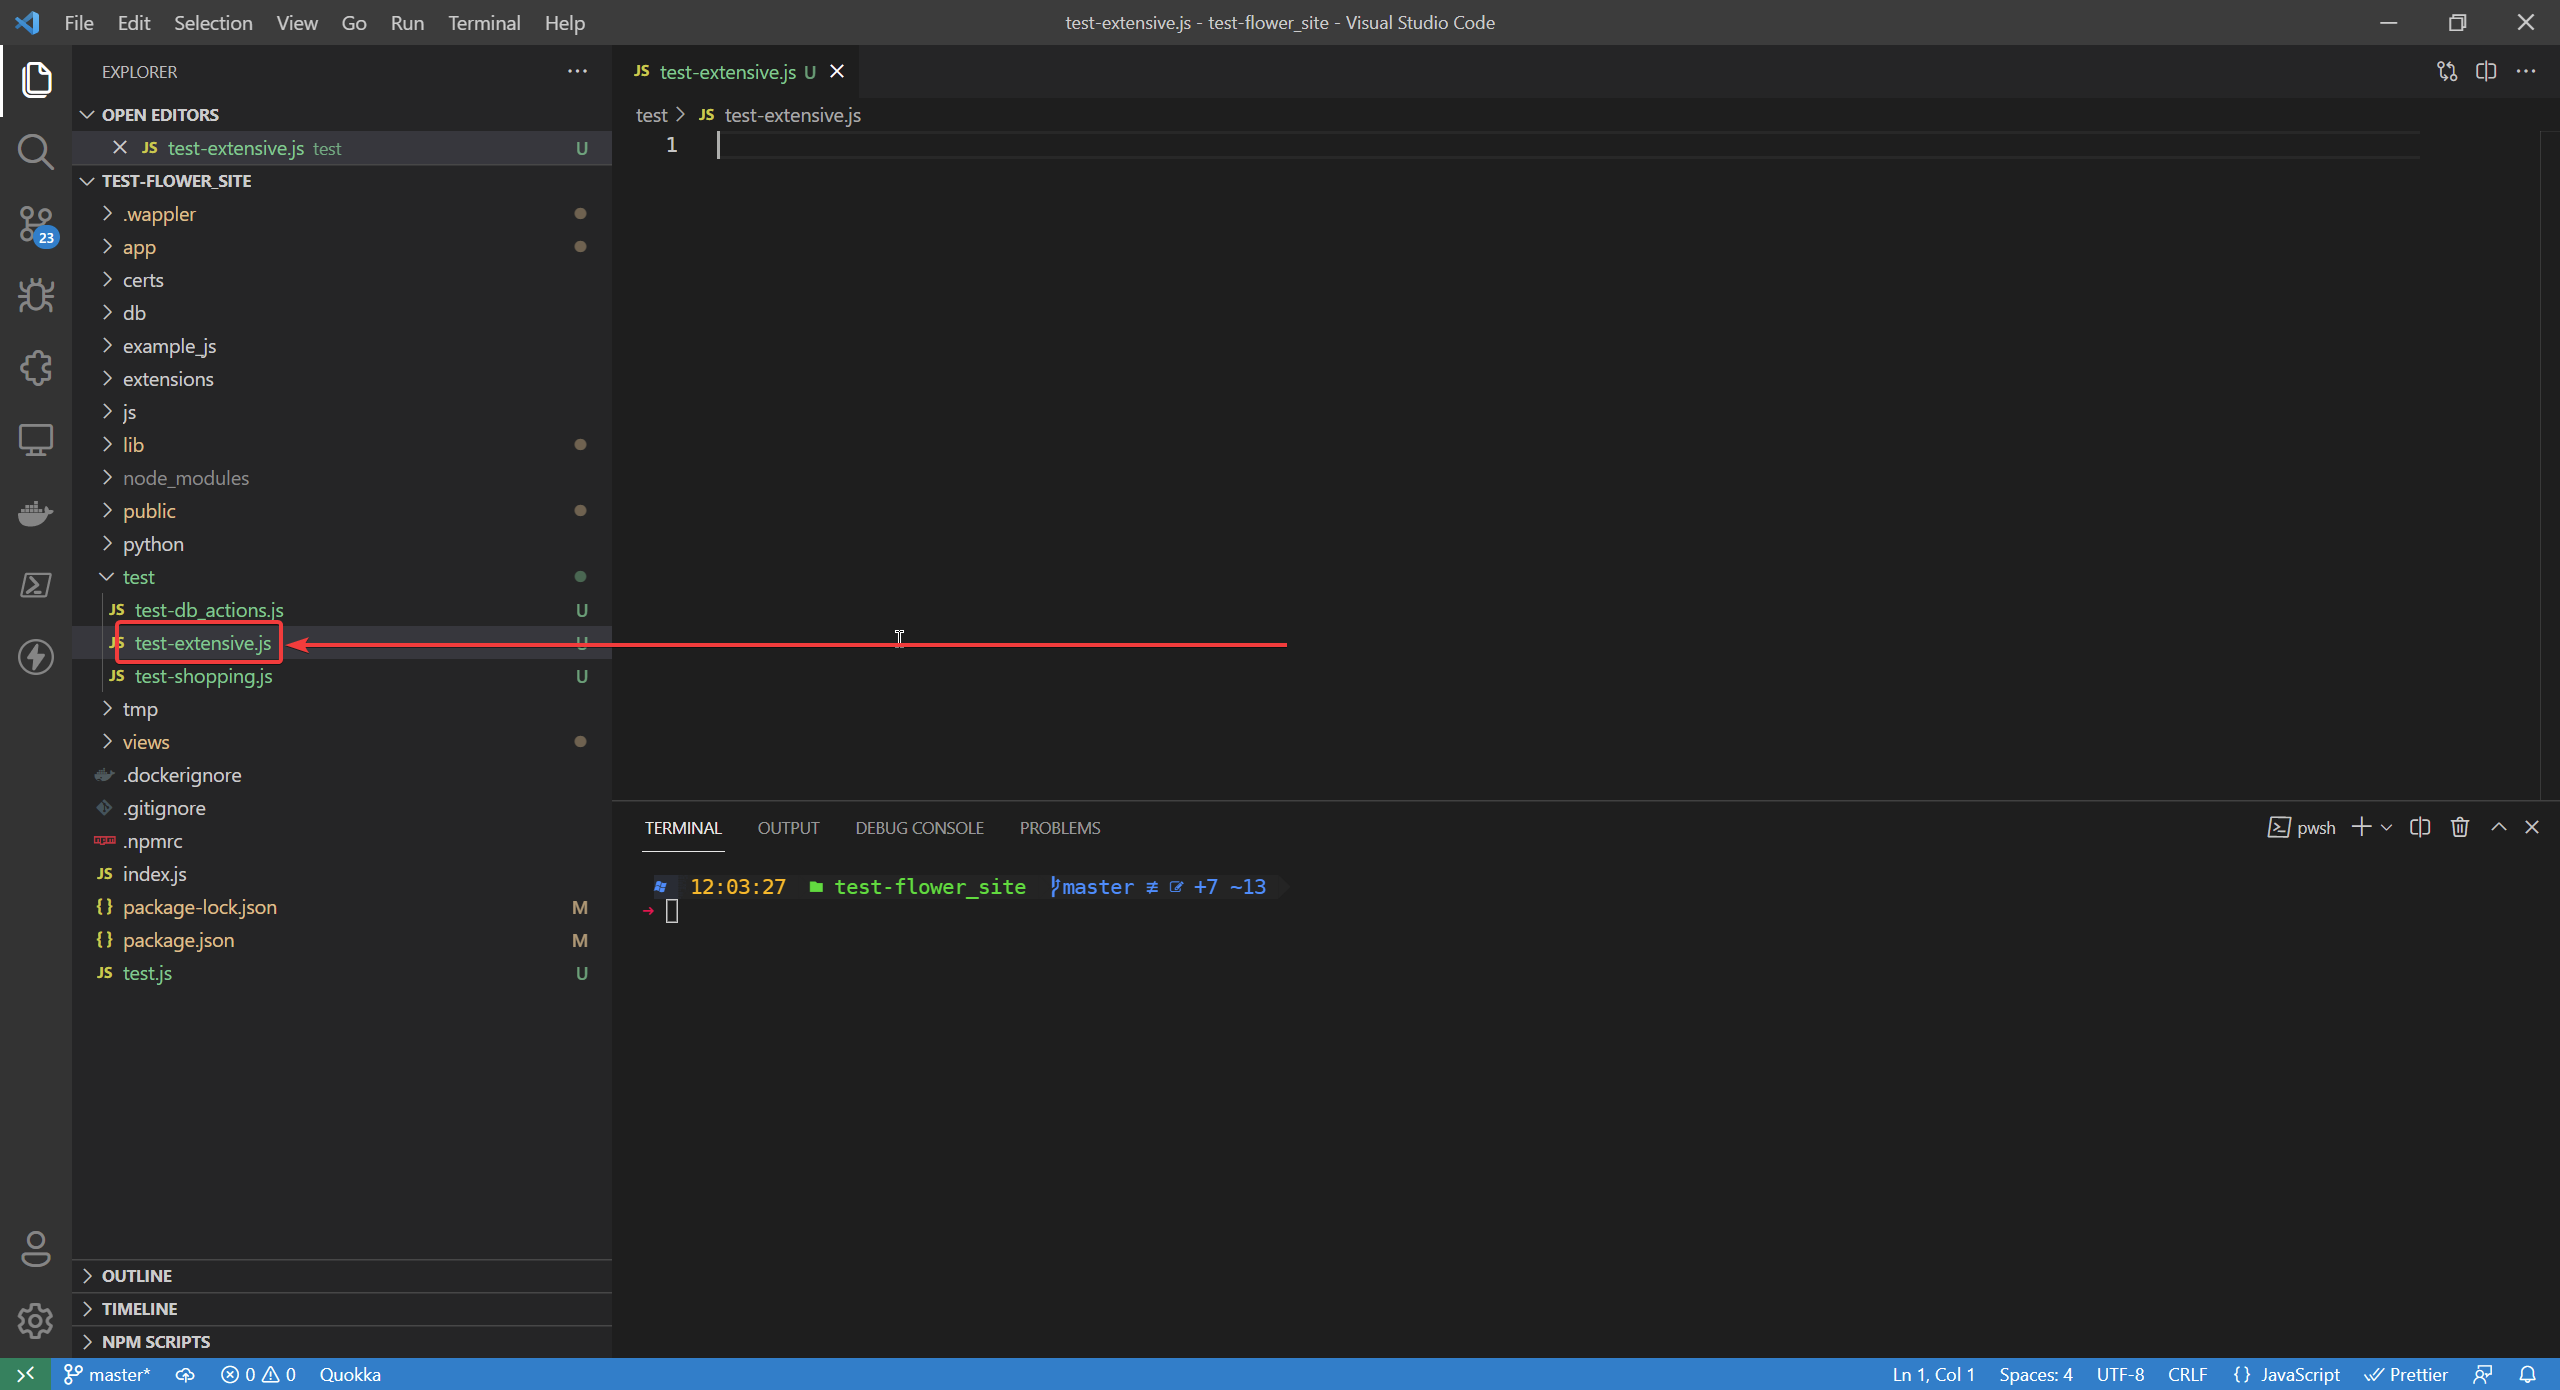
and make a new file
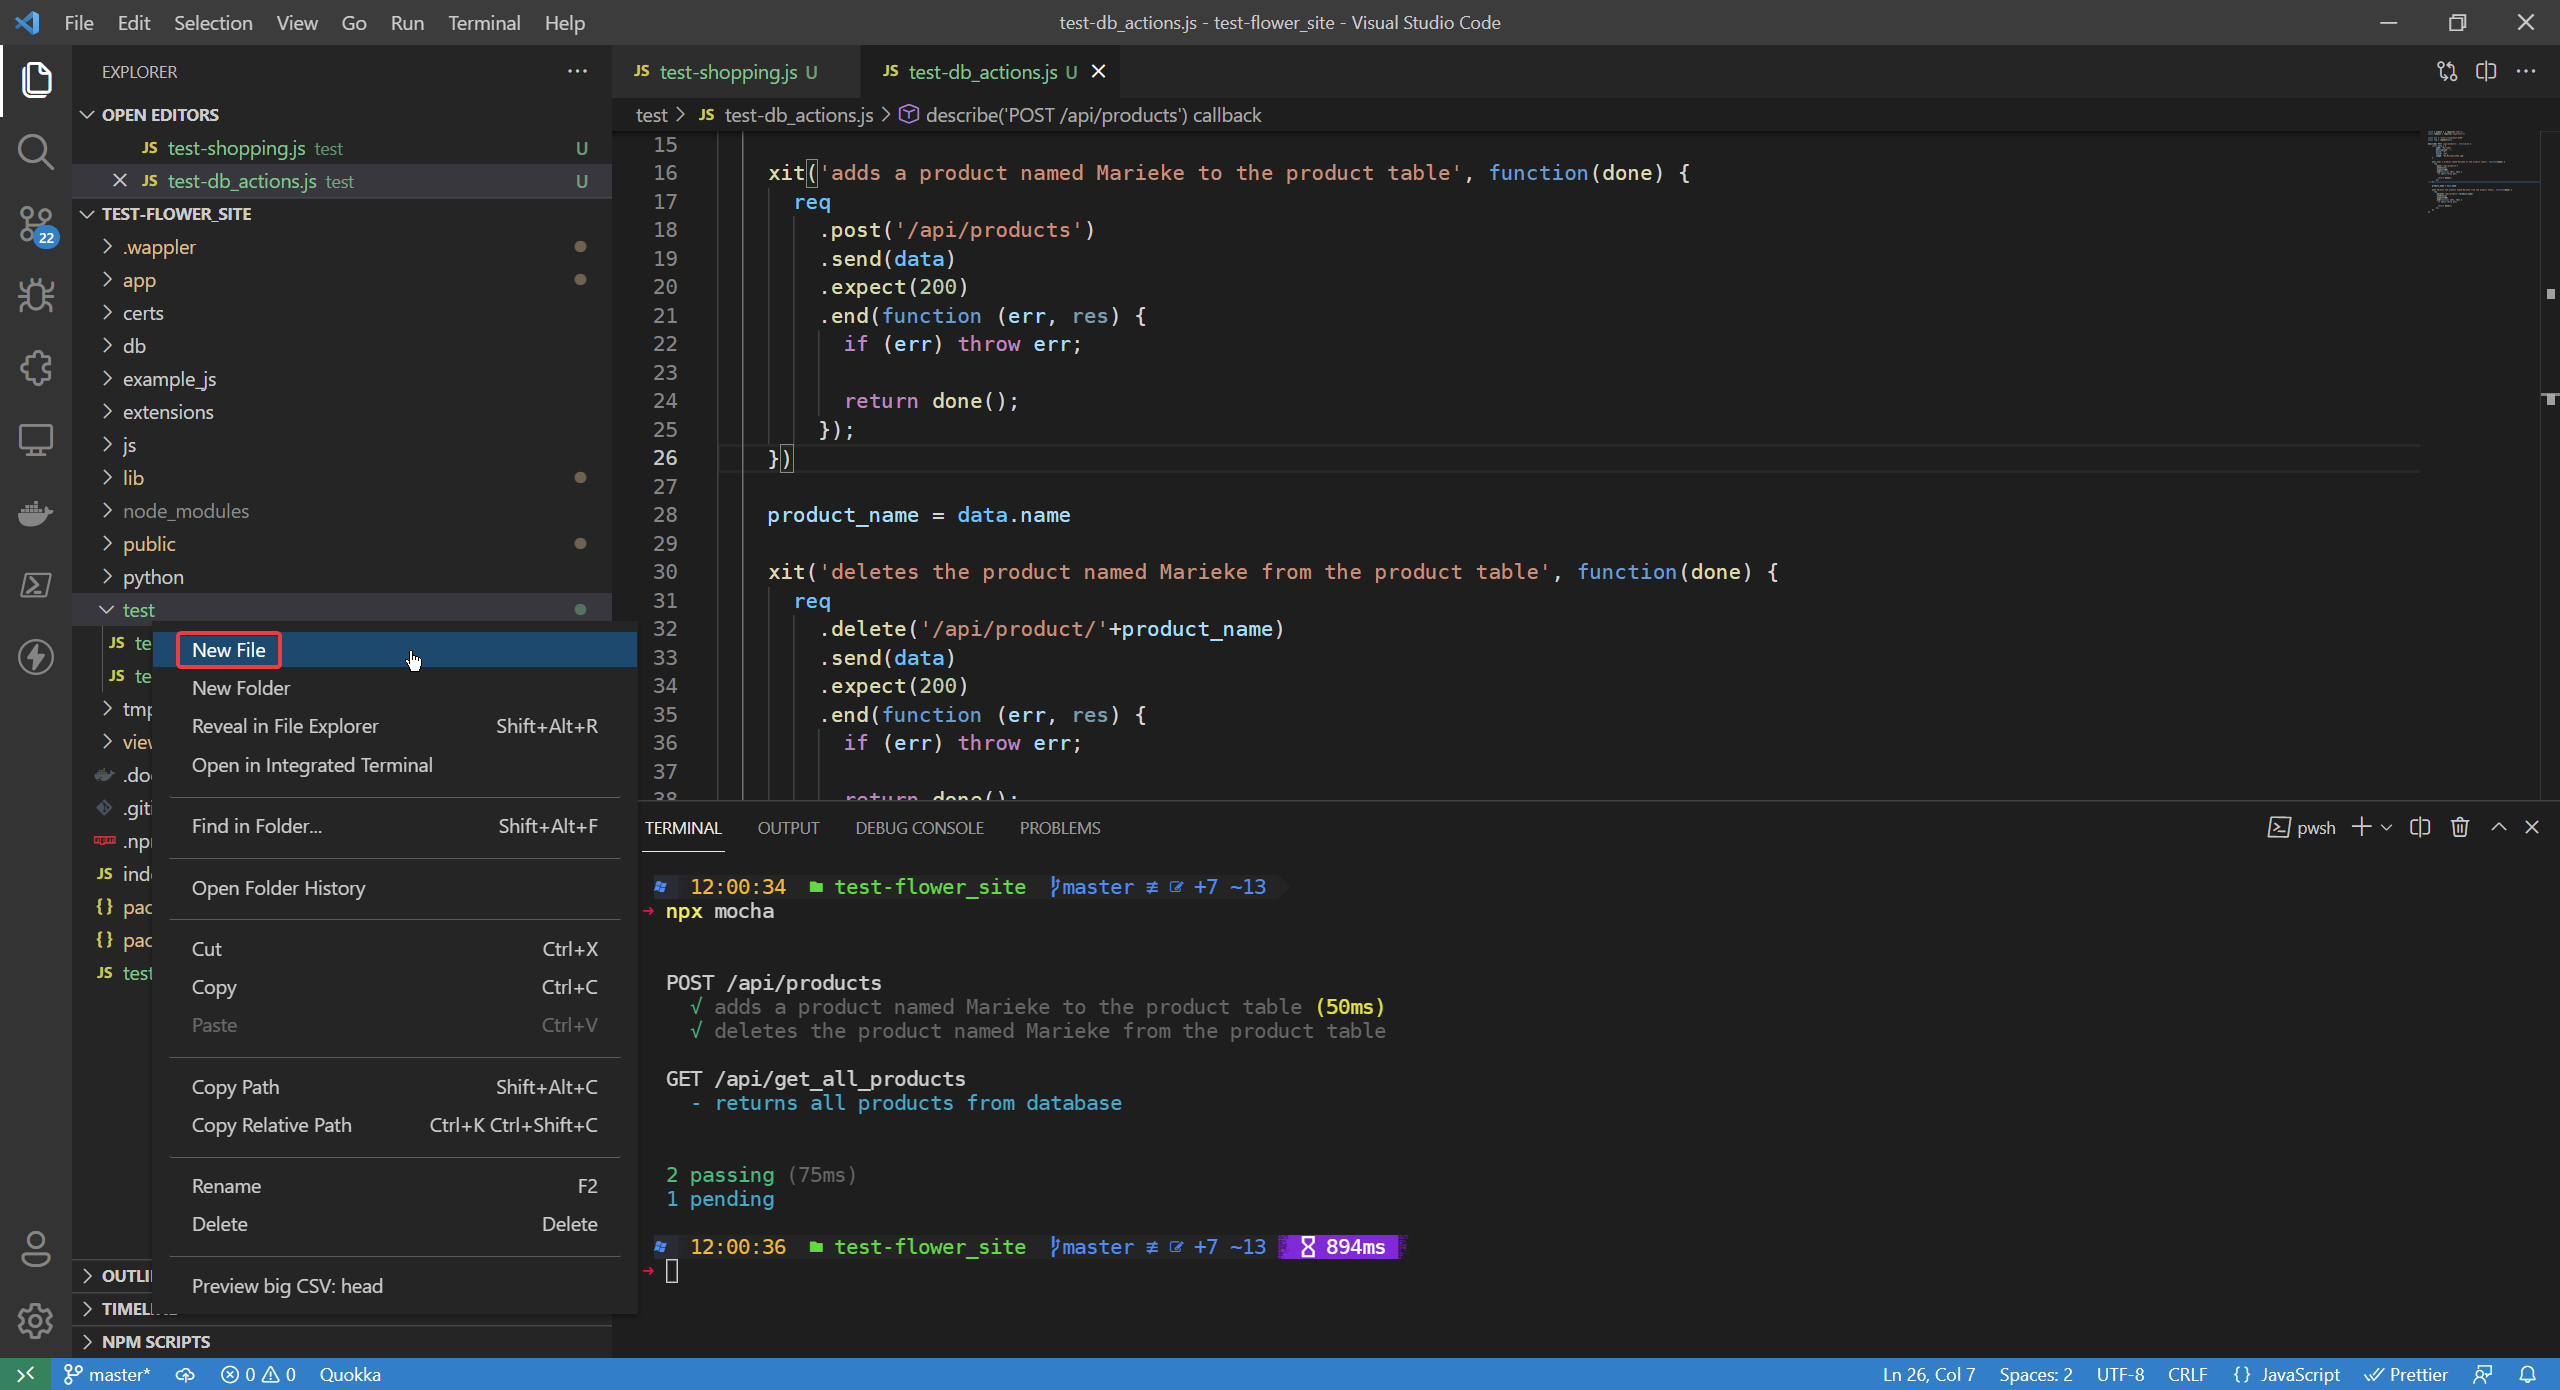
named test-extensive.js
Alright, now what I want to check in order is:
- Are the total number of products in my database equal to 7?
- Can I add the
Mariekeproduct to my database - Did the number of products increase to 8 from the previous query?
- Can I delete the `Marieke product from my database
- Did the number of products decrease to the original 7 from the previous query?
For that I wrote the following code:
const { expect } = require('chai');
const request = require('supertest');

const url = 'http://localhost:8100'
const req = request(url)

describe('Extensive testing of RESTful endpoints', function() {
    const data = {
        name: "Marieke",
        description: "",
        price: "4",
        stock: "10",
        image: "Na_Marieke_5556.jpg"
    }

    it('returns all products from database', function(done) {
        req
          .get('/api/get_all_products')
          .expect('Content-Type', /json/)
          .expect(200)
          .end(function (err, res) {
            if (err) throw err;

            const query_result = res.body.query

            expect(query_result).to.have.lengthOf(7);

            query_result.forEach(product => {
              expect(product.price).to.be.greaterThanOrEqual(0)
            });
            return done();
          });
      })

    it('adds a product named Marieke to the product table', function(done) {
      req
        .post('/api/products')
        .send(data)
        .expect(200)
        .end(function (err, res) {
          if (err) throw err;

          return done();
        });
    })


    it('checks if the number of products in the database increased by 1 (8 in total)', function(done) {
        req
          .get('/api/get_all_products')
          .expect('Content-Type', /json/)
          .expect(200)
          .end(function (err, res) {
            if (err) throw err;

            const query_result = res.body.query

            expect(query_result).to.have.lengthOf(8);

            return done();
          });
    })


    product_name = data.name

    it('deletes the product named Marieke from the product table', function(done) {
      req
        .delete('/api/product/'+product_name)
        .send(data)
        .expect(200)
        .end(function (err, res) {
          if (err) throw err;

          return done();
        });
    })

    it('checks if the number of products in the database decreased by 1 (7 in total)', function(done) {
        req
          .get('/api/get_all_products')
          .expect('Content-Type', /json/)
          .expect(200)
          .end(function (err, res) {
            if (err) throw err;

            const query_result = res.body.query

            expect(query_result).to.have.lengthOf(7);

            return done();
          });
    })
})
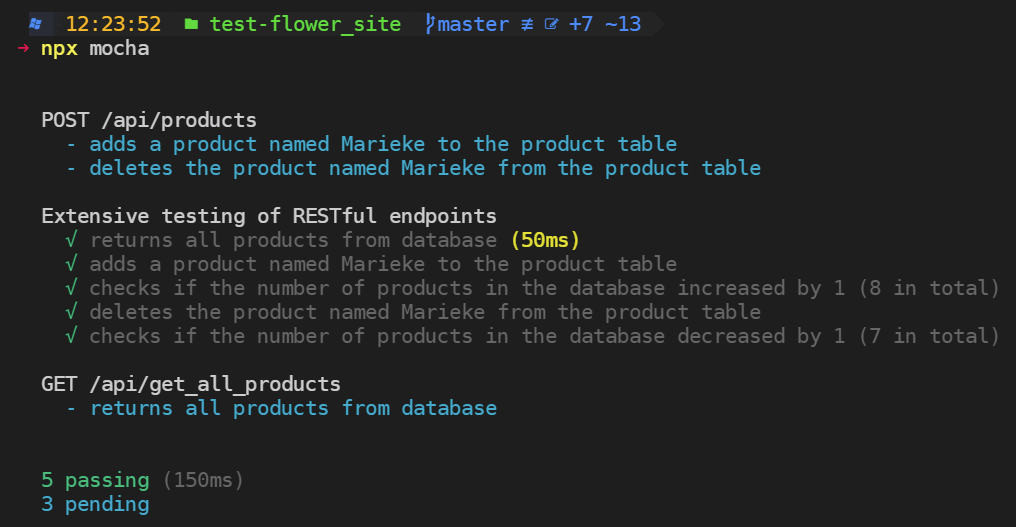
Running npx mocha now results in the following:
Congrats now you know enough to start writing your own complex tests.
Last updated: