I have been fiddling around with the Wappler implementation of their GeoLocation component and here are some additional things to possibly consider.
To use the Wappler version of the component you will need to make sure you have the page open you would like to use it with, have App Connect as well as Bootstrap 4 local or CDN added to the page and then click App in the App Structure and Add an App ID, now…
- Right Click App in the App Structure
- Select the Data Category and then Geo Location
Now that you have the component in place lets set some initial properties.
- Tracking you will use for live data updates as a person moves around with their mobile device
- Enable High Accuracy
This accuracy property is what interests me quite substantially, with it on/off my results are as follows
| Latitude | Longitude | Accuracy | High Accuracy ON/OFF |
|---|---|---|---|
| -29.7401522 | 30.818139700000003 | 20 | OFF |
| -29.740152100000003 | 30.818143199999998 | 20 | ON |
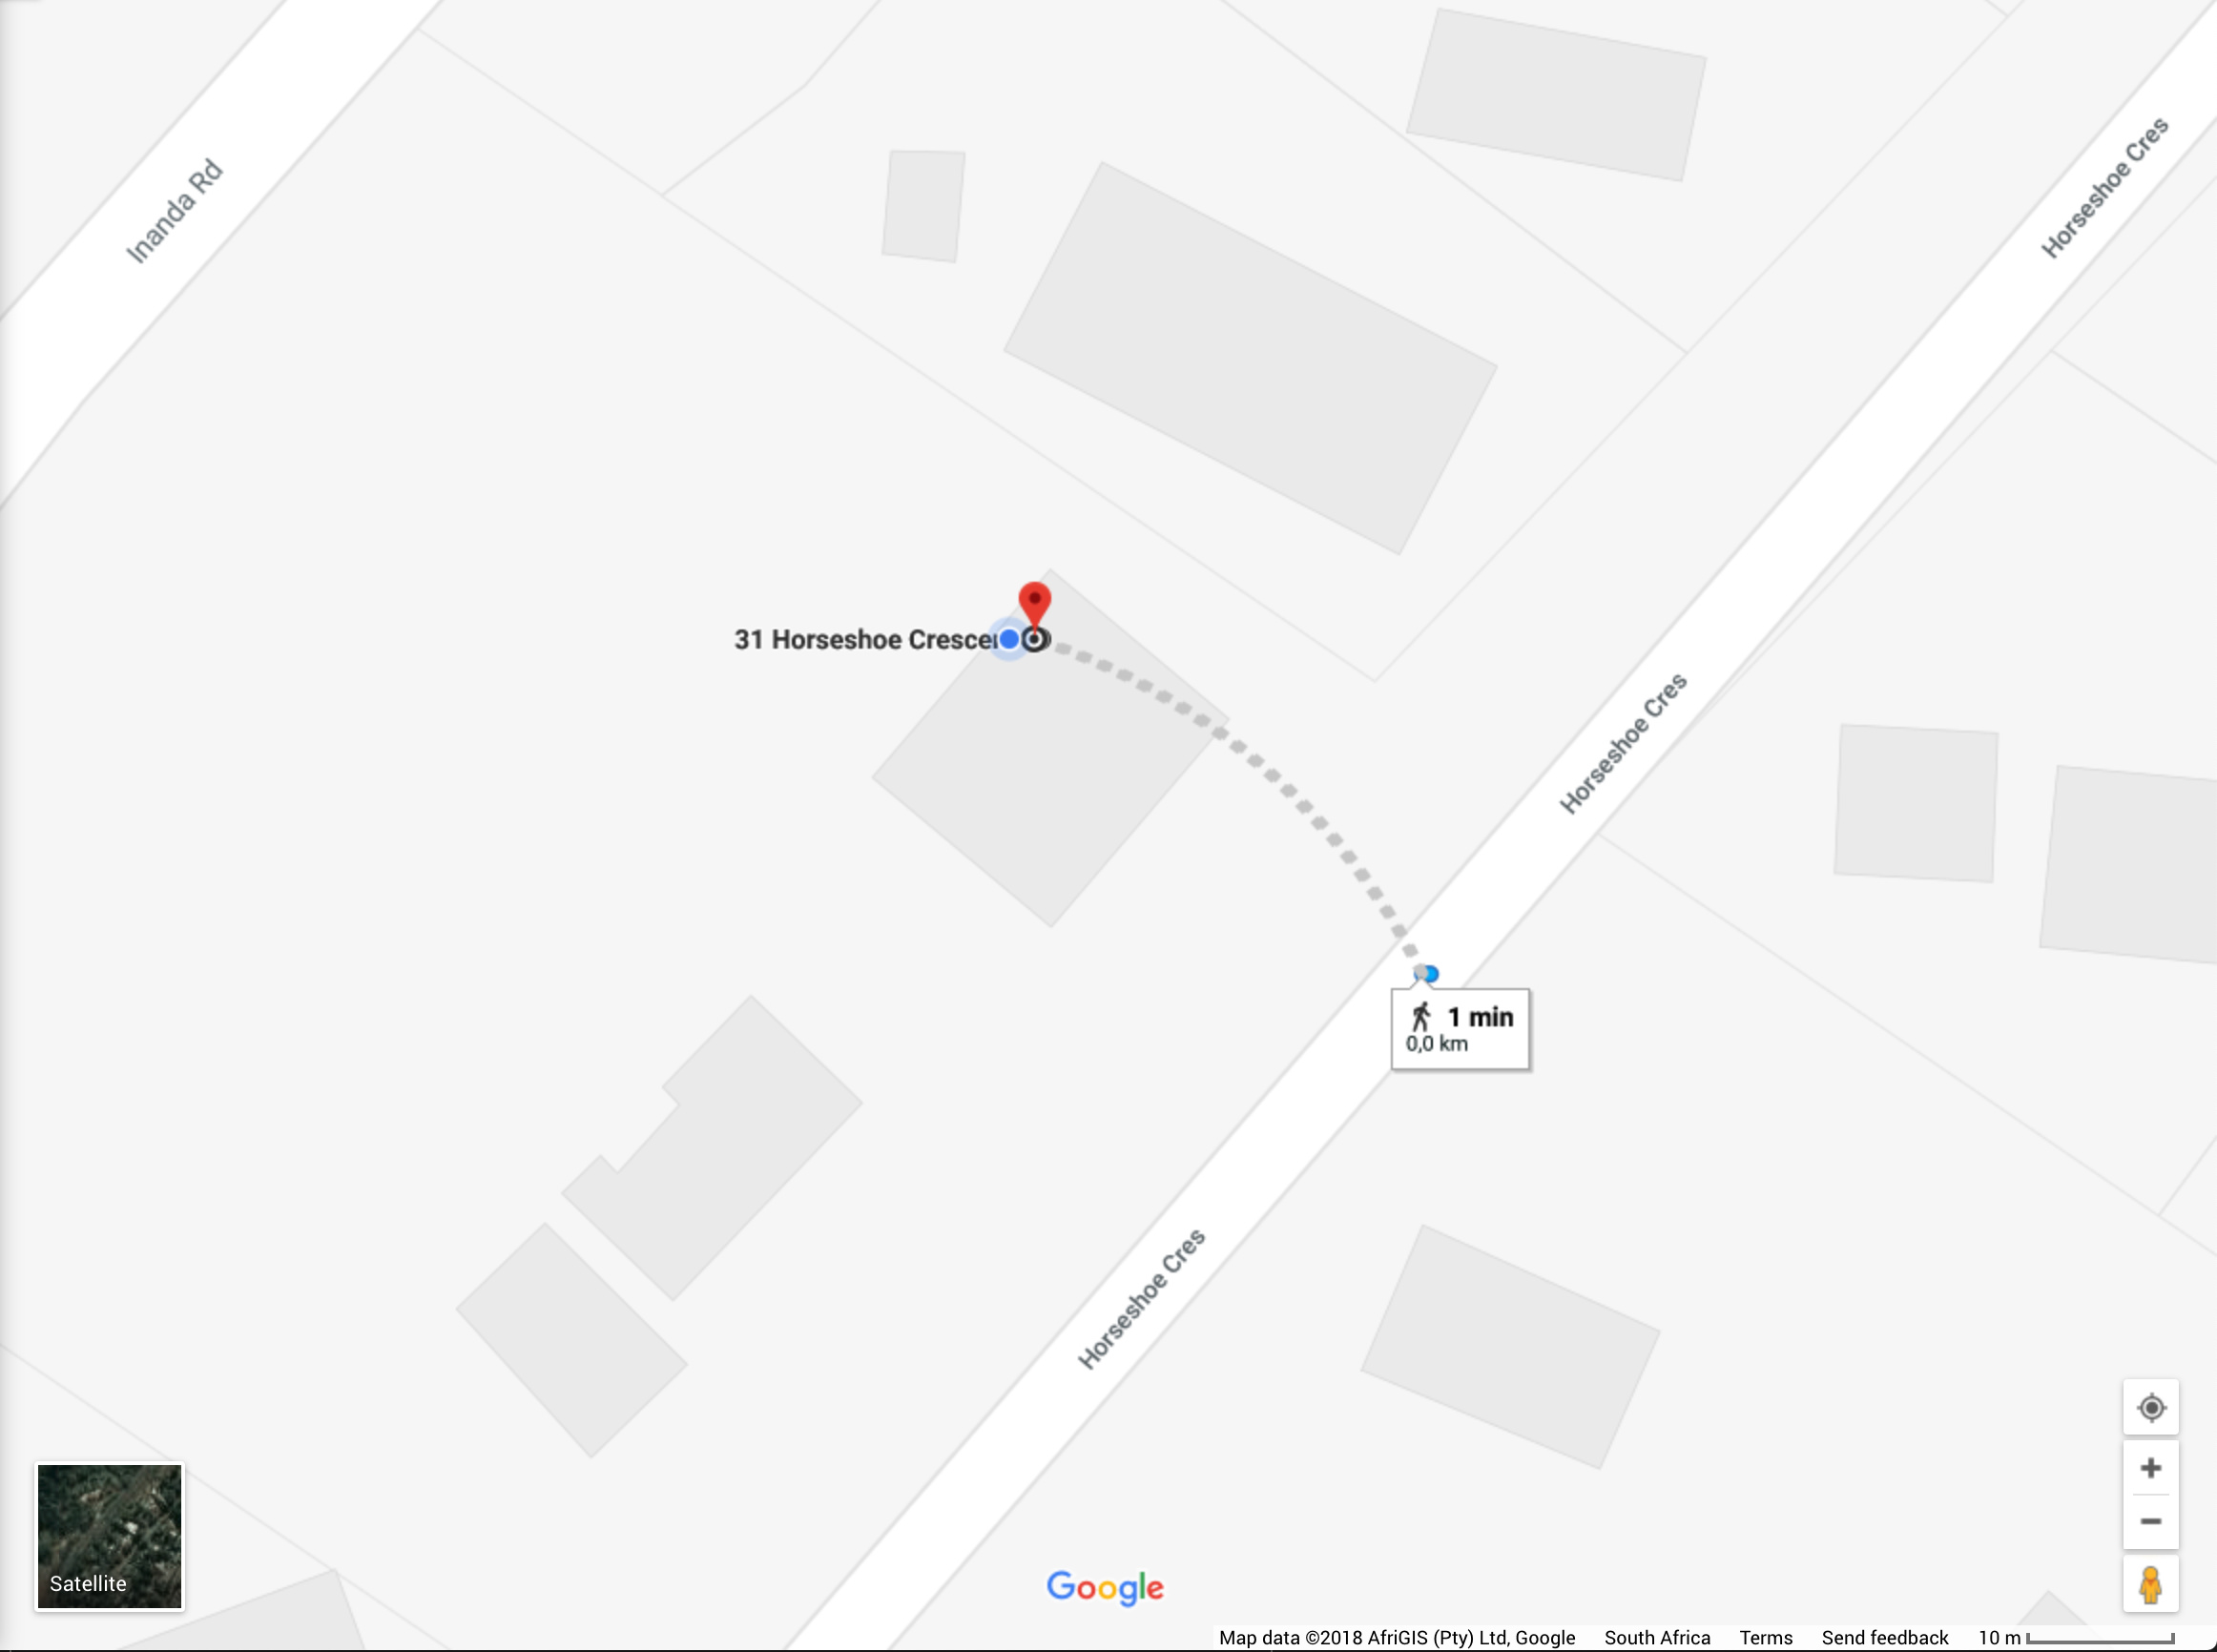
And here is a google map showing the difference, so in my opinion I do not really see a major difference whether it is on or off to be honest, unless the Wappler Team give me one, I am not sure about speed advantages of having it off or on to be honest.
Now a few small things to note here are
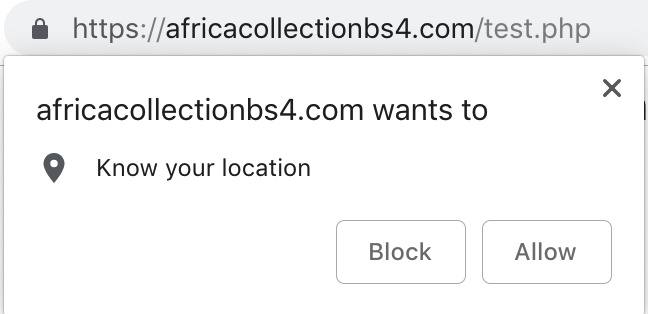
- The built in component requires https protocol currently
- Please check if this is added to the head section of you code, it probably will be but just incase, double check anyway
<script type="text/javascript" src="dmxAppConnect/dmxGeolocation/dmxGeolocation.js"></script> - The user will be presented with a Block or Allow dialog when accessing your page with this component.
The wonderful part about using the Wappler component for this first part is that it is far more accurate than just using IP GeoLocation services. However the Wappler component offers a slightly limited set of bindings directly in the component listed below.
| Binding | My Output |
|---|---|
| support | true |
| status | OK |
| timestamp | 1541789465224 |
| coords > latitude | -29.740152100000003 |
| coords > longitude | 30.818143199999998 |
| coords > altitude | |
| coords > accuracy | 20 |
| coords > altitudeAccuracy | |
| coords > heading | |
| coords > speed |
Extending functionality with an API
I personally like using https://www.geoplugin.com from the user @geoplugin as it is firstly easy to use, it’s free up to a certain usage limitation which is quite high and it is easily documented. Note: I did register my domain name for free with the service.
What this service does for me is allow me to alter every price on my website from GBP Pound Sterling currency to whatever currency the user is forced to use in their particular origin country and it adjusts all the base prices i set with the latest current currency exchange rate.
eg. £100 is equal to R1845.13 South African Rand
The second thing I use this for is to determine if the user is from the United Kingdom specifically and display slightly extended information and functionality to United Kingdom based visitors as the website was designed around them to begin with, and the custom maps etc. are all based around them, so for users outside the UK they will see a more generic Google Map while a UK user will see a custom drawn map.
The UK Price will have International flight included within the price while outside user will see a reduced price excluding international flights.
Lastly the wording in some specific areas are slightly different for each user location.
Now that Wappler gives us the simplest API component around it is really easy to use for Wappler users.
- Right Click App in the App Structure
- Select the Data Category and then API Data Source
Please Note, below are instructions if you are using the free version without the SSL purchase, if you do purchase the SSL then all the below URL’s change to https://ssl.geo… from http://www.geo…
Secondly the email would have provided you a key that needs to be inserted as a parameter to the query before you click Define API Schema, the parameter to add is
Name: k
Value: ‘123abc456xyz789’ (please note the single quotes surrounding the fake key)
Now that you have the component in place lets set some initial properties.
- URL is probably the most important step in this and for the base geoPlugin I used http://www.geoplugin.net/json.gp
- Click Define API Schema
- In the open dialog click Fetch Schema and click save.
That is really all there is to it, you can now click anywhere in your design view and bind whatever data you have available.
Some things to consider here are that the geoPlugin documentation says you need to provide the user remote IP address as a parameter to the URL, and you can ignore that as Wappler somehow just gets around that like magic. As @George says “duh” as though the magic is not magic to him 
The one parameter I use is base_currency because the service assumes US Dollars and I am generally using GBP as my base.
- Select your API Data Source from the App Structure
- Click the + Button beside Query Parameters and input the below
Name: base_currency
Value: ‘GBP’ (please note the single quotes surrounding GBP)
As far as I can tell the only parameters the base json API takes is a remote IP which we can ignore and a base_currency value.
Here is the full output from the base json geoPlug API
| Binding | My Output |
|---|---|
| geoplugin_request | 169.0.96.001 |
| geoplugin_status | 200 |
| geoplugin_delay | 1ms |
| geoplugin_credit | Come of the returned data includes… |
| geoplugin_city | Durban |
| geoplugin_region | KwaZulu-Natal |
| geoplugin_regionCode | NL |
| geoplugin_regionName | KwaZulu-Natal |
| geoplugin_areaCode | |
| geoplugin_dmaCode | |
| geoplugin_countryCode | ZA |
| geoplugin_countryName | South Africa |
| geoplugin_inEU | 0 |
| geoplugin_euVATrate | false |
| geoplugin_continentCode | AF |
| geoplugin_continentName | Africa |
| geoplugin_latitude | -29.85 |
| geoplugin_longitude | 31.0167 |
| geoplugin_locationAccuracyRadius | 100 |
| geoplugin_timezone | Africa/Johannesburg |
| geoplugin_currencyCode | ZAR |
| geoplugin_currencySymbol | R |
| geoplugin_currencySymbol_UTF8 | R |
| geoplugin_currencyConverter | 18.4513 |
Now the problem as explained earlier is the accuracy and here is a picture to display the difference of Wappler to geoPlugin
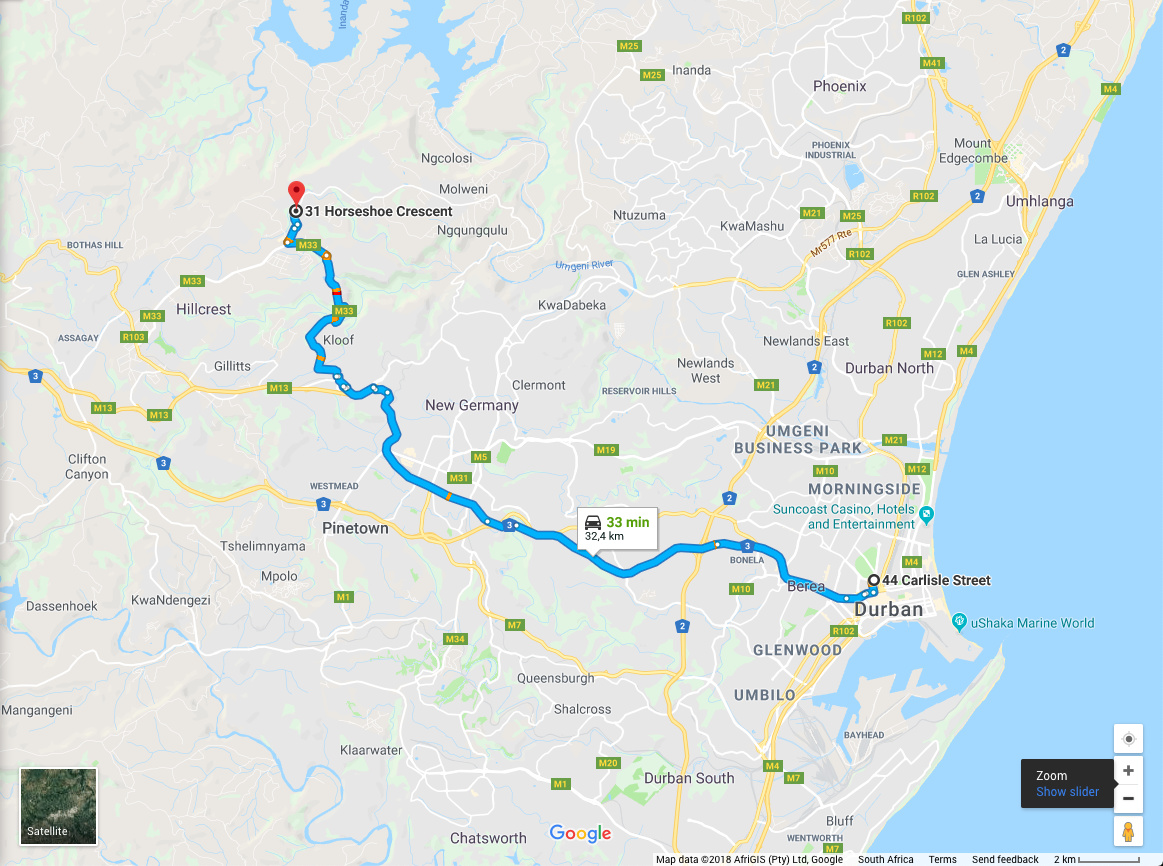
As you can see that is quite a difference, my real location is where the marker is placed. The only way I can see around this is if @geoplugin adds 2 parameters to take lat & long so I can input the coords from Wappler rather.
Extending functionality with a second API
Again from geoPlugin there is a service i needed because the UK relies heavily upon Post Codes / Zip Codes
- Right Click App in the App Structure
- Select the Data Category and then API Data Source
Now that you have the component in place lets set some initial properties.
- URL is probably the most important step in this and for the base geoPlugin I used http://www.geoplugin.net/extras/postalcode.gp
- Click Define API Schema
- In the open dialog click Fetch Schema and click save.
There is one parameter you have to add to get the correct format output and that is
Name: format
Value: ‘json’ (please note the single quotes surrounding json)
The next 2 parameters I added to take advantage of the Wappler accuracy
Name: lat
Value: geo1.coords.latitude
Name: long
Value: geo1.coords.longitude
Now here is where you might find your first small issue as I did, the Wappler component requires https for a secure SSL connection and the geoPlugin allows you to access their secure service but you have to purchase an SSL certificate through them at €12 per year.
The second thing is that if you need to wait for the Wappler GeoLocation component to get the coords before querying the API then you need to select the API Data Source you just created from the App Structure and select “No Auto Load”
Now step 2, select the Wappler Geo Location component from the App Structure and click the + button beside Dynamic Events. Select the category of GeoLocation, and click Success, now click the Dynamic Data Selector beside the Action and select from the Available Actions the API Data Source which has “No Auto Load” set, arrow it out, and double click “Load” then hit Select to close the dialog.
You can now bind any of the data from that API to your page, for me I only wanted the geoPlugin_postCode which gave an output of 3610, where my initial test using the coords from the API gave me the incorrect Post Code, using the Wappler Accuracy I got the perfectly correct one.
Extending Functionality with a third API
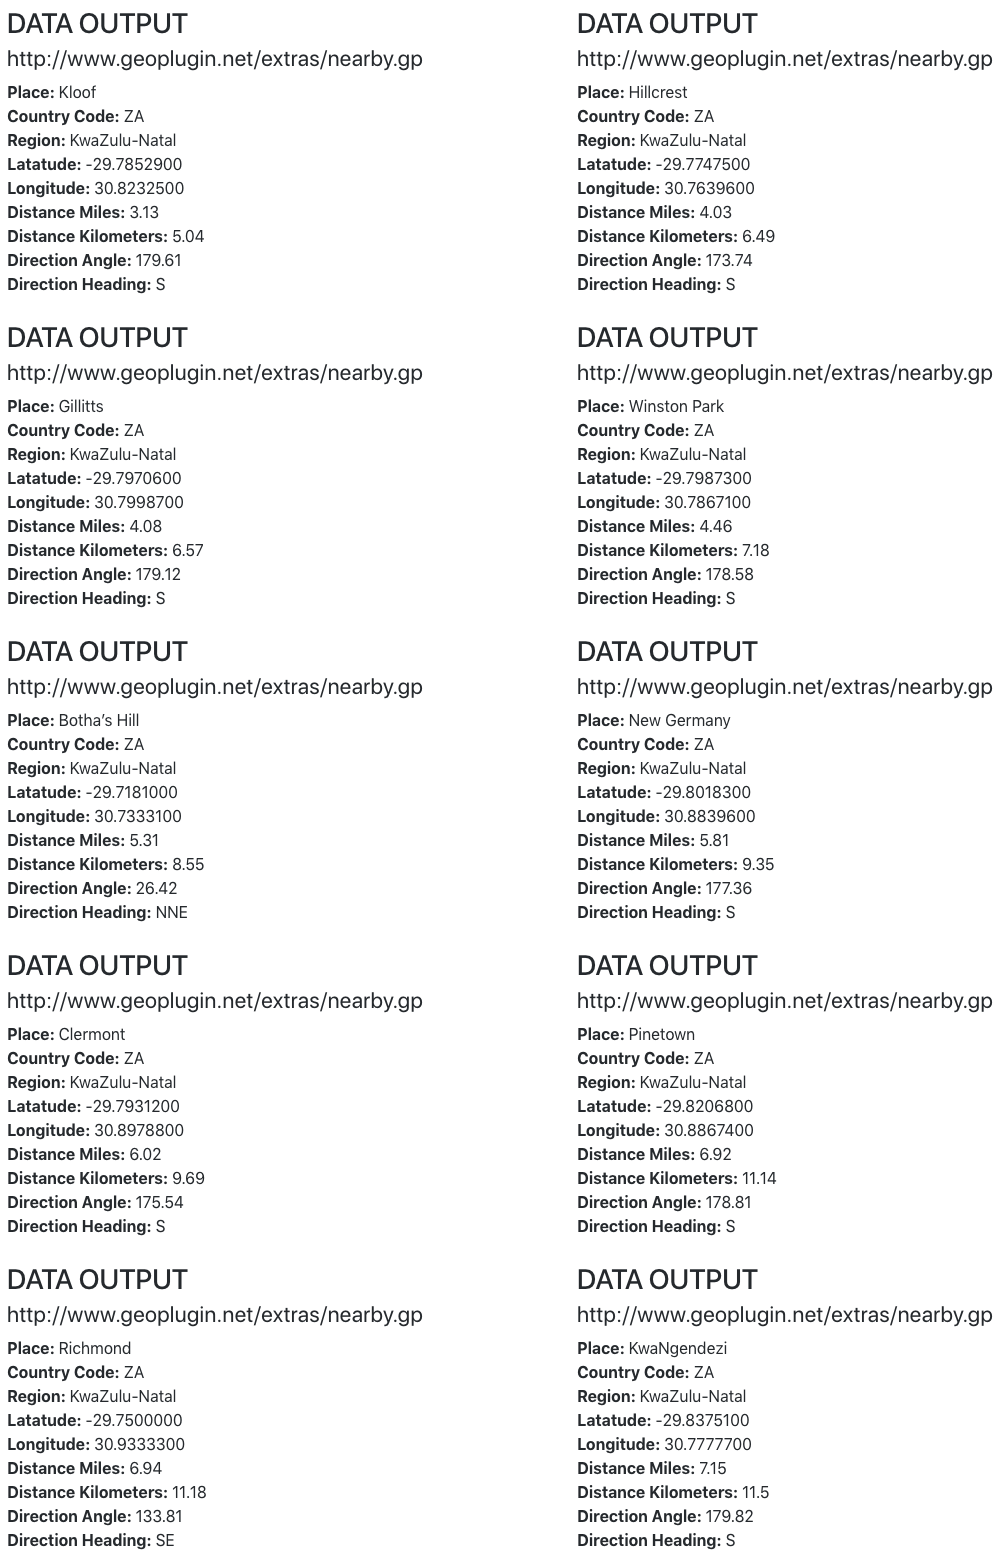
Another from geoPlugin that I wanted is the “nearby” functionality
- Right Click App in the App Structure
- Select the Data Category and then API Data Source
Now that you have the component in place lets set some initial properties.
- URL is probably the most important step in this and for the base geoPlugin I used http://www.geoplugin.net/extras/nearby.gp
- Click Define API Schema
- In the open dialog click Fetch Schema and click save.
There is one parameter you have to add to get the correct format output and that is
Name: format
Value: ‘json’ (please note the single quotes surrounding json)
The next 2 parameters I added to take advantage of the Wappler accuracy
Name: lat
Value: geo1.coords.latitude
Name: long
Value: geo1.coords.longitude
The last 2 parameters I added for fun
Name: limit
Value: 10
Name: radius
Value: 300
Again select “No Auto Load” on this API call as we are using the more accurate coords from Wappler.
Select the Wappler Geo Location component from the App Structure and click the Dynamic Data Selector beside the Action because we already added the Success event earlier and select from the Available Actions the new API Data Source which has “No Auto Load” set, arrow it out, and double click “Load” then hit Select to close the dialog.
Now on success it will load both secondary API’s with the correct accurate lat and long values.
This was my output (Please make sure to bind the API data inside a repeat before binding the values)
Last updated: